A common issue for newcomers in the Character Animator (Ch) forums is getting eyes to work correctly. They are a bit finicky, but I find once most people get the first puppet right, the rest are not a problem.
This blog is not an introduction on how to create a puppet – there are numerous other resources around for that (videos, blogs, etc). This blog lists the steps I go through to debug a puppet that is not working.
(Did I miss something? Please leave a comment below for others to benefit from!)
Tip: Check the layer hierarchy carefully. When someone says they have a Photoshop file (PSD), double check the layer hierarchy.
Ch imports the artwork hierarchy into the puppet to form the puppet hierarchy. So, the first step of debugging a puppet is to check the artwork hierarchy is correct.
Sometimes I find the Photoshop users are not as used to the type of hierarchy that Ch requires. (It seems more natural to Illustrator users.) This is not a criticism of the user – I think it’s more the way the tools operate. Illustrator encourages you to think about structure more.
The following shows the hierarchy for one of my puppets as reference. You can vary this pattern in a few ways I mention later. On the left is the artwork hierarchy, on the right is the Ch puppet hierarchy.


The most import parts of the above puppet structure are as follows.
- Left/Right Eyebrow
- Left/Right Eye
- Left/Right Blink
- Left/Right Pupil Range
- Left/Right Eyelid Top
- Left/Right Eyelid Bottom
- Left/Right Pupil
- Left/Right Eyeball
The names of these layers are important as tags are automatically associated with the layers if these names are used. The tags are what Ch uses to work out the structure of the puppet. This allows you to change the tags around after importing some artwork. I find it common to need to do some tweaking of the tags – the effort is identifying what needs to be adjusted (not the change itself).
The meaning of the tags are as follows:
- Left/Right Eyebrow – tells CH what are the eyebrows, so it can move them via the camera etc.
- Left/Right Eye – groups the following parts of the eye together
- Left/Right Blink (optional) – if present, eye blinks display this layer to blink the eye rather than stretching/distorting the eye lids to make them move. When a blink occurs, this layer is shown and all the siblings are hidden. I also check the “Eyelid Strength” property of the Face behavior and set it to zero if it looks like Ch is not using the blink layer. (The cycle layers behavior can be used to display a sequence of frames for smoother blink animations.)
- Left/Right Pupil Range and Left/Right Pupil Size – the difference between the sizes of these two layers controls how far the eye pupils can move. If they are the same, the eye will not move. In my puppet I created a separate hidden object for the Pupil Range; it is common for other puppets to limit pupil movements by the eyeball meaning the eyeball layer would be tagged with Pupil Range. (More on this later.)
- Left/Right Eyelid Top and Left/Right Eyelid Top Size (optional) – the top eyelid and its size. I normally set both tags on the same eyelid layer. (I don’t know what the eyelid size controls.) Not all puppets need eyelids.
- Left/Right Eyelid Bottom and Left/Right Eyelid Bottom Size (optional) – similar to the top eyelid.
- Left/Right Pupil – the part of the eye that moves. Should almost always be independent.
When debugging a puppet, it is worth expanding the full hierarchy of the puppet and clicking on every layer, one by one, and checking the tags for that layer. It may seem painful, but most puppets can be done in a minute or two.
Tip: Check all the eye sub-layers are directly under the eye (but not the eyebrow).
Strange things can happen sometimes if the layers are not directly under the eye. E.g. blinking might not work as expected, it may have trouble moving eyelids, etc. My advice is always put the sublayers directly under the eye layer, not nested somewhere deeper in the hierarchy.
Tip: Click on each layer of the puppet one by one and check the tags in the property window.
If you click on a layer in the puppet hierarchy, you can see the properties for that layer in the properties panel. Click on the “A” button next to the smiley face to show the textual representation of the tag names. (I find this easier to debug than the graphical representation).
The “Face” tags include the above, plus some additional tags for the head, nose, and mouth.

Tip: Check for layer spelling errors, causing auto-tagging not to occur when you expected it.
Spelling errors may be an “I” instead of an “L”, so may be hard to spot. If you have a layer name that did not get auto-tagged when you expected it, double check for a spelling error. You can add the tags by hand, but I like to get the puppet right. Its harder to fix later.
Tip: Check for multiple layers with the same name.
Another common error is to have multiple layers with the same name (e.g. “Left Pupil” may contain a subgroup called “Left Pupil”). This can cause problems, so I recommend renaming the child groups so only the layer directly under “Left Eye” has the above names.
Tip: Remove unwanted additional tags.
Sometimes unexpected tags are assigned to a layer. This can occur as Ch can assign more than one tag to a layer name during auto-tagging. For example, “Left Eyeball” may have “Left Pupil Size” and “Left Pupil Range” also assigned. That would cause eyes to not move. It is better for the pupil to have “Left Pupil” and “Left Pupil Size” on it, and the eyeball to have “Left Pupil Size”.
Tip: If the eyes are not moving, make sure Left Pupil Range and Left Pupil Size are not on the same layer.
As just mentioned, the layer tagged Left Pupil Size must be smaller than the layer tagged Left Pupil Range or else the eye will not move. This is a very common error due to unexpected tags – the wrong thing has the Left Pupil Range or Left Pupil Size tag, confusing Ch as to how much the eye pupil can move.
Incorrect tagging can also occur if you rename things in the artwork file – the old tags may still be assigned.
If your puppet has a “dot” for a pupil that wants to move around within the bounds of the eyeball layer, then assign the Pupil Range to the Eyeball. (In my puppet I don’t want this as I have an explicit (hidden) layer to represent the Pupil Range.)

NOTE: I probably have badly named my puppet’s “eyeball” layer as in my puppet it really represents the eye clipping mask (the opening in the face skin through which you can see the eyeball and pupil). The “Left Eyeball” layer will also be tagged with the “Left Pupil Range” tag, which I then need to remove since I use the separate Pupil Range layer and clipping (explained next) to clip the pupil.
To expand, in my puppet, you may notice the pupil was larger than what is visible, plus the pupil needs to be able to move so even more of the pupil will be clipped. For this reason, I created a layer “Left Pupil Range” that I made hidden. It exists to control how far the pupil can move. In the artwork file, it is easier to see that the pupil is larger than the whites of the eyes (because Ch does the clipping, not Illustrator). On the right below I made the Pupil Range visible, showing how far the pupil can move.

Tip: If in Ch the pupil extends larger than the whites of the eye in the puppet (not the artwork), check you have clipping set up correctly.
Here is an example where the clipping is not set up correctly on the left (which is the puppet’s “Right Eye”).

Here is what it looks like in the puppet hierarchy.

The order of the layers is very important here. The Pupil should be directly above the layer representing the mask (in my case, the “Eyeball”). Select the Pupil layer and then in the menu select “Puppet/Create Clipping Mask”. That should make a little down arrow appear next to the Pupil layer (like shown for the Left Pupil above). Don’t have any other layers below the Pupil layer or they may mess up the clipping of the pupil.
If the eyelids were down here, they would appear behind the pupil of the eye, which would look strange. So the eyelids must appear before the pupil.
Tip: If things are playing up in strange ways, double check the order of Eye sub-layers.
- If using clipping, nothing should be below the Pupil other than the mask (what I called eyeball). For example, don’t put the Pupil Range object after the Pupil.
- Eyelids should be above the pupil.
- I tend to put the blink layer first since it replaces everything else when used.
The order of layers is important as they control what is displayed in front and behind. For example, in this puppet I put the eyebrows in front of (above) the hair to make them more visible. Other puppets I put the eyebrows lower down (behind the hair fringe). I tend to always put eyebrows above the eyes.
Tip: Distortions are frequently caused by incorrect independence settings.
If I see a puppet that is getting distorted in strange ways, I immediately review the independence settings. If layers are independent, any stretching or distortion of the parent does not affect the child, and vice versa. For example, if the eyebrows of a puppet are not independent, then when Ch moves the eyebrows it will distort the face around the eyebrows. The same is true of the eyes, eyelids, and pupil. There are times where this is desirable, but my default starting position is to make many of these layers independent so they can moved without distorting the head.
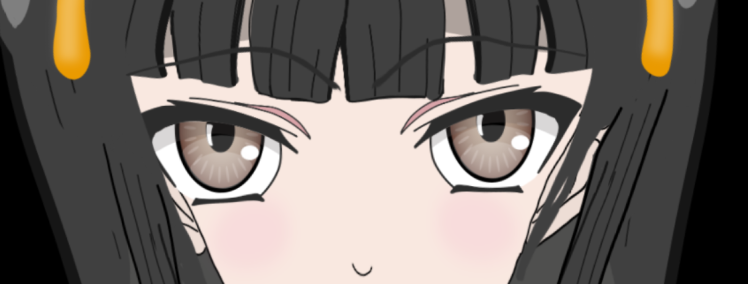
For example, look at the following eye brows. Let’s start with the normal position.

Here are the same eyes with independent and exaggerated raised eyebrows. The eyes and rest of the face are not affected.

Same raised eyebrows again, but with independence turned off for the eyebrows. See how the eyes (which I still have independent) are unaffected, but the rest of the face, hair, and eyebrow shape are strangely distorted?
If a layer/group inside the artwork file has a name that starts with a “+” symbol, it is automatically marked as independent when loaded into Ch. But remember that you can turn on/off independence settings inside Ch for the puppet. So even if a layer does or does not have a “+”, you still need to check the independence settings inside Ch (the little crown icon).
I generally recommend the following layers be created independent:
- +Left Eyebrow
- +Right Eyebrow
- +Left Eye
- +Right Eye
- +Left Pupil
- +Right Pupil
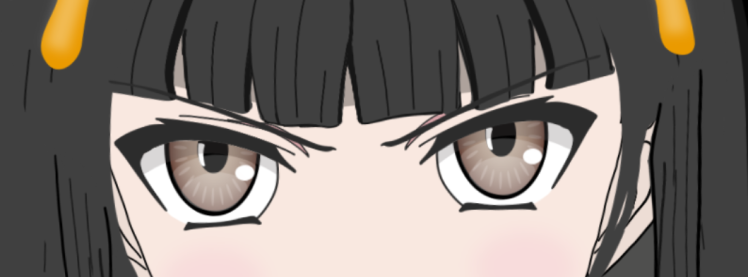
Tip: If you see distortions of the eye when closing or closed, check the Blink layer and Face behavior Eyelid Strength setting.
The following shows some strange distortions of the eye shape that can be caused by not using a Blink layer. The Blink layer is not mandatory. Some puppet eye designs are fine without a blink layer, some are not.

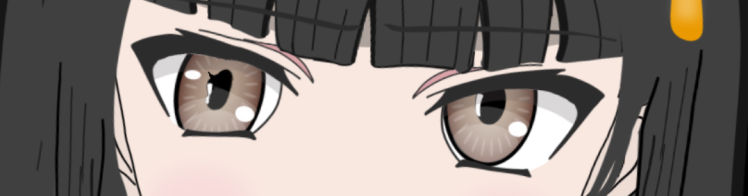
Tip: If an eye is not moving and it is also distorting strangely, check that the Pupil is independent.
The eye on the left below has independence turned off, so instead of moving, Ch is trying to distort the pupil to get it to move. Notice how the black of the pupil is no longer a clean oval.
Tip: Left and Right issues.
Sometimes you clone layers for eyes. The left and right eye are frequently reflections of each other, so this makes sense. But sometimes a “Left Pupil Range” or similar layer when copied is not renamed to be “Right xxx”. Depending on which layer was not renamed, a range or problems can occur.
Also be careful if you have hidden groups inside the eyes before cloning them. The way I make a copy and reflect and move the eyes sometimes is not applied to the hidden sublayers, resulting in some of the eye parts being left on the wrong side of the face. (See the note later on emotions and triggers.)
Tip: When using the Head Turner behavior, repeat the above for each head turn.
Each view of head turner contains a complete hierarchy for the puppets head, so you need to check tagging etc for each perspective the head is facing. Fun!
Tip: My character is blurry in Ch.
Personally, I generally use Illustrator on the theory that vector artwork scales better. For example, I can do fully body shots or zoom in on eyes without pixelization. However, some Illustrator features are not supported by Ch such as clipping masks.
There is also a new(ish) setting in Ch that lets you set the resolution when using Illustrator files. Higher values improves the final video quality (but probably slow down Ch, which is why I am giving “Draft” a go here.)

Tip: I want distortion, but its not happening as I expected.
You can click on the mesh icon in the rigger or scene view window to check for unexpected stray objects in the artwork. This can happen when something was included in the wrong layer. Unconnected objects in a layer tend to cause Ch to fall back to using a yellow rectangle mesh. (This is rarely a problem for eyes if everything is independent.)
The following is a good mesh. It follows the contour of the eye parts.
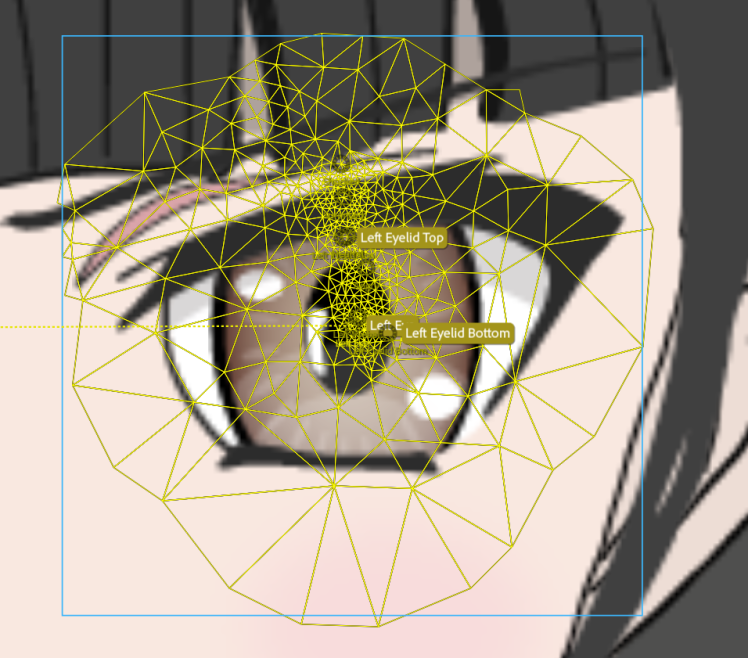
The following is a bad mesh – it no longer follows the contour of the parts of the eye. The whole square is filled up. This typically distorts in stranger looking ways. (This is true in general, not just for eyes.)

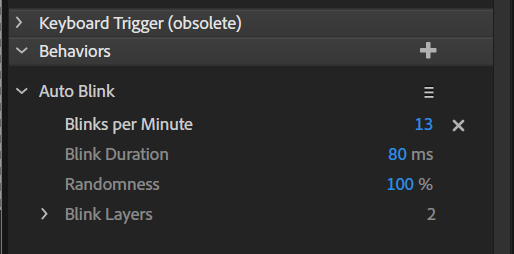
Tip: Does the puppet have an auto-blink behavior?
I generally think auto-blinking is a good idea. You need to add a behavior to the puppet to turn this on (it does not come with the puppet by default.) I often add the behavior to the “Head” layer.
Tip: Emotions with Eyes.
In my puppet, you may have noticed under the top eyelid, bottom eyelid, and eyeball layers I had sublayers named after different emotions. I use keyboard triggers to enable these different emotions where the one keyboard trigger affects multiple objects at the same time. I always put the triggers under the previously mentioned Eye sublayers. (I don’t replace the whole eye completely with different variants, although that might work as well.
Here is my ‘a’ (for “angry”) trigger definition.
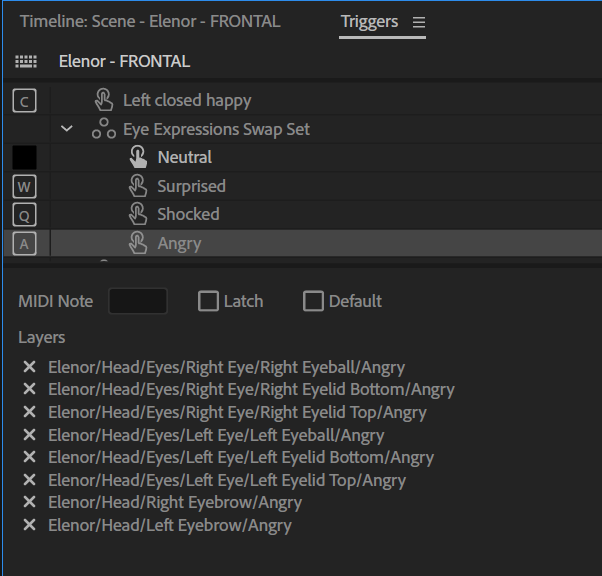
With one keystroke, the eyes and eyebrows for both eyes all adjust together, as well as the whites of the eyes.

Oh, and what is the Left Closed Happy trigger? In anime, happy expressions often involve closed eyes. This is actually why I have separate top and bottom eye lids, ordered as they are. I make a skin colored layer appear behind the top eyelids but in front of the lower eyelids, pupil, eyeball etc when pressing the ‘c’ key. Its also useful for wincing expressions when say combined with “angry”.
That is, the top eyelid is what to display when the eyes are closed, then comes a triggered layer to cover the rest of the eyes to hide them when closed, then there is the bottom eye lid which is really everything about eyelids that I want hidden, then the pupils and whites of the eyeball (which I also use to clip the pupil). If you look at the above example carefully, you will notice at the top of the whites of the eye I have a shadow. This is actually a semi-transparent layer so the pupils can move around and the shadow will still be correct. But I don’t want that shadow visible when the eyes are closed. Hence I put the shadow as part of the bottom eyelid, so the shadow is not visible when the eyes are closed.

There are also Eye Gaze and Face behaviors that may be relevant. Eyebrow strength controls how far the eyebrows will move from the camera. Here I have them turned on for the demos, but I frequently turn them off and use triggers as the camera can cause jitters in the eyebrows during recordings. So I often set the Eyebrow Strength to zero or something pretty small.
For Eye Gaze, if Snap Eye Gaze is off (which allows the puppet to look at more than N, NW, W, SW etc directions), then I turn off Camera Input and turn on the Mouse instead. The camera causes a slight jitter even when you keep your eyes looking perfectly still.
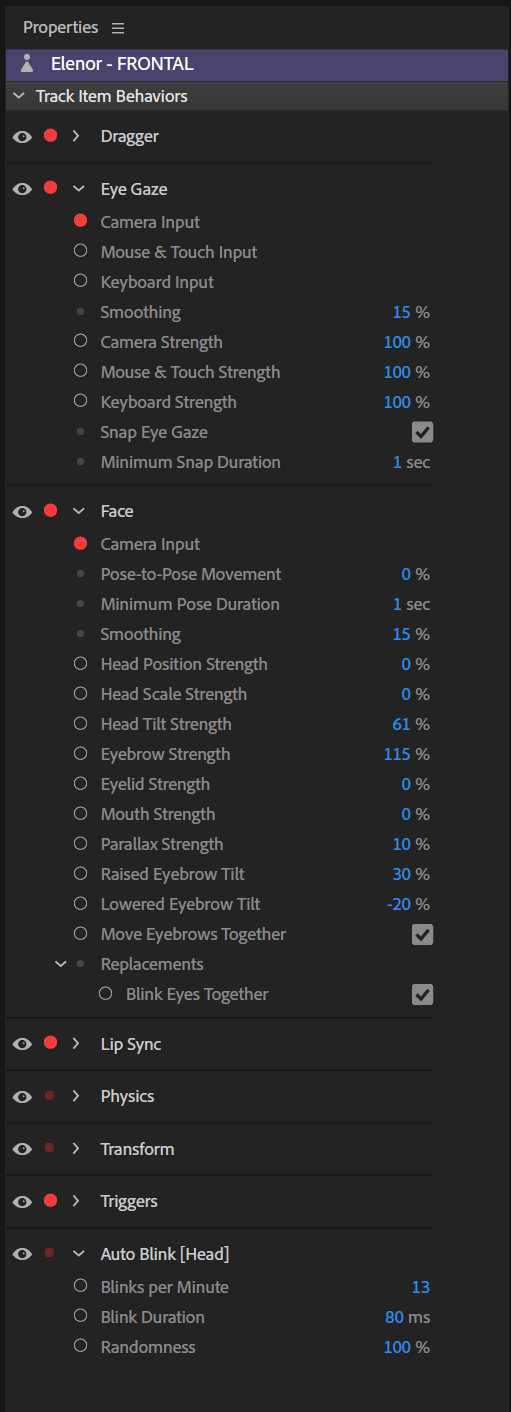
I often set Eyelid Strength to zero and generally have a lower values for most of the settings.
Tip: How to share your problem.
When all else fails, the forums are there for you to share and ask for help. (I like to suggest people help one or two other newcomers for every bit of help they receive.)
If sharing screenshots, the most useful screenshot is the Ch puppet hierarchy. It is more useful than the artwork (as you can make changes). Unfortunately it won’t show all the tagging in one place, so its not perfect.
The last resort is to share a puppet. The best way to do this is to use the menu “Export/Puppet” to create a XXX.puppet file (its a ZIP file with a different file extension). This file will include the artwork and all rigging so far, making it easy for someone else to try. Sharing a project is less useful (unless asked for explicitly) as the file is larger and may include absolute paths to other artwork files depending on where you saved them (and might not be in the ZIP you send).
Wrapping up
So, there you have it, the steps I typically take when debugging a puppet. I hope you found it useful. Please leave a comment if you have other suggestions to add.
UPDATE: 6/21/2018 – Crazy Eyes
Recently I have come across a few cases of “crazy eyes”, so extending this page a bit. Here is a sample video of what I mean.
I recorded a (long) session on how to fix it, but it got truncated half way through. (Sigh!)
In a nutshell, the problem was stray pixels in both the eye pupil and eye pupil range layers. The end result I think was the pupil did not fit within the pupil range. In the above example, the problem was solved by deleting all the stray pixels.
In another puppet, a similar problem occurred using Illustrator. The common aspect seems that the pupil was a little taller than the pupil range (or very close), which resulted in one of the eyes going backwards like above. The solution is to create a separate transparent layer for pupil range as described above, possibly with the clipping mask applied as well (also as described above).
August 2020: I came across a few videos that might be useful too. The first is from Adobe, the second is from Grif.

You have mentioned that the camera does not allow the eyebrows to stay in the desired position when they are raised or lowered, which is my experience also. As an alternative you have displayed an Ai file with four versions of the eyebrow. These avoid the jitters of the camera but they are presumably staccato whereas with the camera at least there is a smooth (though jittery) transition from one position to the other. Is there any compromise between these two options?
Thank you for your reply to my question about blinking. I tried to click on like and helpful but the system did not respond.
You recommend auto blink which I would prefer to use. However, even though the default is 30 blinks per minute it happens a lot slower than every two seconds and sometimes blinks two or three times in one go. Did you ever have this problem?
LikeLike
Yes, alternative eyebrows are more staccato – but you can use Cycle Layers to introduce intermediate frames for a smoother transition.
Yes, sometimes I have seen “butterfly eyes” (eyelids flicker multiple times together). There are settings on autoblink to change the randomness and duration between blinks, but I have not played with these settings much to be honest. https://helpx.adobe.com/adobe-character-animator/using/behavior.html#auto-blink
LikeLike
Hello Alan! I was wondering if you happen to know the best resources to learn character animator? I am having quite a lot of trouble. If you could point me in the correct direction that would be great.
LikeLike
Adobe has a lot of tutorials. Looking at sample puppets can help. If you want step by step I have a series of videos called Project Wookie. https://extra-ordinary.tv/2018/10/22/project-wookie-a-beginner-youtube-playlist/ – i show every step of what i do there – you could try and repeat with your own project. I think there is a course on Udemy as well. And of course the user guide, but i find that more for reference.
LikeLike
Thank you for this post and for sharing some of your techniques in CH. I’m building a puppet at the moment and have already benefited from many of the points you make here. Seeing the rigging in properties and hierarchy is helpful and your tips on aesthetics…like the shadow under the upper lid being transparent. Also the pupil mask for all the elements within your pupils. And the trigger groups. Great post. So helpful. Cheers.
LikeLiked by 1 person
I can only get one eye pupil to move. I have the perfect set up and they’re both the same. The right eyeball moves, but the left does not. It’s very frustrating. Anyone know a fix?
LikeLike
I think best way is to share a copy of the puppet. Sometimes gets too hard to debug otherwise. If you can share, reach out on the adobe forums I think is best (or send me a direct message there).
LikeLike
It’s cool. I erased the puppet and re-imported my illustrator file, and it worked fine. I spent about 3 hours going over and over the layers, and am now an expert. lol… thanks guys.
LikeLike
Hello.
I have a problem with my characters left pupil. Right is moving just fine when im using mouse to control it, but the left one is moving like the direct opposite I am moving my mouse, also it is weird in other ways too (going out of the pupil range and so on). But they both seem to be set correct. Maybe someone knows a fix? 🙂
~ Michael
LikeLike
It is usually a tagging issue – e.g. an extra tag, or the Left instead of Right tag etc. I suggest asking in the Adobe Character Animator forums and including screenshots of the rigging hierarchy. I also check the Face and EyeGaze handles for eyes to see if it bound to the correct layers. But longer discussion easier in forums.
LikeLike