I am trying to identify a good solution for dangling hair bounces and cloth (e.g., a skirt) in NVIDIA Omniverse for characters/avatars. The recently released Omniverse USD Composer (Kit 105) now uses “Omnijoint” intead of “SkelJoint” for skeleton bones in characters. These are real prims, so you can add children prims and they will track with the movement. This means, for example, if you put colliders on the arms and legs, as the character moves, cloth particle systems and deformations should react to avoid collisions with the arms. This was not the case in 104. This blog post is a summary of my attempts to get it going.
TL;DR: I had some success, but not enough yet. I am sharing this blog in case it helps anyone else move forwards. (Please tell me if you get it going!)
Why is there a problem? Omniverse has sophisticated cloth physics and mesh collision support, but unfortunately skeletal animations the modify the mesh are not accessible to the physics engine. This meant collision detection was not possible when animating characters.
One thread I am still following up on indicated you could record a mesh animation and feed that back into the physics engine in a second pass to get full mesh collisions working. (See example_mesh.py in the Omniverse extension data/scripts directory.)
First Attempt
For a first test, I wanted to add a capsule to the upper arm and see if it tracked with arm movements. Steps:
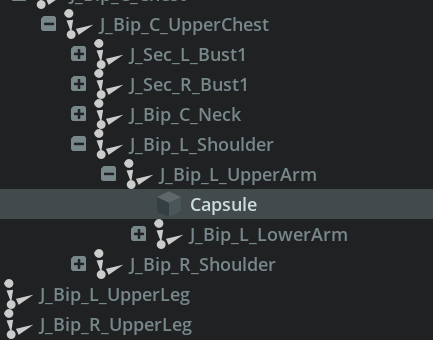
- Select the upper arm bone of the character’s skeleton. Note in 105 these are now Omnijoints, not SkelJoints as in 104, which my understanding makes this parenting now possible in a reliable manner.
- From the menu, select Create / Shape / Capsule to add a capsule as a child, which will track the arm movement. For my character the parent bone is called “J_Bip_L_UpperArm”.
- Select the capsule and Add / Physics / Collider Preset. This adds a static collider to the capsule.
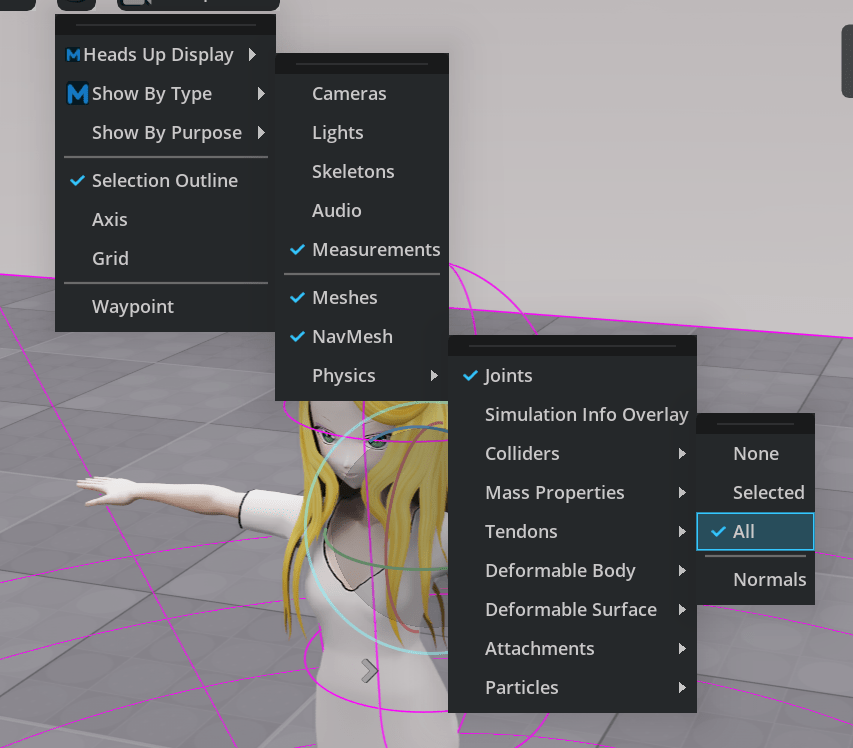
- To view the capsule, enable in the Viewport display of Show By Type / Physics / Colliders / All.
- Resize the collider capsule, rotate it, and adjust its position so that it covers the arm. For my arm, I found a capsule height of 15 and radius on 5 was pretty good to match the upper arm.
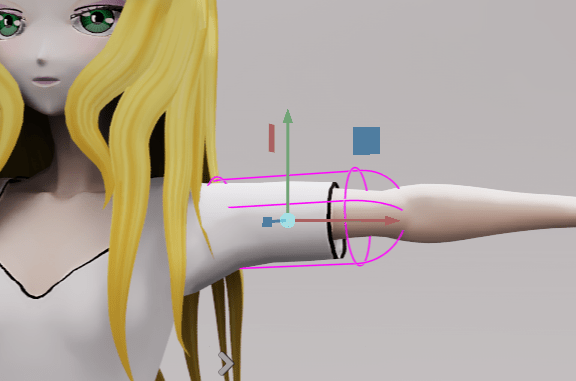
Test the above by rotating the upper arm bone. The capsule should follow the arm movements.
I decided to give the cloth particle system another go. (The other option is to use deformables.) Previously I did not think deformables took into account world position. If the character moves, the deformed mesh does not wobble. I want the hair to bounce as the character walks along. I am not sure if either deformable or particle meshes support this today.
Here is a useful video on meshes, deformables, and particle cloth meshes:
It starts with how to implement a particle mesh for a shirt, but it then goes on to talk about attachments, which are important to attach hair to the head. Without this, hair will drop off the head and fall onto the ground. (The first part of the above video talks about deformables.)
Next, add a particle cloth to the hair. I selected my hair_0 mesh, then clicked on Add / Physics / Particle Cloth. For fun, hit the Play button and see what happens. The hair will probably fall to the ground because it is not attached to the head. But when I restarted several times, I could see that the falling hair was moving around the arm collider. So a degree of success!
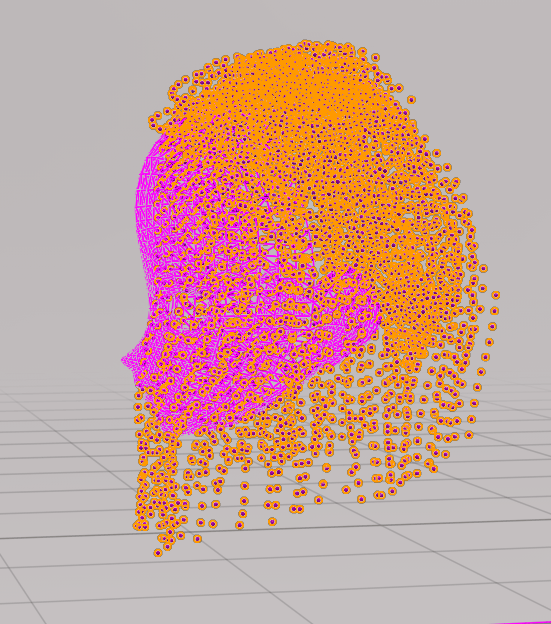
Want to visualize what is going on better?
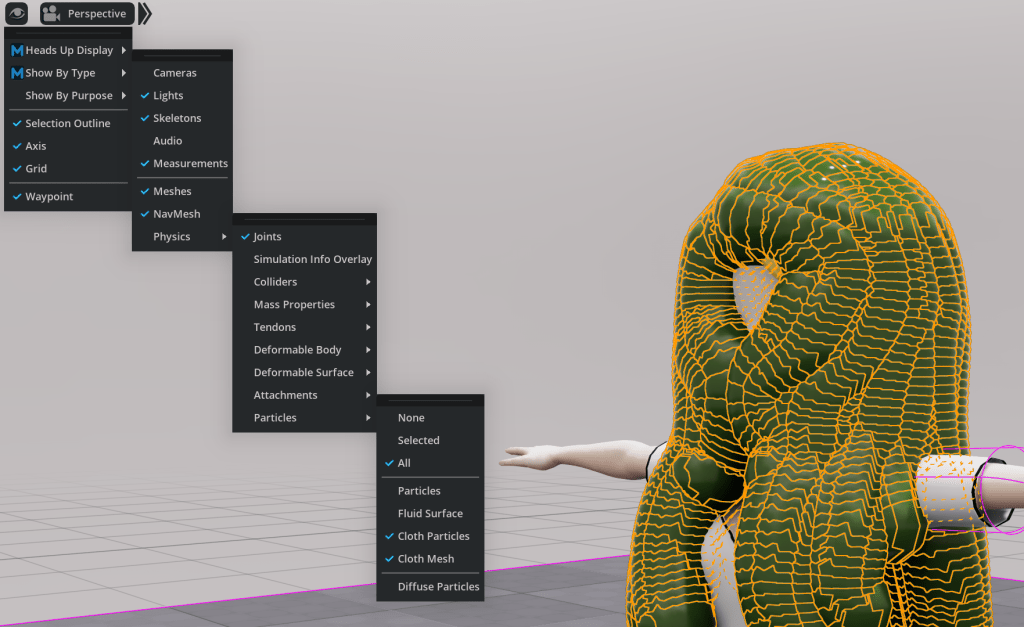
First turn on the viewpoint window view option for particles. You should see something like the above (which is not a well configured mesh – all the points are colliding with each other!
Select the Particle System prim that was added to the stage. I changed Particle Contact Offset to 1 (from 5), which looks a bit better for my character.
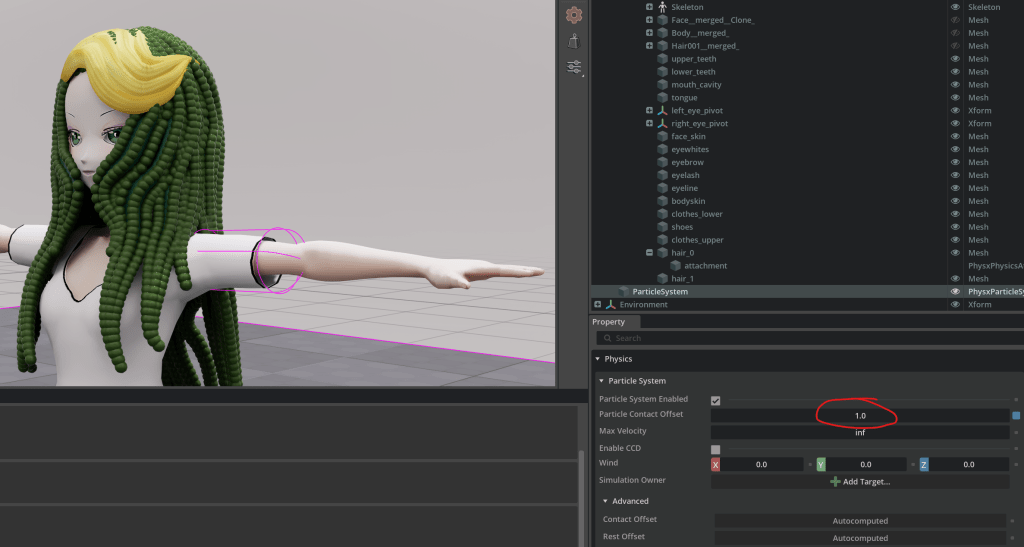
Bring up Physics Debug window. There is a drop down Particle Radius to select what to view where Contact Offset is the most important setting to set. It is the maximum distance used by any of the other settings. For my character a Contact Offset of 1 and a Rest Offset to 0.5 seem like a reasonable option.
Head Sphere Frustration
Next I tried to add a sphere collider to the head of the character. I selected the head then Create / Shape / Sphere followed by Add / Physics / Collider Presets. I resized the head to radius 15, hit Play, and Omniverse hung on me. Time to restart the app.
I restarted 105, loaded my saved project file, added a sphere with radius 10, and hit play. Hair fell to the ground (no colliders had any effect). Confusing.
I reloaded the file, added a sphere of radius, moved it up on the screen a bit, hit Play, Stop, Play. The collider on the arm was no longer visible. Hitting ‘f’ in the viewpoint (to focus on the selected object) showed it near 0,0,0 where the feet of the character are. Confusing.
I reloaded file again, added a sphere with radius 12, moved it up a bit, hit Play. No colliders in sight – they seemed to have scaled to size zero and were sitting at offset zero.
No idea what was happening. All very confusing after a moment of hope. Time to move on.
Attachments
I wanted to try and attach the roots of the hair to the head. The video above includes an example of a cape, where the cape is attached to the shoulders of the character. (It also mentioned a “wind” clip that I would also dearly like to understand. Maybe I can turn movements in world coordinate space into “wind” to get the hair to respond to real world movements.)
Based on the video, I performed the following steps.
- Select the Head Omnijoint in the skeleton.
- Create / Shape / Sphere and set the radius to 15.
- Add / Physics / Collider Preset to add a static collider.
- Select the hair_0 Mesh and double check it has particle cloth (otherwise Add / Physics / Particle Cloth).
- Control-click the collider sphere under head (so the head_0 and sphere prims are both selected), right click in the Viewport windows, and Create / Physics / Attachment. hair_0 will now have a child Attachment prim.
- Select hair_0/attachment and set the Overlap Offset and Filtering Offset properties to 3.
- Turn on Viewport view of Show by Type / Physics / Attachments. I expected to see points attached to the sphere, but did not.
- Hit Play!
- The hair exploded outwards the first time I hit Play (pushed out from colliding with the sphere I assume). After that, hitting Play just made the hair fall to the ground. All the colliders had vanished again.
- I repeated the process with a sphere mesh instead of a shape. I added a NVIDIA standard material to make it visible. All good, the sphere is visible. I try to scale the sphere 10% smaller. It vanished! The prim still exists, but the sphere is not visible.
Plan B
Plan B time. Instead of adding a new shape or mesh object, I decided to use the existing face skin mesh as an attachment point. I added a collider (Add / Physics / Collider Preset), selected the hair and face skin mesh the right clicked in the viewpoint window and selected Create / Physics / Attachment. I then set the attachment Overlap Offset and Filtering Offset values to 10. These meant most of the points of the hair were attached to the head. I was wanting to use a sphere as the face skin mesh does not cover the back of the head area very well.
For more information about the settings, see the video above.
The above did help – the hair did not fall to the ground instantly like before. But the colliders seemed hit and miss. They frequently just stopped working for no reason I understand. Reloading the USD file cleared things up for a while.
Conclusions
I don’t have a completely working solution yet. I am also not sure whether particle cloth responds to real world movement of the character (which is a real issue). I hit a number of crashes and hangs trying things out. There were glimpses of hope, with the arm collider have a bit of impact.
It does seem like the collider as a child of the arm bone does solve the skeleton animation bone tracking problem in 104 and earlier, which is good news. But even with this, I don’t have a robust overall solution with hair physics that responds to real world movements.
Did you have any luck trying to get a character going with dynamic bouncing hair? Please let me know if you do! With all the sophisticated cloth simulation available, it seems a bit frustrating I cannot get some simple hair bouncing to work.
UPDATE: I recorded a scrappy video of the steps I took in case helpful.
