I have been exploring NVIDIA Omniverse and the standard it is built on, OpenUSD (aka USD). It provides a number of ways to animate objects in a 3D scene. My personal interest in animation is I am trying to build a tool to simplify assembling your own animated video where the final result is exported in as USD files to be imported into other tools for rendering, further adjustment, etc. One decision is whether to generate “pure” USD files, or USD files that use Omniverse extensions.
What is Animation
Before getting into the depths of animation in USD, a quick refresher of how animation works under the covers.
In traditional cartoon animation, you draw a series of 2D images, the flip between them to make it appear they are moving. In 3D computer animation, each frame a set of slight adjustments to numeric properties that affect how an object appears. For example, move the X position of an object to make it move sideways, increase the scale to make it grow bigger, and in the case of characters, change the rotation of bones in a character to make them move. So it’s all numbers – making slight adjustments to numbers each frame to result in smooth animation.
Going deeper, one object may be controlled by multiple things concurrently. For example, a character may have bone rotation and “root motion” animation to make a character walk and move, but there may be independent animation of their hair and clothes to make them bounce and jiggle according to the rules of physics. The secondary animation may be computed by code and formulas at runtime, rather than being recorded in advance – it still computes numbers, but they are computed on the fly instead of being pre-rendered.
Character Animation of Bones and Blendshapes vs Mesh Animation
For a physics based simulation of a big pile of boxes falling down, you could have a simulation engine that works out the position and rotation of each box as they fall down. If you want the models to change shape during an animation, you could instead animate each individual vertex of model’s mesh. This can be useful to say animate a scarf blowing in the wind. The code gets complete control over each vertex, but the result is a lot more data to record for the animation.
For characters, it is common to use animate bone rigging and blend shapes. For bone animation, you create a skeleton of bones that rotate at joints, then for each mesh vertex you say which bones it follows. In the middle of an arm, each vertex would be 100% affected by the bone position. Near the elbow joint, a vertex may be affected by both arm ones, to make the joint flex look nicer. The assignment of weights to bones is called “weight painting”. The advantage is you only have to record rotation data for one bone and it can affect hundreds of vertices. This results in much smaller animation files. (The animation files are also easier to reuse on different characters.)
Blend shapes are similar. A blend shape defines different positions for each vertex in a mesh, with a weight between 0 and 1 to allow a smooth transition between the two states. Blend shapes can be useful for facial expressions like a smile (the face mesh deforms the cheeks and mouth shape to smile), but you can use blendshapes for anything that adjusts the mesh. For example, I made a tree sway in the wind. Again, a single number (the blend shape weight) in an animation sequence controls many vertexes, reducing file size.
Animation in OpenUSD
Coming back to animation in OpenUSD then, there are multiple ways in which animation can be recorded.
- You can record time series data for every point in a mesh.
- You can record time series data for bone rotations and/or blendshape weights.
- You can record time series data for object positions and rotations, such as boxes in a pile falling down.
- In fact almost every property of prims in an OpenUSD file can be animated if you have a reason to do so.
To capture animation in a USD file, instead of recording a single value for a prim property, you specify a different value per time codes. These values can be numbers, vectors, matrices and so forth.
Skeletal Animation
Here is an example USDA file using time sampled data for joint rotations in USD.
def SkelAnimation "Animation" (
  prepend apiSchemas = ["AnimationSkelBindingAPI"]
)
{
  uniform token[] joints = ["Root/J_Bip_C_Hips"]
  quatf[] rotations.timeSamples = {
    1: [(0.985674, 0.074989, 0.145938, -0.039068)],
    2: [(0.985612, 0.075789, 0.146061, -0.038617)],
    3: [(0.985916, 0.076102, 0.144255, -0.037003)],
    4: [(0.986166, 0.074925, 0.143348, -0.036247)],
    5: [(0.986020, 0.076229, 0.143400, -0.037286)],
  }
  half3[] scales = [(1,1,1)]
  float3[] translations = [(-2.939486e-8, 0.0722093, -0.0093069)]
}
The “rotations” attribute specifies a different rotation value per time code, whereas the scales and translations attributes define a single value that does not change over time. This can be done for most attributes – specify a single value, or values keyed by time.
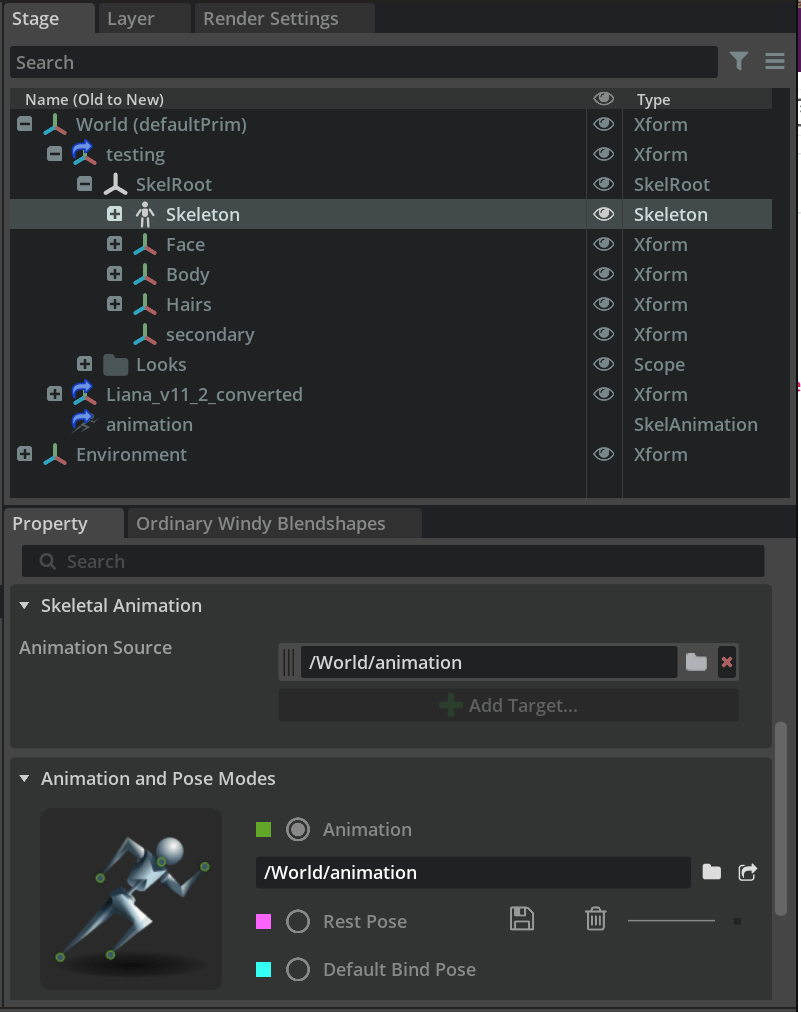
The above example is skeletal animation where rotation data is stored in an animation clip. This animation clip is then applied to a character. Core USD allows a skeleton to specify the animation clip to apply via the skel:animationSource property (the screenshot below shows the Skeleton prim has skel:animationSource set to /World/animation). You don’t specify the time series data directly on the model. This is in part because the bone hierarchy is actually generated when a model is loaded (using OmniJoint prims), so the bones themselves are not in the prim hierarchy by default. USD standardizes that you should list bone names in properties, not as a hierarchy of prims.
Note: There is another concept of animation retargeting that I have posted on before. It allows skeletal animation clips to be applied to different characters, even if the characters use different names for bones. See also this Discord thread if you want a bit more depth on skeletal animation in USD.
Direct Property Animation
Another animation approach uses the same time series encoding of values, but directly on the model being animated. The following snippets are from https://openusd.org/release/tut_xforms.html.
def Xform "Top" (
    prepend references = @./top.geom.usd@
)
{
    float xformOp:rotateZ:spin.timeSamples = {
        1: 0,
        192: 1440,
    }
    uniform token[] xformOpOrder = ["xformOp:rotateZ:spin"]
}
This loads up the geometry of the model (top.geom.usd), then overrides the rotateZ attribute value with value 0 at time code 1, and value 1440 at time code 192. (USD can interpolate between values at different time codes.)
This layering of USD files was interesting to me. The stage file references an external file holding the model, then overrides the rotation attribute value in the stage with time series data. This makes it easy to reuse a single model with multiple animations.
There is another example later on the same page.
def Xform "Middle"
{
    double3 xformOp:translate = (2, 0, 0)
    uniform token[] xformOpOrder = ["xformOp:translate"]

    def Xform "Top" (
        prepend references = @./Step5.usda@</Top> (offset = 96)
    )
    {
    }
}
The offset metadata when the external USDA file is referenced offsets the time series data by 96 time codes. You can also adjust the time scale to make it play faster or slower via the scale metadata.
def Xform "Right"
{    double3 xformOp:translate = (4, 0, 0)
    uniform token[] xformOpOrder = ["xformOp:translate"]

    def Xform "Top" (
        prepend references = @./Step5.usda@</Top> (scale = 0.25)
    )
    {
    }
}
These pieces of metadata let you adjust when to start an animation and the playback speed. Usage does require advance planning to work out how you want to lay out your USD files and your prim path naming conventions.
I should also mention the metadata at the top of a USD file can include details such as the time codes per second and the start/end time code for the current USD stage timeline. Playing a stage file will start at the start time code and end at the end time code, no matter what length the animation sequences are on different models.
#usda 1.0
(
    startTimeCode = 0
    endTimeCode = 120
    timeCodesPerSecond = 24
    defaultPrim = "World"
    upAxis = "Y"
)
There is also USD support for “Value Clips” which allows more complex ways to combine multiple clip files via metadata. For more details, see USD Value Clips and Clip Sets.
Omniverse Animation
Omniverse has its own extensions to support animation.
- For characters you can define animation graphs to attach to characters that moves the characters through different states, such as sitting and walking. It can blend between different animation clips, or react to action graphs (which can be triggered from keyboard keystrokes, or button clicks, etc)
- There is a Sequencer that allows you to drop animation clips into a character track, simplifying the sequencing of different animation clips.
- There is an animation curve editor where you can adjust keyframes and curves rather than plotting out each movement individually.
- There is all the physics simulation code that can adjust model properties real time.
- Another consideration for rendering a movie clip is how to specify the start and end time for the recording. Omniverse Movie Capture is an extension for specifying how to capture the output as a video, including the frame subsequence to record. Sometimes you want an animation to start playing a second or two before capturing video, to let physics effects (like hair and cloth simulation) to settle down a bit.
- Omniverse Farm makes it easy to kick off offline rendering jobs and works well with Omniverse Movie Capture.
A decision you then need to make in your project is do you want to stay with “pure” USD, or want to leverage Omniverse extensions. The extensions do make things nicer, but may make your files less portable (the features might not be understood by all tools).
Conclusions
For my own use case I am still considering which technologies to use. The Omniverse Sequence would be tempting if I wanted to make editing animation timings easier. But it is not powerful enough for me, which is why I am building my own. I will most likely export time coded animation clips using a combination of skeletal animation clips and normal animation clips. I still have to make some decisions, like whether to animate hair and cloth physics in the rendering platform (which will need platform specific code for physics calculations), or generate mesh animation in my own code and export that instead. The good news is OpenUSD supports both.
All up, my interest in Omniverse is primarily driven by USD. Exporting USD files means I only have to export one file format and it can be used by many other tools. That avoids vendor lock-in, without having to support many different formats.
