In my last post I introduced the approach of using Google MediaPipe to control VRM character facial expressions. Hasn’t this been done before? Yes! There are some excellent projects around, including XR Animator. But there is nothing like firsthand experience. In this blog post I describe my efforts to use TensorFlow.js to train a machine learning model to recognize faces based on blend shape weights, with 100% of the code running in a web browser.
Inputs and outputs
To summarize (for details, please refer back to my last blog), I have a stream of floating point weights between 0 and 1 for 52 ARKit blendshapes coming from Google MediaPipe, and I want to map it to VRM Expressions (neutral, happy, relaxed, sad, angry, shocked) plus mouth positions for talking and eye blinks/winks.
In terms of machine learning, this means I am trying to convert a vector of 52 input numbers into a vector of 14 output numbers (labels). I am trying to do this all completely in the user’s web browser, allowing users to train the model on their own face. So I picked TensorFlow.js as it can both train models and make model predictions using JavaScript running in a browser.
To go a bit deeper on the set of 14 output labels, the goal is to combine one of the 6 full face expressions with 5 additional weights for the mouth vowel sounds, and eyes (blink, left wink, and right wink). To turn this into a vector, I set one of the expression labels to 1 and the rest to zero. It may actually make more sense to create multiple models, one for expressions and one for mouth tracking, then capture expressions with different mouth positions.
I then ask the user to record a set of animation clips of the user making each expression. I collect a few seconds of recording at 24fps (frames per second) to have a good sample set. There is some jitter in the output of Google MediaPipe, so giving multiple frames helps the machine learning model better understand the range of values that should map to an expression.

Once the different reference clips are recorded, I go over to an expression training page. It tells me which clips are defined and which are missing.
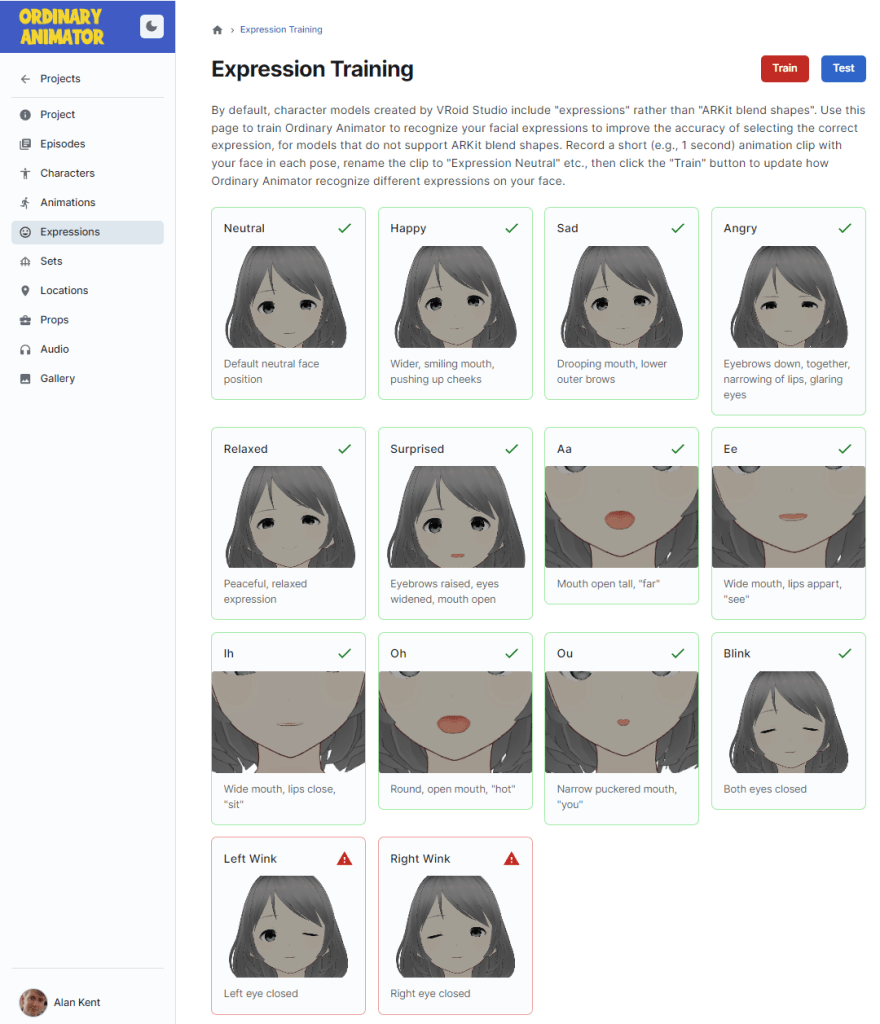
The “Train” button then loads all the sample expression animation clips and runs the model training code over the recorded animation clips.
Here is a diagram explaining the structure of the training data.

To generate the data, I iterated through the labels (neutral, happy, angry, sad, etc.) looking for a recorded animation clip for that label. Then for each frame of the animation clip, I captured the 52 blend shape weights and formed them into a input vector (a row in the table on the left above). I then added each input vector with a copy of the label vector (a vector of zeros for all expression weights, except for 1 for the target expression). The data is collected into a big training data array.
Here is the core code of the code to train a model. This is implemented as part of an application implemented using Next.js and React. The TensorFlow.js library is added using npm.
npm install @tensorflow/tfjs
The code is as follows. First we import the TensforFlow.js library.
import * as tf from '@tensorflow/tfjs';
Next we create an array of all the training data read from animation clips.
const trainingData = [];
for (const expressionIndex in expressions) {

  // load the animation clip for the nth expression.
  const clip = ...

  // We have an animation clip. Create the label tensor, setting the
  // current expression to 1, the result to zero.
  const labelVector = Array(expressions.length).fill(0.0);
  labelVector[expressionIndex] = 1.0;

  // Iterate through each frame of the animation recording.
  // We turn each frame into a new sample to train on.
  for (const frameNumber in clip.keyFrames) {

    // Create an input vector from the available blendshape weights
    const inputVector = Array(numArkitBlendShapes).fill(0.0);
    for (const blendShapeIndex in arkitBlendShapeNames) {
      const name = arkitBlendShapeNames[blendShapeIndex];
      if (name in clip.blendshapes) {
        inputVector[blendShapeIndex] = clip.blendshapes[name][frameNumber];
      }
    }

    // Save input and label vectors together as a pair.
    trainingData.push({inputVector, labelVector});
  }
}
Next, we shuffle the training data to improve the quality of the training. Training is performed in batches, so it is better to mix up the data to avoid clumping data in some batches.
// Shuffle the data
tf.util.shuffle(data);
The input and label vectors are still stored together because I shuffled them as pairs. Now that shuffling is complete, we need to separate them into an array of input vectors and an array of label vectors, which are then wrapped in tensors as 2D arrays (the outer array index is the row number and the inner array is the vector of weights column number). The two tables in the above diagram show the contents of the two tensors.
// Convert the shuffled training data into tensors
const inputs = trainingData.map(d => d.inputVector);
const labels = trainingData.map(d => d.labelVector);
const inputTensor = tf.tensor2d(inputs, [inputs.length, numArkitBlendShapes]);
const labelTensor = tf.tensor2d(labels, [labels.length, numExpressions]);
Next we create a model. The input is shaped by the number of ARKit blend shapes (the input vectors). The labels are shaped by the number of expressions to output (the label vectors). I create a few layers here, but more care should be invested into working out the right number of layers and units in each layer.
// Create the model
const model = tf.sequential();
model.add(tf.layers.dense({inputShape: [numArkitBlendShapes], units: 64, useBias: true }));
model.add(tf.layers.dense({units: 32, useBias: true}));
model.add(tf.layers.dense({units: numExpressions, useBias: true}));
We then have to create a model, specifying details such as the optimizer to use. Training involves adjusting the neural network internal weights so that output label vector are pretty close to the desired output vector.
// Prepare for training
model.compile({
  optimizer: tf.train.adam(),
  loss: tf.losses.meanSquaredError,
  metrics: ['mse'],
});
console.log(model.summary());
Now let’s run the training code. I picked 200 for the epoch count as smaller values (like 50) was less accurate, but larger values like 500 did not improve the reliability over 200 iterations (epochs).
// Train the model
const batchSize = 32;
const epochs = 200;
const result = await model.fit(inputTensor, labelTensor, {
  batchSize,
  epochs,
  shuffle: true,
  callbacks: {
    onTrainBegin: (logs) => {
      console.log("Training starting");
    },
    onYield: (epoch, batch, logs) => {
      console.log(`Epoch ${epoch + 1} of ${epochs}, loss = ${logs.loss}`);
    },
    onTrainEnd: (logs) => {
      console.log("Training done");
    },
  },
});
Once the model is trained, I save it to Firebase Cloud Storage for retrieval in later sessions. By default, the save() function takes a string which can be path such as “file://…” (if Node.js is running on a desktop), or a URL to POST the data to, a URL for saving to local storage (“localstorage://…”), or more. In my case, I wanted to save the result to Google Firebase Cloud Storage which is not one of the provided storage methods, so I implemented my own serialization/deserialization code.
const ioHandler = new FirebaseIOHandler(storage, path);
const saveResult = await model.save(ioHandler);
Here is the FirebaseIOHandler that I implemented. I use it to save the model in a serialized form, then read it back again.
// Implements IOHandler - need save() and load() methods.
class FirebaseIOHandler {

  // Provide the Firebase storage handle and the path to save the model at.
  constructor(storage, path) {
    this.storage = storage;
    this.path = path;
  }

  // Save the model to the path given in the constructor.
  // Returns Promise<SaveResult>.
  async save(modelArtifacts) {

    const modelTopologyAndWeightManifest = {
      modelTopology: modelArtifacts.modelTopology,
      format: modelArtifacts.format,
      generatedBy: modelArtifacts.generatedBy,
      convertedBy: modelArtifacts.convertedBy,
      weightSpecs: modelArtifacts.weightSpecs,
    };

    const jsonText = JSON.stringify(modelTopologyAndWeightManifest);
    const jsonBytes = new TextEncoder().encode(jsonText);

    const header = new DataView(new ArrayBuffer(4 + 4 + 4));
    header.setInt32(0, 1); // Version number
    header.setInt32(4, jsonBytes.length);
    header.setInt32(8, modelArtifacts.weightData.length);

    const blob = new Blob([header, jsonBytes, modelArtifacts.weightData]);

    // Write data to firebase
    const storageRef = ref(this.storage, this.path);
    const uploadResult = await uploadBytes(storageRef, blob);

    return {
      modelArtifactsInfo: tf.io.getModelArtifactsInfoForJSON(modelArtifacts),
      responses: [uploadResult],
    };
  }

  ...
}
Once saved to disk, the following code can be used to turn bytes back into a data model.
  // Returns Promise<ModelArtifacts>
  async load() {

    const storageRef = ref(this.storage, this.path);
    const arrayBuffer = await getBytes(storageRef);
    const dv = new DataView(arrayBuffer);

    const version = dv.getInt32(0);
    if (version != 1) {
      throw Error('Version number is wrong in model file');
    }

    const jsonBytes = dv.getInt32(4);
    const jsonString = new TextDecoder().decode(new DataView(dv.buffer, 12, jsonBytes));
    const modelConfig = JSON.parse(jsonString);

    const weightBytes = dv.getInt32(8);

    const modelTopology = modelConfig.modelTopology;
    const weightSpecs = modelConfig.weightSpecs;

    const weightData = arrayBuffer.slice(12 + jsonBytes, weightBytes);

    return {modelTopology, weightSpecs, weightData};
  }
The following code can be used to load a model from cloud storage.
async function loadModel(user, storage) {
  const path = `/user/${user.uid}/expression-model`;
  const ioHandler = new FirebaseIOHandler(storage, path);
  const model = await tf.loadLayersModel(ioHandler);
  console.log("Successfully loaded expression prediction model");
  return model;
}
Now we have our model saved for later use, and can load it back into memory when needed, let’s take an input vector and predict the label vector of blend shape weights.
function predictExpressions(model, blendShapeWeights) {
  const vector = Array(numArkitBlendShapes).fill(0);
  for (const bs of Object.values(blendShapeWeights)) {
    const blendShapeName = bs.categoryName;
    const weight = bs.score;
    const ordinal = arkitNameToOrdinal[blendShapeName];
    if (ordinal !== undefined) {
      vector[ordinal] = weight;
    }
  }
Convert into a tensor. In our case we are sending it one row to process at a time, so the outer array dimension is 1.
const tensor = tf.tensor2d(vector, [1, numArkitBlendShapes]);
Then predict the VRM expression weights.
  const predictions = model.predict(tensor).arraySync();

  const expressionWeights = {};
  for (const expression of expressionDescriptions) {
    expressionWeights[expression.name] = predictions[0][expression.ordinal];
  }
Let’s use the above code to compile, train, and save a model, and then test it. First click the “Train” button.

The “Test” button provides a quick test of whether the training completed. It takes a frame from the input data and uses that to predict results. (This is not “good” testing, but it makes sure the basics are in place.) The values down the diagonal should be close to “1”, and the other values should be close to zero.

The data in this case shows happy is struggling a bit (0.883 instead of closer to 1), probably because it is too close to “relaxed” when I made my recording.
The code to generate this test result is:
const results = [];
const inputTensor = tf.tensor2d(inputs, [1, numArkitBlendShapes]);
const predictions = model.predict(inputTensor).arraySync();
for (const expression of expressionDescriptions) {
  const weight = predictions[0][expression.ordinal];
  row.push(weight.toFixed(3));
}
results.push(row);
Trying it out
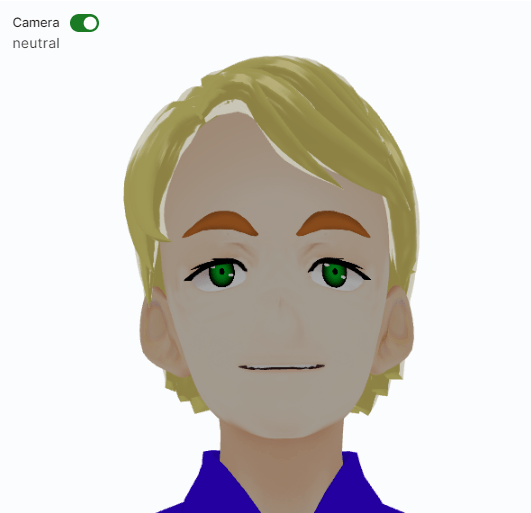
The real test of quality is going back to the animation recording screen and selecting a model that does not have ARKit blendshapes defined. Make different facial expressions and see how they come out.
First, a neutral expression. One challenge is to keep the mouth closed. The TensorFlow model is predicting values slightly greater than zero for the different mouth positions, causing a cumulative error.
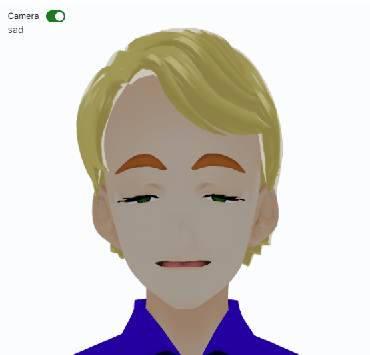
A sad face.
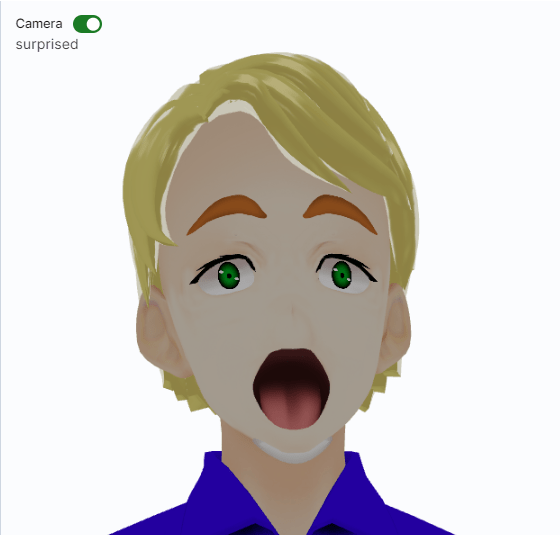
A face of surprise reveals another problem. It detected the shocked expression correctly, but the open mouth got picked up as both a surprised action and as an “ah”. When combined, the lower teeth were pushed out the bottom of the head. This is an example where combining different blend shapes (mouth open + surprise which also includes mouth open) can result in undesirable results.
What went well
So, what went well in this exercise?
- I successfully trained a machine learning model in JavaScript running in a web browser.
- It successfully recognized a number of faces based on facial pose training data.
- By recognizing the “surprised” expression, it picked up to shrink the irises, adding to the effect.
- It did recognize half strength vs full strength emotions – you can slowly close your eyes and it correctly mapped it across to expression weights.
What did not go well
The following are example challenges faced.
- Calibrating is painful. It felt like different sessions using MediaPipe generated slightly different data, meaning that sometimes it did a good job of predicting the expression and other times it did not.
- Sensitivity. Some expressions I found not different enough, causing the model to flicker between the two.
- Combining different expressions (happy + mouth positions) can make things like the teeth go out of bounds.
- It was interesting to see that many values are near zero, not exactly zero. This can cause problems with mouth lips where the mouth would not correctly fully close.
- Using knowledge of the problem space improved the quality of results. For example, I decided to pick the full face expression with the highest weight and force the weights of other full face expressions to zero. That is, if the biggest weight was “happy”, then I forced “sad”, “angry”, etc. to zero. This avoided problems with combining facial expressions.
- It may make more sense separating models for mouth controls from expressions since they will be controlled separately (one is for lip sync to audio, the other is the character’s emotional state).
- Recording some combinations of expressions and mouth positions may make sense, so it understands the mouth moves are not good predictors of the emotion.
- I also added masks to different recordings (mouth, eyes, brows, etc.) to help avoid unwanted influence from different parts of the face. I was having trouble where the width of the mouth was influencing the eye lid position.
The biggest problem I faced however was having some characters with VRM expressions and other characters with ARKit blend shape names was confusing for users. An animation clip of expressions weights cannot be played on a character that does not have VRM expression indexes, so users had to know which clips could be used where. Users had to be trained to learn about ARKit blend shapes vs VRM expressions.
Note: Some animation clips are tied to a specific character, especially if a character has had additional bones defined. In the case of VRoid Studio characters, hair has bones and so any recording with hair bones is unlikely to work on a different character.
So, for me, the blocking problem is that it is confusing to users to have different recording and character types, and my goal is for user simplicity. I kept forgetting that some animation clips and characters won’t work together. So my next step is to look into automatically adding ARKit blend shapes to VRoid Studio characters, where the mesh varies between releases of VRoid Studio, making direct copies of blend shapes not possible.
Conclusions
The goal of this post was to show a practical application of machine learning in a web browser. I got the whole expression prediction code working in a day or two from nothing (with not much tuning). This includes training and predicting results, all in the browser.
But the quality is borderline acceptable, not good. Addition development time to improve the model and/or collecting more data would be required to improve the quality.
It is worth noting that you can use Python code instead to train a TensorFlow model, and then load the result into JavaScript for execution. I chose to train the expression detection based on recordings made by a user all in the browser. I could have instead built the model into the application, and not allow users to retrain it.
In closing, it always amuses me that there are impressive projects emerging all the time for creating 3D models. The following is an example LinkedIn post that popped up just as I was finishing this article. Highly detailed faces, rigged with expressions. Impressive work.
I then return to my own world of just trying to copy a single blend shape from one character to another. There are so many small practical issues to solve to build a product that users will enjoy using. Fancy AI is great, but only one part of a complete solution.
