Want to add a bit more “life” to your video voiceovers, but don’t want to show your own face? How about using a 3D avatar, synced with your facial movements?

When to use an Avatar?
Are avatars always the best option? No! If you are your brand (say, you are an individual business coach) then getting your own face in front of your audience is a great way to reinforce your personal brand. But there are times an avatar is a good option.
- You want mix things up and do a video that is different from your normal content.
- You want to send a personalized greeting to a friend. Any birthdays of relatives coming up?
- You are starting out online but are not yet confident enough to show your own face in front of a camera. It can be easier to create good quality video using a computer generated avatar compared to setting up a good recording environment.
Using an avatar can be a useful tool to have in your toolbox.
Your voice or computer generated?
If you are not going to show your own face, should you still use your own voice? Computer text-to-speech is very good quality now. Using your own voice can help to deliver a deeper level of emotional connection with the audience. You can express a lot of your personality and passion through your voice. Think of listening to a phone call – you can emotionally connect even if you cannot see the other person.
However, there are times synthetic voices are useful, such as when a business does not want a voiceover tied to a specific employee, or if you need voices for a range of characters available over an extended period of time. You can give each character its own distinctive voice. For myself, I am interested it pushing the boundaries of screenplay (text) to animated video, so generated voices can help reduce the effort required to complete an animation. I am exploring options to make this available in the future.
Free tool, available now
To help you get started and explore, I am making a free tool available that can be used for voiceovers. This tool can generate a lower quality (more of a 2D feel, like the image below) video file directly from your browser, or a set of OpenUSD files that you can load into software such as NVIDIA Omniverse for rendering with higher quality (more of a 3D feel, like the image above), and allowing you to put the character into an environment of your choice.

If there is sufficient interest, I plan to provide a paid service where the environment can be loaded as well, multiple characters can interact, and text-to-speech is all integrated to help go from written screenplay to animated video. The goal is to take reduce the effort required to create such videos or voiceovers. (Leave a comment if you would be interested in such a tool!)
The free tool currently uses two default sample characters from VRoid Studio, freely available software from Pixiv. I am working towards allowing you to create your own characters for your distinctive brand, and I plan to add support for other character creation platforms such as Reallusion’s Character Creator, ReadyPlayer.me‘s avatars, Unreal Engine’s Metahumans, and so on. (There may be restrictions in functionality due to the licensing of the different tools. For example, Metahumans can only be used with Unreal Engine, but Unreal Engine also has OpenUSD support.)
Recording your own animated voiceover
I am making the free tool available now so people can try it out. I would love to get feedback on what features are most important to you (via Discord). Long term I plan to generate the higher quality rendered videos for you, avoiding any need to install and maintain additional software locally.
So how to get going? The process is
- Open ordinaryanimator.com/try in your desktop web browser.
- Pick one of the provided characters.
- Turn on the camera on the web page.
- Recording of your facial expressions and voice (a few minutes maximum).
- Download a video file rendered in the browser, or export your recording to a set of OpenUSD files and render in NVIDIA Omniverse or similar that you install separately.
Want to see it in action? I use it, along with a number of exploration projects not yet available in the tool, in a NVIDIA Omniverse livestream.
Step by Step Instructions
If you prefer, here is a video demonstrating the process.
Let’s go through the full process in greater detail. Don’t be scared by the the length, I describe various options available at each step. Most recordings only take a few button clicks.
Open the website: Open the site https://ordinaryanimator.com/try. I recommend from a desktop, but the site also works from modern, powerful mobile devices or tablets. A lot of processing is done in the browser. For example, my iPhone X struggles with the site (getting a bit old), but my iPad works fine.
Accept the cookie request: An “accept cookies” popup will appear the first time you arrive on the site. I collect some anonymous usage information to better understand the needs of users. The site also saves your preferences in browser storage.
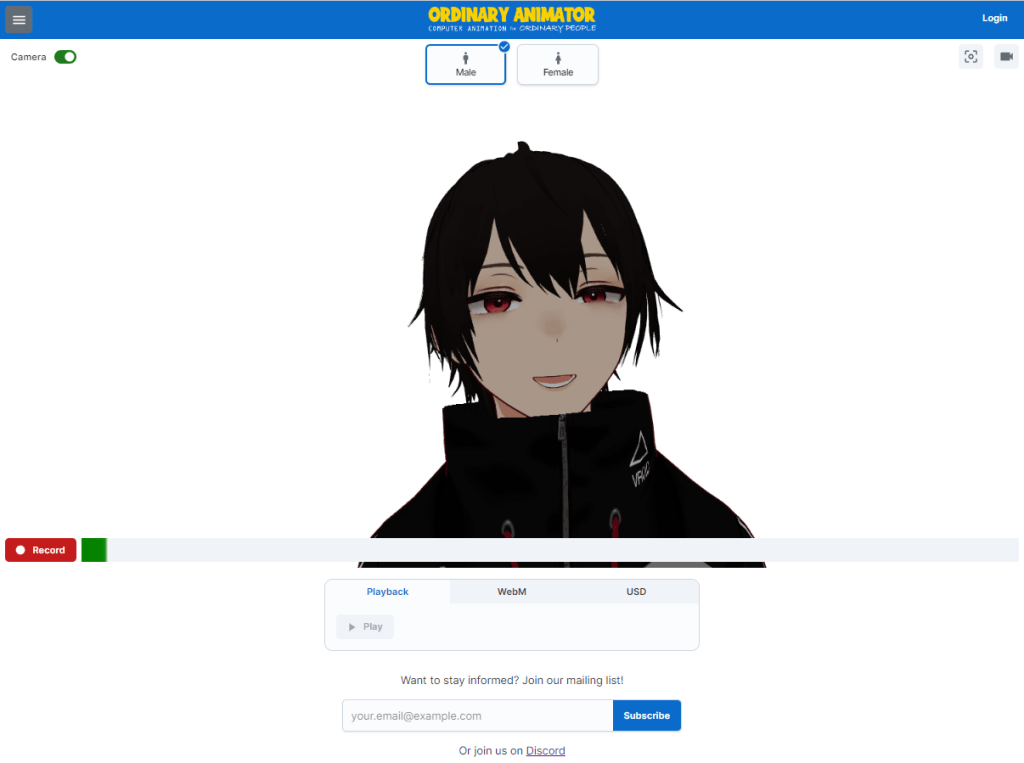
Select an Avatar: Select from one of the provided avatars at the top of the page. Currently one male and one female avatar are provided. These are sample avatars from VRoid Studio. In the future you will be able to create your own VRoid Studio avatars, Reallusion Character Creator characters, etc. and load them.
Turn on the Camera: Click the button in the top left corner to turn the camera (and microphone) on. If prompted, grant the site access to your camera and microphone. Once you grant the site access, the page make take a few seconds to get ready to start live video processing to convert images from your camera feed into facial features. (Video processing is done locally, in your browser, so you need a reasonably powered device.)
Test the character: Once the “loading” animation completes on the button in the bottom left corner of the page, try moving you head around and making expressions with your face. The avatar on the screen should mimic you!
Changing camera or microphone: If the site picks the wrong camera or microphone, turn off the camera using the switch in the top left corner of the page and click the settings (cog) button in the top right corner. It will show a drop down of available cameras and microphones. Then turn the camera back on.
Recenter your face: If your face is not centered, you can click the “recenter” icon in the top right corner. This is useful for minor adjustments, but the further off center your face is, the greater the site will struggle to capture your facial expressions. If reading from a script, try to position the script on your screen close to your camera, then click the recenter button when looking directly at the script.
Check the camera feed: You can click the camera icon in top right corner to check what the camera is seeing, to make sure your face is in the field of view and the lighting is acceptable. If using a laptop, you may need to angle the screen to make sure your face is centered in the camera.
Start recording: Click on the “Record” button in the bottom left corner to start a recording. The label will change from “Record” to “Stop” when the recording starts. The tool keeps the full recording in memory inside your browser, so is intended for recordings up to a few minutes long. Be aware that if something fails, your recording may be lost, so I don’t recommend longer individual recordings. When you are finished with your recording, click the “Stop” button. The label will change back to “Record” once stopped.
Turn the camera off: You can turn the camera off at this time if you wish.
Play back the recording: You can play back the recording using the “Play” button at the bottom of the page. It plays back the full recording from start to finish.
Render to a video file: Click the second tab at the bottom of the page and click “Render” to render your recording to a video using the same quality as the preview on the screen. Once finished, you can download the file using the “Download” link. Different web browsers and operating systems support different video encoders, so you may get a WebM file using say Chrome on Windows, and a MP4 file using Safari on an iPad.

Export to OpenUSD files: If you want more 3D depth to the video, you can instead export the recording as a set of OpenUSD files. I recommend only using this option on a desktop or laptop, not a mobile device. OpenUSD was developed by Pixar for their movies and is gaining popularity as an interchange format between animation tools. OpenUSD was selected by the new Apple Vision Pro as its format of choice. To export the files, select an output directory (you will be prompted to grant the web page permission to write to your local disk)

then click Export.
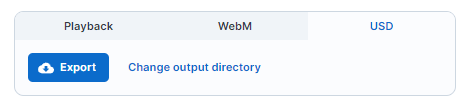
The site will convert the models and recording in your browser to the OpenUSD file format, and write the files to disk. This can take some time to complete (potentially minutes), so please be patient. If you reload or close the page, the export will be aborted.
Render the OpenUSD files: Multiple tools can render USD files. In the next section I give a run through how you can use NVIDIA Omniverse for free on Windows desktops/laptops that have a modern NVIDIA graphics card (e.g., a RTX 3080). In the future I hope to provide this as a paid service, rendering your project in the cloud to avoid the need to install any software locally.
Troubleshooting: Please report any problems you encounter. I have created a new Discord server if you want to join and provide feedback. (I am opening this up now for the first time.) A common solution to work around problems is to refresh the page in the browser, or close the tab and open a new one. This forces a full refresh of the web application. For example, if the site starts slowing down, a page refresh may help.
Rendering OpenUSD files with NVIDIA Omniverse

NVIDIA Omniverse is a tool provided by NVIDIA for handling OpenUSD files. It is available for free for individual users (there is a paid enterprise edition). It currently only runs on Windows and requires a reasonably modern NVIDIA GPU. By exporting your recording as a set of OpenUSD files, you can open the project in Omniverse, add background props, change the camera angle and lighting, and then render to a video file. Alternatively you can render the head as a PNG sequence with transparent background and superimpose it over another video.
Omniverse is a tool for professionals. As such, it is not a trivial tool for newcomers to use. The following instructions are intended to get you going, but there is also extensive documentation and videos that NVIDIA provide on the tool. There is also a useful Discord server where you can ask for help.
If you create a solid background for your recording, the easiest option is to use the Omniverse Movie Capture to render directly to a MP4 file. It will render each frame to a PNG file, then combine the PNG files into a video file for you.
As of this time, the Movie Capture tool will not capture audio, so you will need to use a video editing tool to combine the video and audio files together later.
If you want to superimpose your video over the top of another video, use the “Render as PNG Sequence” option. Make sure you turn on “with alpha” (alpha = transparency) in the Movie Capture settings. This will create one PNG file per frame of the video. Most video formats and tools do not support transparency, requiring techniques like green screen backgrounds. Using a PNG sequence generally avoids this problem. You then can import the PNG sequence and audio files into your video editing software. Make sure you set the image sequence to 24 frames per second (fps).
Congratulations!
You should now have created your own first voiceover with an avatar!
Got questions or got feedback? I would love to hear from you on the Discord server. No official support is provided for the free tool, but I will do my best to get you going. If you have Omniverse specific questions, I recommend asking on the Omniverse Discord server as there is a large community there to provide deeper advice and guidance. (I hang out there a lot too!)
