Runevision developed a locomotion system for use with Unity. It deals with issues such as walking over sloped or uneven surfaces, making sure the feet correctly walk on the ground. This is not the only way to do locomotion in Unity, but the combination of features appealed to me. You tell the character where to go and the locomotion system works out the best way to get the character there, taking into account non-flat terrain.
The bad news however is I don’t think it can be easily used. It is an old package that does not use the Avatar model (it manipulates bones directly) and seems to not work with animation clips based on the Avatar Humanoid approach (referred to as “muscles” instead of “bones”). I decided to still write up my findings in case a solution becomes apparent later.
Installation
The first step is to add the Locomotion package to your project. You can do this via the Unity package manager. The package details I am using are as follows:

More information on the package can be found at http://runevision.com/multimedia/unity/locomotion/. Documentation for the package can be found inside the package at “Assets/Locomotion System Files/Documentation”. The following refines those instructions for VRoid characters.
Adding Locomotion to a VRoid Character
First, make sure the ground has a “Collider”. Since the ground in the sample scene I am using (from the Locomotion package) has flat ground, a “Box Collider” can be used. It cube that has been squished flat (Scale X=10, Y=1, Z=10).
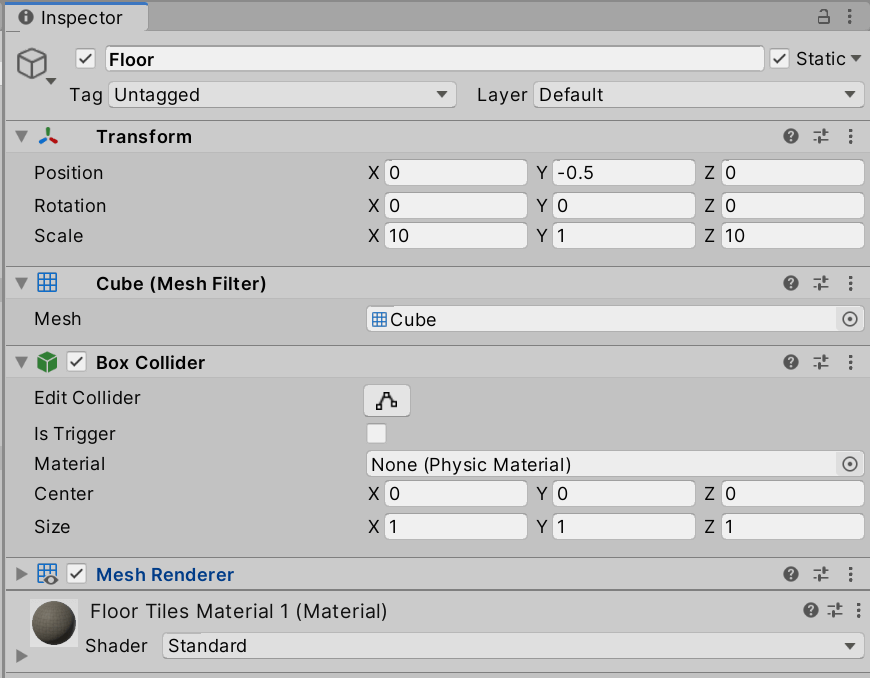
This is important as the character will fall down until it reaches an object with a collider. This confused me at times as the character disappeared through the ground almost before I saw it. It was not until I noticed the Y value of the character decreasing that I understood what was happening.
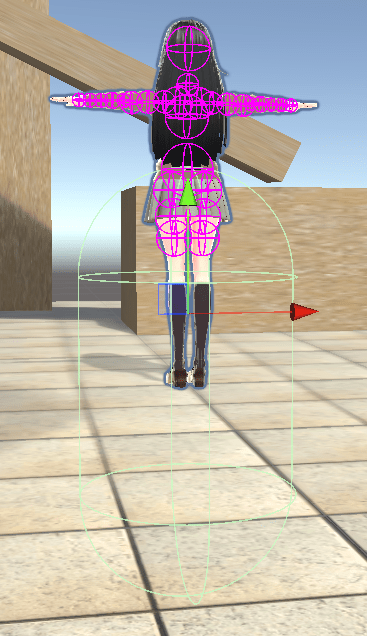
Next, add your VRoid character to the scene. Add a “Character Controller” component to the character. It will display a “capsule” shape representing the collision area. The default settings have the capture going through the floor.
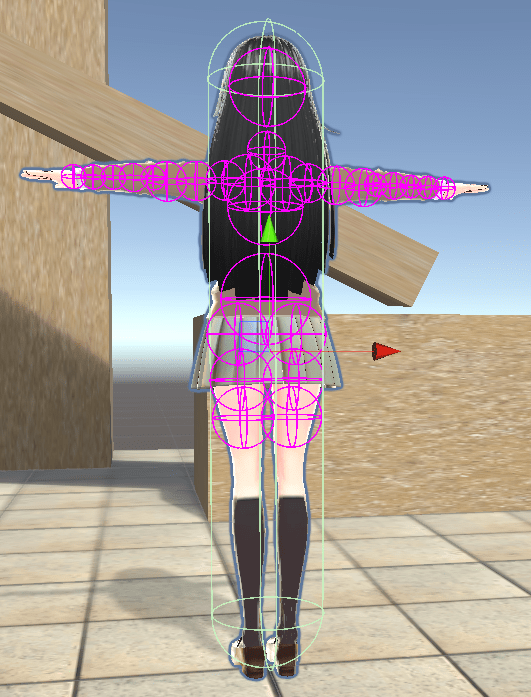
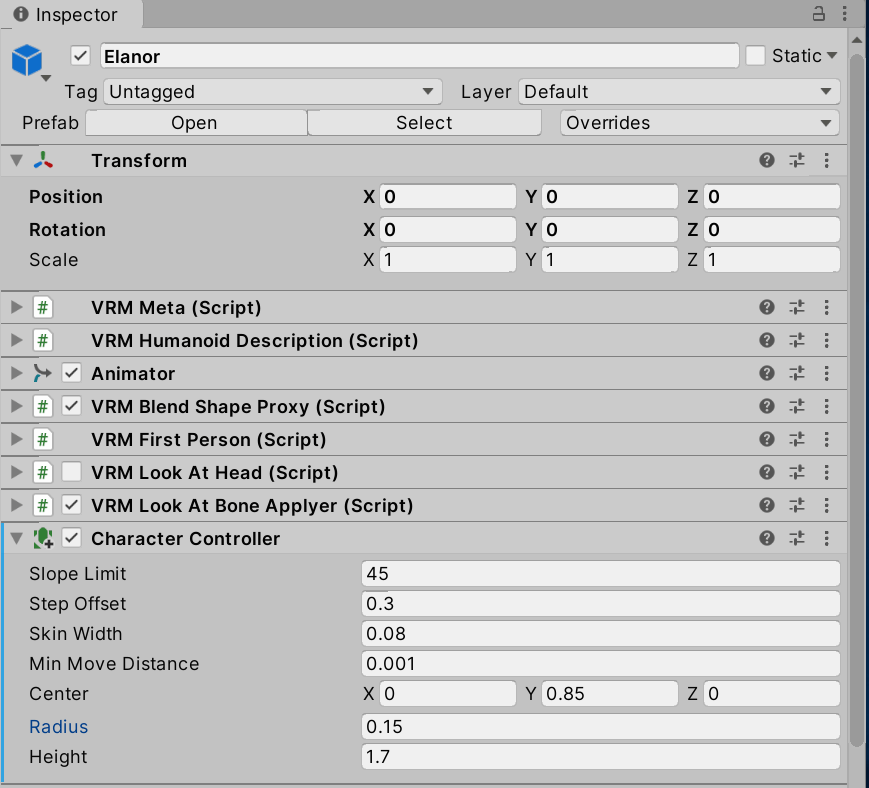
The exact values to use depend on your character dimensions (height etc). I picked 0.85 for the Y center value and a height of 1.7 (double the Y center value). The radius I set to 0.15 (a larger radius of 0.2 is probably fine too).
The final component property values:
Next add a Normal Character Motor script. This controls aspects such as the maximum speed and gravity values. You can fiddle with the settings, but the defaults are a good starting point.
The Locomotion instructions then recommend adding a “Platform Character Controller” component, so you can control the character via inputs, but as we want to animate the character using timelines and keyframes we will skip this step here.
Test the character by entering “Play” mode in Unity. (It should just stand there.) Make sure the feet are on the ground correctly.
Add an “Animation” (not “Animator”!) component to the character. Make sure the “Play Automatically” option of the “Animation” component on the character is unchecked. This component collects all the animation clips that will be used by the character.
You can search for available animation clips using the project panel search box. You can restrict the object type to “Animation Clip” to refine the results. Click on the square+triangle+circle icon next to the search box for a drop down list of asset types to search for.

The easiest way to add an animation clip to the “Animations” component is to drag it into the “Animation” property (the first one of the component). If the clip is supported, it will automatically be added to the array of “Animations” in the component. I first dragged a “Run” clip into the “Animation” property and then an “Idle” clip. Both were added to the array of animations.
If you get an error message about the animation clip being a “Legacy” clip, it means it is using properties other than the “Animator” properties, meaning it cannot be retargeted to different humanoid characters. See “Using Animation Clips for VRoid Characters in Unity” for a little more detail. For example, if you get the clip from mixamo.com, there is a particular set of steps to go through to ensure the clip can be used with VRoid characters.
Add the “Leg Controller” script component to the character (located at Assets > Locomotion System > LegController). It must be on the same game object that has the Animation component. Set the Ground Height property to zero. Drag the Idle animation clip you added to the “Animations” component into the “Grounded Pose” property.
The “Root Bone” property should be set to the root of the bone hierarchy. You don’t need to set this manually as it will correctly work it out if not set (by looking for the bone about the leg hip bond.)
Expand out the bone structure of the character.

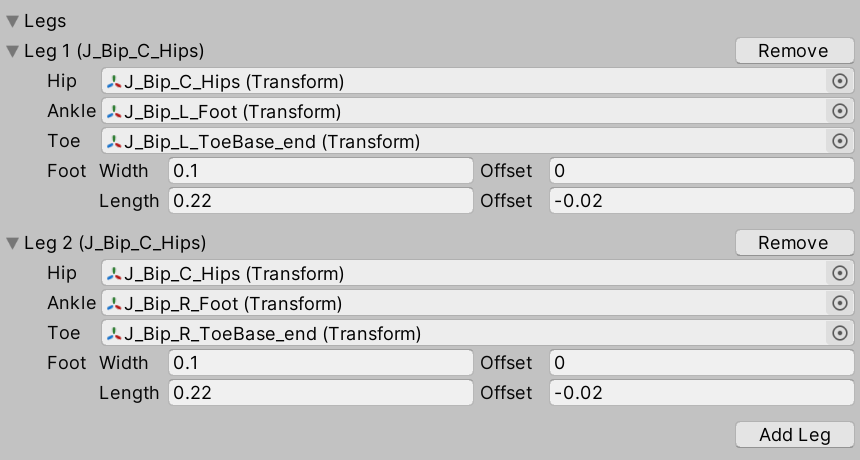
Expand the “Legs” section and click “Add Leg”. Drag the left leg hip, foot, and ToeBase_end bones into the Hip, Ankle, and Bone properties for the first leg. Adjust the foot width to 0.1, length to 0.22, and offset (for the length) to -0.02. A green rectangle should appear on the ground around the foot, verifying the dimensions are correct. Click “Add Leg” a second time and repeat for the right leg.
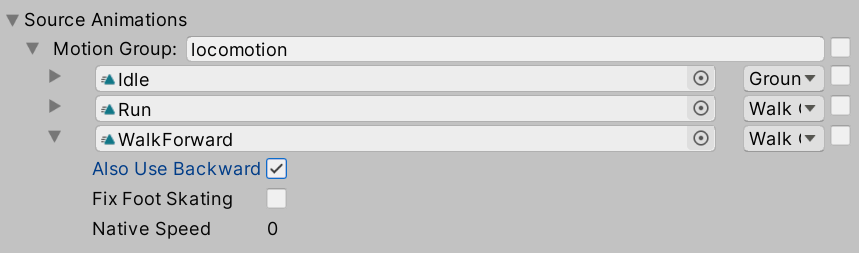
Next we need to tell the Leg Controller which animation clips related to movements that the Locomotion component cares about. This is includes standing idle, walking, and running. Expand the “Source Animations” property of the Leg Controller component. Tick the checkbox next to idle, walk, and run animation clips. Select “New Group” in the “Move Selected To” drop down. Change the group name for the new group to “locomotion”. Change the drop down next to the Idle animation clip from “walk” to “grounded”. Expand the walk script and check the “Also Use Backward” box.
Finally (!!), click the “Initialize” button at the bottom of the component.
And this is where I got stuck.
Sounded Great, so What’s the Problem?
Animation clips, if not designed for the VRoid Studio bone structure, must use the Avatar model to work. For example, the animation clips in the Locomotion package work with the supplied “Hero” character, but do not work with VRoid characters. See this previous blog on how I opened up the FBX file and set the mode to Humanoid for the animation clip. After that I could use the clips with VRoid characters as well. Without that, loading up the clip caused lots of console errors about bones not being found.
However once adjusted, the Locomotion package no longer seems to work with the animation clip. I believe this is because the animation clips are adjusted to use Avatar “muscles”, rather than manipulating the underlying “bones”. The Locomotion package however applies adjustments to the transforms on the bone joints. The two approaches just don’t work together. After converting an animation clip, the Locomotion package moves the character around without animation. I can use the original animation clip on the old character successfully, but as soon as I convert it to Avatar muscles, the Locomotion package seems to no longer understand it.
I have spent days trying to make it work and failed so far. So I plan to pause this work and come back to it later. I posted in the forums asking for help – we will see if any news comes back.
Locomotion Scripts
There are however some useful parts to the Locomotion package that I may use. For example, there is a “Normal Character Motion” script and “Follower” script. These will move the character to a target, turning the character to look at the target etc. It does this taking into account maximum velocity of movements, so it looks a bit more natural. It also takes into account collider objects. The only problem is animation clips do not play (yet!).
The Normal Character Motion script has a number of settings you can experiment with to adjust limits. So far the defaults seem to be reasonable.
The Follower script has a “target” property. I set this to a Dolly Cart which I then animate to move along a path. This then controls where the character moves.
The only problem I have hit with this is if I then try to apply an animation clip to the character, it takes over the positioning of the character in the scene. The Follower does not work. The workaround I am using is to put characters in an enclosing GameObject that I then add the Normal Character Motion and Follower scripts to. I then put the animation clip on the nested character (with root motion turned off). In Play mode, this correctly moves the character. I then manually tweak the speed of Dolly Cart movement and the speed of the animation clip (there is a Speed Multiplier property in the clip). I need to explore more, but it works.
Conclusions
I have not yet reached the end of my Locomotion exploration. The Locomotion package looks appealing, but I am not sure I can get it to work with Avatar based animation clips. Also while I like the Follow approach in general, there are issues with it. I may revert to the more standard animation controller approach where you point a character in a direction, set the speed, and let animation controllers worry about which clip to play and how to blend them.
I will also add that trying more advanced approaches has crashed Unity a number of times as well, losing my work. That is annoying, and another reason to keep things simple.
