There are a wide range of approaches to achieving 3D computer animation, each with its own pros and cons. In this blog I summarize many of the common approaches, and then talk about how you may combine the different approaches into a real project. As a hobbyist, I personally to focus on free solutions that are available, even though they are often of lower quality.
Animating Objects
3D animation platforms (Unreal Engine, Unity, NVIDIA Omniverse, Blender, DAZ Studio, iCLone, Maya, … there is a long list) maintain 3D position, rotation, and scale of objects. If animating a bouncing ball for example, the simplest form of animation is to have a curve showing the path of the ball as it bounces along the ground. Better however is to introduce some squish and stretch for the ball — when it hits the ground, it squishes flat, when it rises into the air again it stretches taller.

To achieve this with animation, you would change the position of a sphere over time, and you would also change the height and width scale factors so it looks shorter/taller at the appropriate times.
This changing of numeric values over time is the basis of animation. A bouncing ball would normally animate the position and scale values of the 3D object. It may also animate the rotation if the ball had a textured pattern.
Animating Characters
To animate a character, the normal way is to have a skeleton representing the bones of a character, inside a mesh representing the flesh and skin of the character. Each bone is attached to a parent bone, with the hips being the root of the character. Each bone maintains a rotation offset relative to the parent bone. So to move an arm, you rotate one bone joint at the shoulder, another bone joint at the elbow, and another at the wrist. The mesh then uses “weight painting” to associate parts of the mesh with bones, so when the bones move, the mesh near it moves.
Here is an example of posing a character in VRoid Studio, free software for creating anime styled characters.
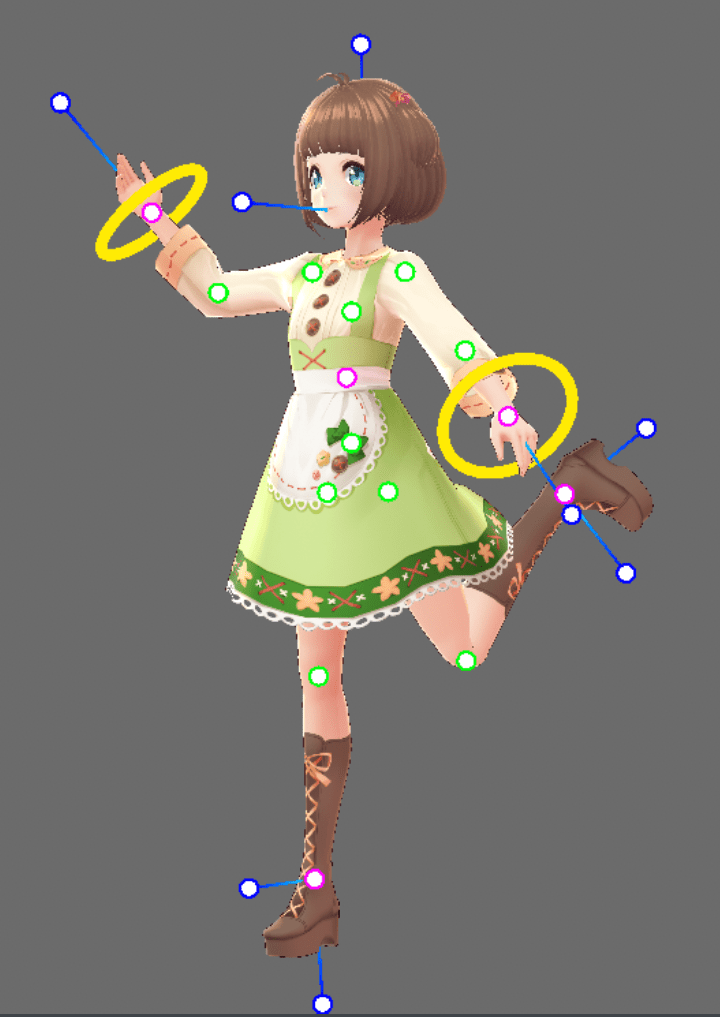
This means animating a character to walk can involve changing the rotation and position of many joints all at the same time. If you animate fingers, you have more than 15 joints to worry about in each hand. It can take a lot of time to do.
To reduce the effort for animators, there is a technique called Inverse Kinematics. The idea is you just move say the wrist of an arm, and computer works out how to move all the other joints to achieve that position for you. This reduces the animation effort and is useful if you want your character to hold a door handle for example. Getting all the bone rotations just right can be hard, so let the computer do the mathematics for you.
An animation clip for a character captures the rotations of various bone rotations or IK positions for a character over time, so the bones move when you play through the clip.
Retargeting Animation Clips
Once you create an animation clip, you may want to reuse it on multiple characters. For example, a walk cycle you may want to reuse on lots of people. This is where the concept of retargeting comes in. There is no mandatory standard for creating bone names when you create a character model, but the actual bones are modeled on humans – so you typically have upper and lower arms, upper and lower legs, and so on. This makes it feasible to map an animation clip designed for one character onto another. This process is called retargeting.
For example, in Unity, there is a built in concept of “Humanoid clips” where the animation clip is expressed in terms of human bone names. A character can then have an “avatar description” which maps bones in a character to the humanoid concepts. This makes it easy to apply a humanoid animation clip to any character model with an avatar description.
Retargeting is useful, but not perfect. For example, an animation clip designed for a normal character may not work well on The Hulk due to the difference in dimensions.
Animation clip libraries
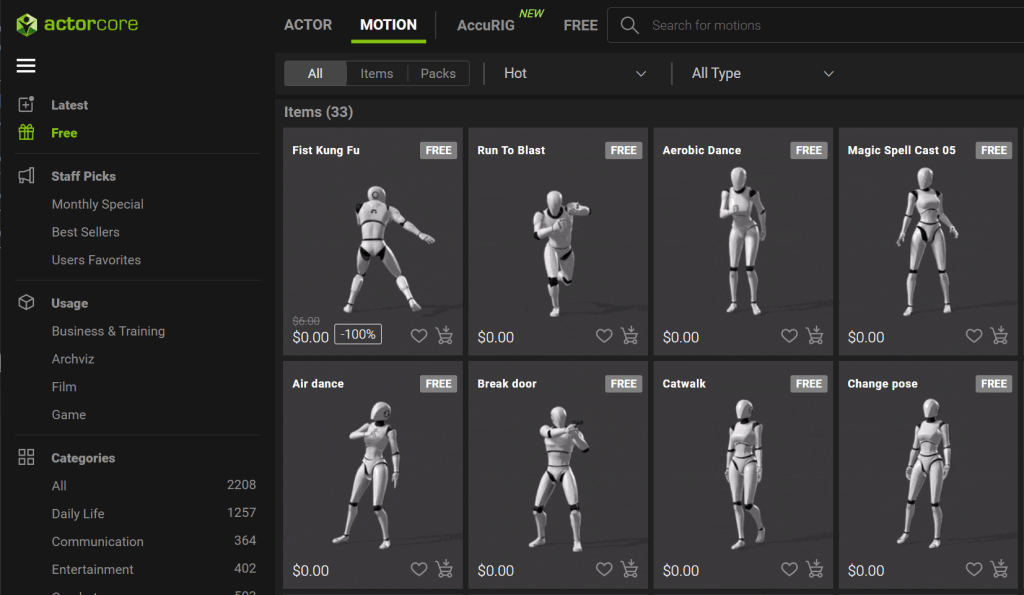
There are lots of free animation clips available for use. There are free sites such as Adobe mixamo.com, but many marketplaces for different platforms have a few free animation clips along with paid ones. For example, the Unity Asset Store has some animation clips, as well as ActorCore from Reallusion. These animation clips have the benefit of being of generally high quality.
Keyframe Animation
Playing an animation clip involves changing the rotation of joints per updated screen frame. Films frequently use a framerate of 24 frames per second (the picture on the screen changes 24 times per second, which is so fast the human eye takes it as smooth motion). High end computer games often have higher frame rates. For an animation clip, you can update the bone rotations by hand for each frame, which means recording 24 values for every bone to get 1 second of animation.
Keyframing reduces the effort. Instead of providing values for every frame, you record values for some frames then let the computer estimate the intermediate values. You can often control the shape of the curve using handles. For example, standing to run to standing again would ease in (start slow and speed up) at the start and ease out (go from fast to slow) at the end. A bouncing ball dropped from a hand would start slow then speed up as it heads towards the ground, then when it bounces the direction suddenly changes from down to up as it bounces off the ground, slowing down as it reaches the top of the bounce. Changing the curve makes such motions faster to create.
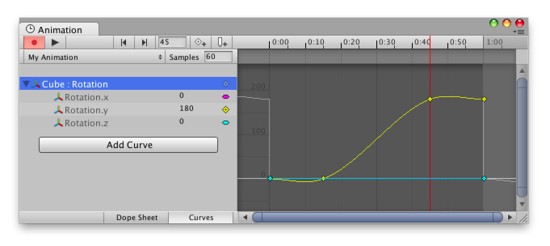
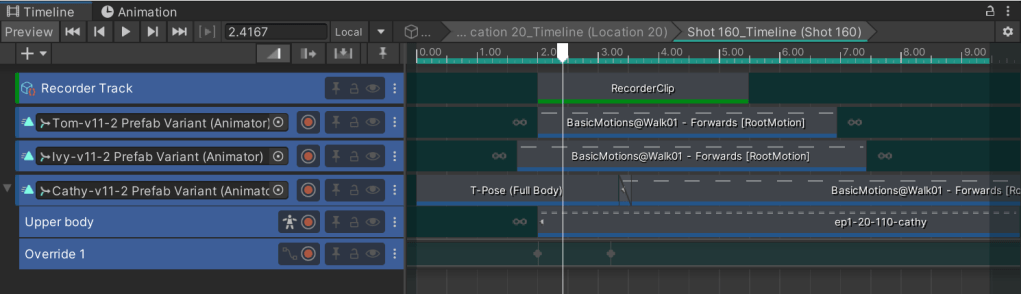
The following is an example of a animation timeline in Unity. Note the dots on the yellow line – these are keyframed points. The values between the dots are computed by Unity according to the shape of the curve. If you click on a keyframe, additional handles appear to allow you to adjust the shape of the curve.
With character animations, things are going a step further with the introduction of AI. By analyzing lots of movements of real people, the computer is able to not only fill in the gaps between keyframes, but it can use AI to predict the most likely position of the rest of the body given a small number of keyframed properties. This makes it much faster to create animation clips as fewer key frames need to be created for fewer parts of the body. Cascadeur and iClone both have examples of AI powered animation.
Mocap
Don’t like the idea of creating lots of keyframes? There is another approach! Record what a real human does! This approach is called “motion capture”, or mocap for short. This is what most of the big Hollywood movies do. It allows an actor to act out what they want to have happen, and the computer records that movement. There are a number of technologies available to capture movements.
- You can get the actor to wear a special suit with spots on it. A computer can then track the position of the spots using computer vision.
- There are also suits that use inertial movement, like what is in modern phones. Rokoko is an example of one such suit.
- Mocopi and SlimeVR are examples of cheaper and lower quality motion trackers for the body without needing a full suit.
- You can use a VR headset and hand controllers to track movements. Vive trackers are particularly popular for attaching to props and cameras as they provide accurate positioning. Meta, creators of the Quest VR headset, have also been doing interesting AI research to predict the movement of legs and the rest of the body just from the position and rotation of headset and hand controllers.
- VTubers (virtual YouTubers) have developed software that can track body positions using a computer webcam. The accuracy is lower quality, but easy to do on a modern computer. VSeeFace.icu is one of my favorites here, 3d.kalidoface.com is a fun site to experiment with directly from a web browser.
- There are a number of AI based services becoming popular that you feed in a video (such as recorded on a mobile phone) and they return an animation clip. Move.ai and DeepMotion.com are two example sites.
The following images shows Mocopi trackers from Sony. You attach them via straps to your head, wrists, and ankles.
Using motion capture is an effective way to reduce the complexity of capturing full body motion, although lower quality technologies can suffer from jitter that may need smoothing out and manual correction.
Procedural Animation
While animation clips record values for animated properties per frame, there are other approaches. Procedural animation is where code is used to compute values on the fly. For example, eye blinking of a character can be implemented using code. Every few seconds, the eye lid is made to close in a blink. There is no need to create an animation clip for this.
There are other forms of procedural animation, such as making a character look at (with just eyes, or eyes and head) a nominated target. The computer rotates the eyes/head towards the target, then updates the direction even if the target moves. This makes it easier to have one character walk around a scene, and another character always look at the first character. The animation of the first character can completely change and the second character will still look at it correctly.
Another example is to follow another character. This can be used to have a camera animation follow a character by tracking its position, or it can be used to make say a cup track the position of the hand of a character, so it looks like a character is holding the cup.
Procedural animation is also useful for special cases such as reaching out and hold moving objects in a scene, like the handle of a swinging door.
Facial Animation
Facial animation is similar to the rest of the body – there are a set of numeric properties that are modified over time to make the face move. For example, a mouth may open and close during talking, or the mouth may change from a smile to a frown. Sometimes this is done with special bones placed on the face, but there is another common technique referred to as blendshapes. With a blendshape, you use the same modelling software that created the mesh of the character to create alternative meshes for different facial expressions. You can then apply weights to the different meshes, allowing a smile blendshape affecting the mouth to be combined with an eye brow blendshape lowering the eyebrows, creating a sinister smile. So facial animations are useful to both convey emotions and for moving the mouth to lip-sync with an audio speech track.
There are also a number of solutions around for live recording the position of the face, similar to mocap for the rest of the body. Both Unity and Unreal Engine have built in solutions for example. This can be useful for real actors, but personally I find blendshapes more effective.
Combining Different Clips
Once we have all these different forms of animation (full body clips for movements like walking, hand poses such as pointing, facial animations, etc), how to combine them?
A few platforms (Unity, Unreal Engine, NVIDIA Omniverse, etc.) support “state machines” where a character can start say in an idle state, then change into a walking state, then into a run, etc. The state machine tries to smooth out the transitions between the different movements. This approach is particularly useful in computer games, where the position of the character is controlled by a player. The system has to cope with whatever the player asks it to do – the movements are not known in advance.
Timeline or sequencer based animations more often use animation clips chained together in a timeline/sequence. These are more like cut scenes in a game – a predetermined sequence that will be shown. This is also more often what is used for cartoon animation. A timeline may have multiple animation clips dropped onto it, ideally with blending between one clip and the next to help with transitions.
Layering animations is also very useful when using timelines. For example, you may have a walking animation clip repeating in a loop, then add facial expressions using a separate clip. I frequently use animation clips for walking from an asset store, then use simple mocap solutions to record upper body movements, then have a series of facial expression poses, and hand position poses (such as pointing) that I combine in a timeline.
How to pick which approach to use?
Given there are different approaches, which one to use when?
Motion capture can be good, although there are often errors or jitters in the collected data that needs to be cleaned up. So it’s not perfect. Keyframed animation gives great control, but can also be very time consuming. If you are doing an action movie needing perfect alignment, this may be worth the effort. If you are doing more like a sitcom, the movements may be less important (lots of people sitting around talking), meaning lower quality motion capture may be sufficient for upper body movements only. Also facial expressions may be reused a lot rather than needing more dynamic expressions.
Timing with other things
Combining animation clips can involve more than just other animation clips. You have to worry about speech for lip-sync, but also sound effects like footsteps that should align with the animation, or background music so the music and action reinforce each other. Or you may have a character throwing a fireball, combining visual effects an animations. There are other challenges too, like having a leash connecting a person and a dog moving through a scene. Both objects are moving, but the leash has to follow them both.
Moving between platforms
Another consideration is how portable are your timelines. Animation clips are reasonably portable between platforms, but timelines/sequencers are less standardized. State machines are also less standard. Even simple things like blending between clips due to overlaps and one clip overriding another are not well standardized. I am hoping this will improve over time as it is very important for a good solution to be able to combine the different systems. E.g., I frequently combine a procedural “look at” animation for the head with a full body animation clip for the rest of the body.
Conclusions
The purpose of this blog was to give an overview of commonly used animation techniques. If doing your own project, you need to think about which approaches to adopt. Personally, I use a range of approaches for different camera shots. I leverage pre-recorded animation clips from marketplaces, with overrides for facial expressions or upper body movements.
I hope this overview helps you understand the range of techniques in common use today, with an eye to picking which one is best for your own project.
