I created a scene using NVIDIA Omniverse standard assets. No movement in the trees or grass. Ideally want some wind to give the feeling of movement.
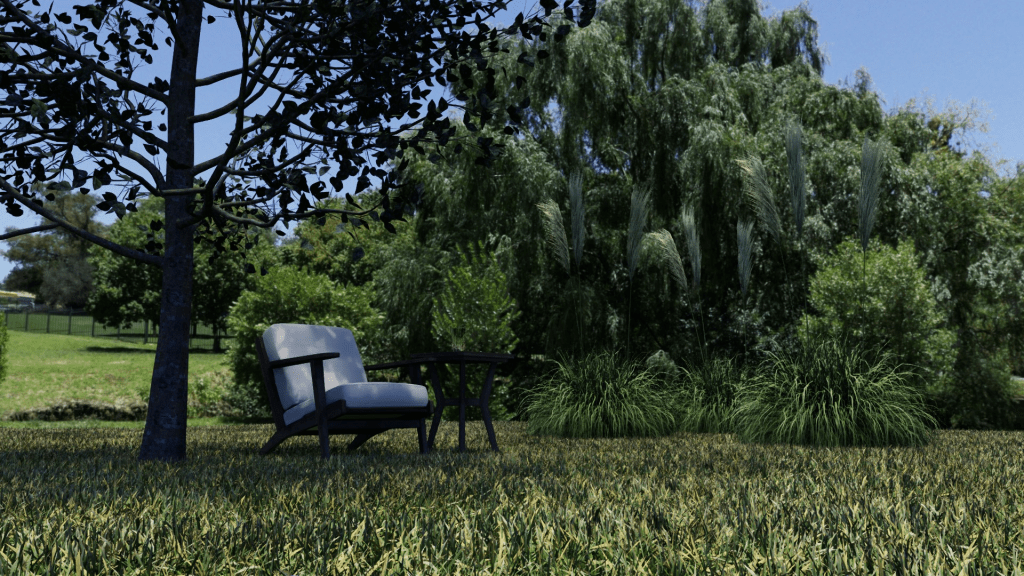
Here is the final video.
This is for the current Omniverse #StartToFinish community challenge.
My process
I wanted to animate models (trees, grass, bushes, etc) to get a bit of swaying in the wind. The models are static 3D meshes – not rigged with bones. I used assets that NVIDIA provides for free with Omniverse.
In Unity, shaders can do “vertex animation”, but I don’t think this is possible in Omniverse, so instead I created an Omniverse extension to create blend shapes for all the points in the meshes. These blend shapes move the vertexes sideways proportional to the height of the point (so the mesh at ground level does not move, but higher up it moves more). (An alternative is to try and add bones to the models, but I felt a blend shape would be easier to get right.)
To create an animated version of foliage:
- Create a new empty stage file.
- Click the “Create Skeleton” button in my extension – this creates the SkelRoot, Skeleton, and several SkelAnimation prims.
- Drag a model from the NVIDIA sample window to under the SkelRoot prim. The model meshes have to be under SkelRoot for them to be animated by the skeleton animation clips.
- Then click the “Create Blend Shapes” button. This looks at the meshes and creates blend shapes for each mesh.
- Save the file.

Then, create the scene by adding references to the above animated model USD file(s). Nothing will be moving yet (the static image at the top).
Next, add a Python behavior script file. I used one to walk the scene looking for Skeletons with my wind SkelAnimations under it. It then uses the current time to animate movements of the meshes. I added in the coordinates of each object so things do not sway in perfect unison.
I then created a SkelAnimation for animating the blend shape weights. I created blend shapes for the different compass directions, then adjust the weights based on sin/cos of the wind direction.
I tried to create an animation graph and action graph to control the blend shapes, but I ended up finding it easier to create a single Python script that scans the stage looking for Skeleton prims with my wind animation clip under it. It then changes the animation object to adjust the weights to make things move. (There might be a better approach, but this is what I managed to get working.) Create an empty prim and right click and “Add > Python Scripting” and select the file holding the following.
from omni.kit.scripting import BehaviorScript
from pxr import Usd, Sdf, Gf, UsdGeom, UsdSkel
import math

class WindBehaviorScript(BehaviorScript):

    def on_init(self):
        self.skel_anims = []

    # Find all the skeletons of models worth animating.
    def on_play(self):
        self.skel_anims = []
        for prim in self.stage.Traverse():
            if UsdSkel.Skeleton(prim):
                anim = prim.GetChild("defaultWindAnimation")
                if anim:
                    p = prim.GetParent()
                    while p and not UsdGeom.Xform(p):
                        p = p.GetParent()
                    if p:
                        attr = UsdSkel.Animation(anim).GetBlendShapeWeightsAttr()
                        self.skel_anims.append((attr, UsdGeom.Xform(p)))

    # Called per tick - adjust the blend shape weights.
    def on_update(self, current_time: float, delta_time: float):
        for (attr, xform) in self.skel_anims:
            world_transform: Gf.Matrix4d = xform.ComputeLocalToWorldTransform(current_time)
            translation: Gf.Vec3d = world_transform.ExtractTranslation()
            direction = current_time / 48
            strength = math.sin(current_time / 100 + translation[0] + translation[2] * 4 )
            dx = math.cos(direction) * strength
            dy = math.sin(direction) * strength
            self.set_animation(attr, dx, dy)

    def set_animation(self, anim_attr, dx, dy):
        if dx >= 0:
            east = dx
            west = 0
        else:
            east = 0
            west = -dx
        if dy >= 0:
            south = dy
            north = 0
        else:
            south = 0
            north = -dy
        anim_attr.Set([east, west, south, north])
Remaining Challenges
I tried animating so the height changes a little as it sways, but it was not very smooth so there was a noticeable jump as the object swayed past the mid-point. If I don’t find a solution, I will probably keep only two blendshapes as you can use a negative weight (+east is the same as -west).
I am not sure there is a better way to animate the blend shapes. I need a bit more research.
I want to extend the approach for more severe weather conditions. But this will do for now as it proves that it possible to achieve.
I plan to improve the scripts over time.
Painful Experiences
One annoyance was Python behavior scripts if they have errors can result in needing to restart Omniverse USD Composer for it to pick up the changed files on the file system. This slowed down development.
Creating the skeleton animations and blend shapes require me to exit and restart USD Composer, or else it will probably crash (or at least not work). This may be a bug I have, but I don’t know what it is. This wasted a bit of time until I realized I had a workaround of restarting Omniverse.
Applying blend shapes slows down the render quite a bit. There may be a faster way to apply blend shapes.
