I am working on a project where I want to manipulate Skeletal Animation clips (for 3D computer animation) in JavaScript, then export to USD. Depressingly it’s not that hard. Why depressingly? Because I spent a LONG time working out what turns out to be pretty simple code. Luckily I am not BITTER about that at all. So this blog introduces skeletal animation briefly, then how I used Three.js to load in various file formats and convert them to OpenUSD.
File Formats
First some key file formats.
FBX is and old and commonly used file format that can hold models and animation clips. In this post I am mainly interested in the animation clips.
glTF is a more modern format, designed for delivery of 3D assets on the web. There are a few good JavaScript libraries. I am personally using three.js, although Babylon is also popular. glTF encodes data in JSON, making it easy to manipulate in JavaScript in a browser.
GLB is binary form of glTF that makes it more efficient and better able to contain textures (image files), so you can deliver all of the content for a character model in a single download. (You don’t want to send image files encoded in JSON if you can avoid it.)
USD (now called OpenUSD) is a scene description language originally from Pixar that is becoming popular for 3D content. USDA is a textual encoding of content and USDC is a more efficient binary encoding. USDZ, championed by Apple, is USD in a ZIP file allowing a set of files including textures to be delivered in a single download.
I use three.js to read from FBX, GLB, and USDZ files. For now I am writing out USDA files (using my own code) because it is easier to debug.
Skeletal Animation
The cornerstone of 3D animation recording values for properties in “key frames”. You could record an initial position for a model such as a car at time zero, then a final position for a car 10 seconds later, and using interpolation between these two keyframes make the car move from the original position to its final position, rendered frame by frame. To the animation engine, it is just changing the value of numeric properties (the X, Y, and Z coordinates of the car model). It does not care if that property is position, scale, rotation, color, transparency, etc. So to make the wheels of the car rotate, you may also define keyframes for wheel rotation starting at 0 degrees and ending up at 360 after one second (or 3600 degrees after 10 seconds).
For a character that we want to make walk or sit down, what we visually see is a “mesh” that is typically made up of lots of small triangles.

Textures (image files) are then stretched and rotated to cover those triangles.

Clever techniques (normals) are used to smooth over surfaces. Without this smoothing you can see edges between the meshes.

To make an arm move, you have to move the vertices of all the triangles in the mesh that forms the arm. Animating each vertex gives great control over the flow of a mesh, which can be useful for a scarf blowing in the wind, but generally it is too tedious to animate, so bone/joint-based skeletons were introduced.
In skeletal animation you define a series of bones and their influence on vertices in the mesh. For example, the upper leg bone will influence the upper leg mesh vertices. Near joints, like a knee, it is common for a vertex to be influenced by multiple nearby bones so you get smoother movements near joints.
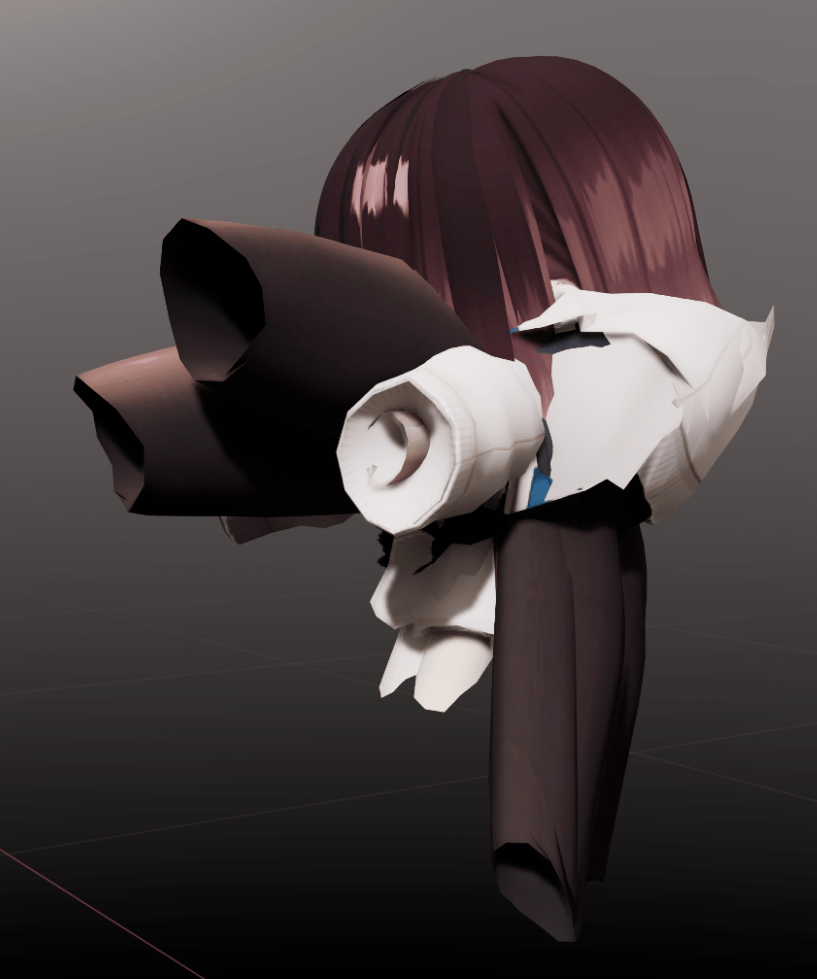
The following shows bones inside the mesh for arms and legs, but also includes bones in the hair to help with hair physics. (Bones are not restricted to human body bones.)

Skeletal animation then is responsible for moving bones, leaving the responsibility of adjusting the mesh to other parts of the rendering engine. You may have tens to hundreds of bones to animate, instead of thousands to tens of thousands of mesh vertices. (Why so many bones? Your arms and legs only need a few upper and lower bones, but once you get into hands there are many smaller bones to give full control over all your fingers.)

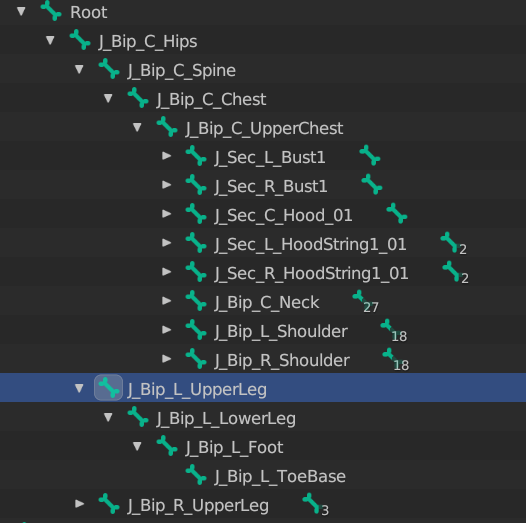
It is common for characters to share a very similar bone structure for human bones, but there can be a lot of difference for hair and cloth bones. In this blog I focus on the core human bones (hips, spine, arms, legs, neck, fingers) – the bones of a human skeleton that impact the movement of a character.
A skeleton animation clip defines the rotation, position, and scale of bones of a character. To get smooth natural movements, it is common to record many key frames per second (frequently one per rendered frame).
Skeleton Hierarchies: World Space and Local Space
Bones in a skeleton are normally organized into a hierarchy. The normal convention is to start from a “root” bone, with a single “hips” child. The root bone can be used to move the overall character (e.g. if walking). From the hips, it is common to have several bones for the spine that goes up and branches out into the neck/head and left/right arms, then two legs that go down to the feet.
The idea is if you move an upper leg, everything under it also moves automatically without you having to manually update the position of everything. For example, rotating the upper leg moves the lower leg as well, as the lower leg is a child of the upper leg in the skeleton hierarchy.

Local space is where the rotation, position, and scale of a bone is recorded relative to its parent bone. This is how animation clips are normally recorded. Rotating the upper leg above did not change the local space rotation of the lower leg.
World space is the rotation, position, and scale of the bone in the scene. To compute the world space coordinate of a bone for example, you need to combine the values of all the ancestor bones up to the root of the skeleton. The rendering engine wants to know the final world position of mesh vertices so it knows how to render an animated character. For example, the world space rotation and position of the lower leg did change when the parent bone rotated (even though its local space rotation did not change).
The math to do this is not too hard. A 4×4 matrix is often used (including by three.js) to capture rotation, position, and scale in a single data structure. You then do matrix operations to compute the final world position of each vertex in a mesh. When using three.js, bones have .matrix and .matrixWorld properties that hold the local and world space transformation matrix for each bone – the math is all done for you.
Retargeting Animation Clips
One of the benefits of recording animations as bone rotation, position, and scale values is you can frequently take an animation clip for one character and apply it to a different character of similar proportions. It is not guaranteed to come out right, but it works pretty often.
Here is an example of the mixamo.com “Sitting Talking” animation clip, retargeted to my own character. Notice where the two arms cross. In my character, the arms overlap too much and the shoulders are a bit too close together.

The mixamo.com site is pretty nice however as it allows you to upload your own model then gives you a bit more control to tweak a few settings like “Character Arm-Space”, which allowed me to improve the hand positions. See the position of the two hands in the adjusted clip.

So retargeting is easy, right? Well, not quite. There are a few remaining problems:
- There is no standard for bone names. Mixamo has its own conventions for bone names (e.g. hips), but I use characters created by VRoid Studio which uses quite different bone names (e.g., J_Bip_C_Hips).
- The overall bone hierarchies for different characters are pretty similar as they mimic the human skeleton, but there is not a strict standard. For example, different characters generally have upper and lower arm bones, but they may use a different number of bones for the spine.
- Transformations are relative to the “bind pose” of a character (typically a T-pose), so you need to map from the bind pose of the character an animation clip was created for to the bind pose of the destination character you are retargeting the clip to.
For the last point, the way you combine matrices is to multiply them. If you want to undo a change, multiply by the inverse of the matrix. So, for example, to change the rotations for a bone (once you have the source and destination bone names worked out), you multiply the source rotation by the inverse of the source bind pose (in world space), then multiply by the destination bind pose rotation, then use that to multiply to the animated rotation.
offset_transform = inverse(source_bind_pose_world_matrix)
    * target_bind_pose_world_matrix

retargeted_rotation = offset_transform * original_rotation
Just remember that the order of matrix multiplication matters!
Bind and Rest Poses
In USD, when you define the skeleton for a character, you also define restTransforms and bindTransforms properties to hold the character’s default pose (typically a T-pose). While these two properties can be different, it appears that the correct thing to do is set the restTransforms property to the local space transform for the joint (a combination of rotation, translation, and scale, encoded into a single 4×4 matrix), then set the bindTransforms property to the world space transform for the joint. The bindTransforms property is important for retargeting animation clips.
The following is a snippet of a skeleton of a character model.
#usda 1.0(
  defaultPrim = "Character"
  metersPerUnit = 0.01
  upAxis = "Y"
)

def Xform "Character"
{
  ...
  def SkelRoot "SkelRoot" (
    prepend apiSchemas = ["SkelBindingAPI"]
  )
  {
    ...
    def Skeleton "Skeleton" (
      prepend apiSchemas = ["SkelBindingAPI"]
    )
    {
      uniform token[] joints = [
        "Root",
        "Root/Hips",
        "Root/Hips/Spine",
        ...
      ]
      uniform matrix4d[] bindTransforms = [
        ( (1, 0, 0, 0),
          (0, 1, 0, 0),
          (0, 0, 1, 0),
          (0, 0, 0, 1) ),
        ( (1, 0, 0, 0),
          (0, 0.992087, 0.125547, 0),
          (0, -0.125547, 0.9920875, 0),
          (0, 0.895375, 0.00436706, 1) ),
        ( (1, 0, 0, 0),
          (0, 0.9885497, 0.15089568, 0),
          (0, -0.150895, 0.98854973, 0),
          (0, 0.9513533, 0.01681907, 1) ),
        ...
      uniform matrix4d[] restTransforms = [
        ( (1, 0, 0, 0),
          (0, 1, 0, 0),
          (0, 0, 1, 0),
          (0, 0, 0, 1) ),
        ( (1, 0, 0, 0),
          (0, 0.992087, 0.1255477, 0),
          (0, -0.125547, 0.992087, 0),
          (0, 0.895375, 0.0043670, 1) ),
        ( (1, 0, 0, 0),
          (0, 0.999672, 0.025591, 0),
          (0, -0.025591, 0.999672, 0),
          (0, 0.057097, 0.005325, 1) ),
          ...
    }
Notice the first 4×4 matrix for “Root” is identical for the bind and rest transforms because the parent of the root of the hierarchy is always the identity matrix. The second matrix for “Root/Hips” is also the same because the “Root” rest transform was an explicit identity matrix. The third matrix for “Root/Hips/Spine” is different because the bind world space matrix is equal to the multiplication of all of the three local space rest matrices in the hierarchy path (the “Root”, “Root/Hips”, and “Root/Hips/Spine” matrices). So the world space bind matrices can be computed by multiplying the local space rest matrices for the bones listed in the joint path.
Exporting Animation Clips in USD
In my case, after retargeting, I want to export animation clips as USD. In particular, I was trying to render the animation using NVIDIA Omniverse. This is where I got stuck for an embarrassing amount of time. My retargeted animation clip worked perfectly in three.js, but I assumed I was getting the rotation calculations wrong when I exported to USD.
It turned out the rotations were fine – it was the transforms that were incorrect. What happened in the above is all the bones had position starting from the hips. That is, the upper leg, lower leg, feet, spine, neck, upper arm, lower arm, and so forth were all positioned at an offset of 0,0,0 from the hips. Once that was fixed, everything started working.
So what went wrong?
Three.js (and glTF/GLB in general) composes an animation clip from a series of animation tracks. For each bone you wish to rotate or change position, you create a new track. If you do not want to change the value, then don’t create a track for that property. Each track can specify keyframes at different time points, as desired. It is common for an animation clip to adjust the position of the character’s root bone if the character is walking, or perhaps the hips if the character is sitting, then all the other animation tracks are for bone rotations. (Scaling is typically not animated.)
The encoding of USD skeleton animation clips are however different. Instead of an independent track per property to be animated, a SkelAnimation specifies the list of bone name hierarchy paths (USD calls them joints) that are animated. It is then required to specify rotation, position, and scale for every joint. So if you want to rotate a joint, you have to also specify the position and scale as well.
The following example includes a key frame for each time code (0, 1, 2, 3, etc.) where each time code represents 1/24th of a second, a common frame rate for films. The bone names are from VRoid Studio characters with “J_Bip_C_” prefixes removed from bone names for brevity.
#usda 1.0
(
  defaultPrim = "Animation"
  framesPerSecond = 24
  timeCodesPerSecond = 24
  metersPerUnit = 0.01
  upAxis = "Y"
)

def SkelAnimation "Animation" (
  prepend apiSchemas = ["AnimationSkelBindingAPI"]
)
{
  uniform token[] joints = [
    "Root/Hips/Spine/Chest/UpperChest/Neck/Head",
    "Root/Hips/Spine/Chest/UpperChest/Neck",
    "Root/Hips/Spine/Chest/UpperChest"
  ]
  quatf[] rotations.timeSamples = {
    0: [ (0.9556, 0.0306, 0.2872, -0.0569),
         (0.9633, 0.2544, 0.0850, 0.0003),
         (0.9947, -0.0928, 0.0400, -0.0145) ],
    1: [ (0.9562, 0.0320, 0.2848, -0.0589),
         (0.9632, 0.2549, 0.0845, -0.0005),
         (0.9948, -0.0925, 0.0396, -0.0148) ],
    2: [ (0.9577, 0.0325, 0.2799, -0.0569),
         (0.9634, 0.2548, 0.0829, -0.0001),
         (0.9948, -0.0926, 0.0389, -0.0144) ],
    3: [ (0.9612, 0.0292, 0.2681, -0.0569),
         (0.9640, 0.2536, 0.0795, -0.0004),
         (0.9948, -0.0933, 0.0372, -0.0139) ],
    ...
  }
  half3[] scales.timeSamples = {
    0: [(1, 1, 1), (1, 1, 1), (1, 1, 1)],
    1: [(1, 1, 1), (1, 1, 1), (1, 1, 1)],
    2: [(1, 1, 1), (1, 1, 1), (1, 1, 1)],
    3: [(1, 1, 1), (1, 1, 1), (1, 1, 1)],
    ...
  }
  float3[] translations.timeSamples = {
    0: [(0, 0.0717, 0.0003), (0, 0.1245, 0.0069), (0, 0.1023, -0.0013)],
    1: [(0, 0.0717, 0.0003), (0, 0.1245, 0.0069), (0, 0.1023, -0.0013)],
    2: [(0, 0.0717, 0.0003), (0, 0.1245, 0.0069), (0, 0.1023, -0.0013)],
    3: [(0, 0.0717, 0.0003), (0, 0.1245, 0.0069), (0, 0.1023, -0.0013)],
    ...
  }
}
So what was my problem? I thought the position (and rotation) were added to the bind/rest transform, so if I do not have a value for position because there is no animation track for the position property I was inserting (0,0,0). This is not correct. Instead it should use the default restTransforms value (the local space value) as the animation overrides the default (it does not add to it). Once I made that minor adjustment, everything started working. (I am NOT going to admit how long that simple change took me to work out, even though I then remembered a phrase in the official docs making that exact statement – rest transforms should be used as the default values in animation clips.)
Conclusions
I have not completed my journey into manipulating animation clips, writing USD files from JavaScript code. But I have finally got to the stage that I am now able to create animation clips in a web app and download in a USD file, and have the character animate correctly. I was planning to write a wonderful blog post on the complex calculations required, but frankly it is pretty simple once you understand what the various values should be. What caused me delays were two problems:
- Realizing the default value for un-animated properties should be
restTransforms - Realizing that Omniverse may notice when a file is changed, but with skeletons it caches values, meaning that even if it offers to reload an animation clip file you may not see the new file contents until you re-open the stage.
The latter did not help as many experiments I tried seemed to have no apparent impact (when in fact they did – I just had to completely reload the scene to see the difference). For my use case this is going to be a little annoying. I plan to automatically write out new versions of animation clips in my web app. Omniverse will pop up “want to fetch a modified file?” (which is great), but the user will not be shown the new animation clip. So I left a note on the forums in the hope it will get fixed. (My alternative is to try and connect to a local Nucleus server, but with the extra challenge of web browser security models trying to stop malicious JavaScript from accessing the user’s local network.)
For further reading on skeletons and animation in USD, check out OpenUSD.org.

Thanks very much for your post on this topic. Very informative! I’m working on some animation retargeting code myself, so I’d be very interested in any of the “simple” calculation code that you’d be willing to share.
LikeLike
I posted a version on a three.js forum a while back – for GLB models. I don’t have any OpenUSD / Python code. See “Fixing SkelUtils retarget() and retargetClip() functions” https://discourse.threejs.org/t/fixing-skeletonutils-retarget-and-retargetclip-functions/65149/7
LikeLike
Thanks very much! I’ll take a look.
LikeLike
Great, thanks! I’ll take a look.
LikeLike