A personal side project is converting textual descriptions of camera positioning (for filmmaking) to a machine readable form. Screenplays normally do not include camera directions (that is left for the Director to do on set), but I am interested in creating 3D animations from just a screenplay and want to give the writer control over camera shots. So my goal is to allow the writer to create both a screenplay and shooting directions (aka a shot list) to go with the screenplay. I was curious to see how off-the-shelf Large Language Models (LLMs) would perform, converting potentially ambiguous English into a nice, consistent, machine readable format.
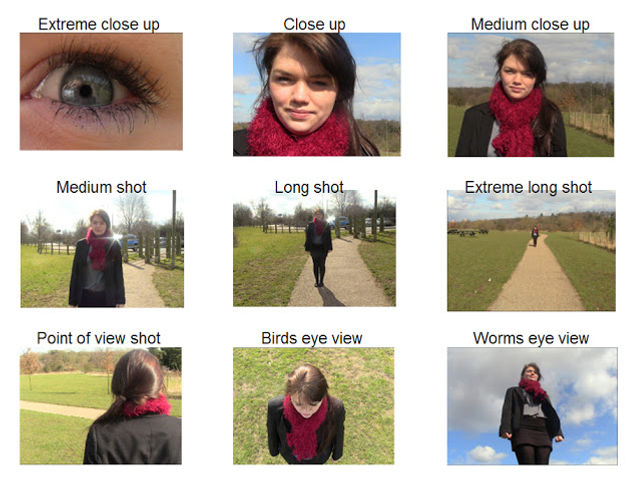
Sample camera shots from walkingstickpresentations.com.
I was doing this partly to try out NVIDIA TensorRT. They have a competition on at the moment with prizes including passes to GTC, but I ran out of time so I decided to post this as a blog post instead.

More generally, the question I am trying to answer is how effective can it be to convert arbitrary English task descriptions into consistent machine readable instructions using AI.
I have done this on a previous project using textual descriptions to query relational databases (text to SQL) and then graph the results on a chart (text to chart options). Using multiple passes of ChatGPT requests, I managed to get good results. But there are large numbers of resources on the internet talking about how to write SQL queries. Is it as effective for other domains?
So I grabbed a copy of NVIDIA TensorRT, tried the Facebook Llama 7B model and Mistral‘s 7B model on my desktop and ChatGPT (online). I also added Google Gemma to my list last minute, directly on HuggingFace as I had some authorization issues when trying to download the model. I then started trying simple prompt engineering to see how far I could get.

Is comparing Llama 7B to ChatGPT? Not really! For example, there is a 65B model for Llama that would probably do better. I was partly curious to see if a smaller model would work running completely on my desktop.
Prompt Engineering
Prompt Engineering is tweaking the text of a request to guide the LLM to generate the output you want from input. In this case, I take a base prompt then append the shot description on the end, asking it to generate a simple to parse output format.
Here was my first attempt at a prompt.
Behave like an expert cinematographer. Convert the camera movement below into a set of instructions in a consistent format as follows:
– Output “Subject:” followed by a character’s name (“Hank”, “Sam”, or “Patchy”) identifying the object the camera is looking at. A comma separate list of names can be provided.
– Output “Height:” followed by the position of the identified body part. For example, “hands”, “eyes”, or “feet” for different parts of the character.
– Output “From:” followed by a position offset relative to a character. For example, “front”, “behind-left-shoulder”, “above”, “left”.
– Output “Distance:” followed by a distance in meters the camera should be from the character.
Camera instructions: Frontal close up of Hank
I then fed it a few shot descriptions to see how well it would fair.
“Frontal close up of Hank”
Llama generated the following output. It got name/value pair structure generally correct. But “Left Shoulder”? That is for an “Over The Shoulder” (OTS) camera shot, not a close up. (This can be improved with prompt tweaking – I could tell it to use “front” by default for close up shots.)
Subject: Hank
Height: Eyes
From: Left shoulder
Distance: 0.5 meters
Next, Mistral. It got from the front with a focus on the eyes better than Llama.
Subject: Hank
Height: Eyes
From: Front
Distance: 0.5
My first attempt with Gemma did not go so well.
Left profile of Hank, mid shot
from behind-left-shoulder, 1.5 meters
Right profile of Sam,
So I adjusted the prompt to include a bit more of a hint as to the output format that I wanted. Specifically, I added the following to the end of the prompt.
Camera instructions: Frontal close up of Hank
Output
“`
Subject:
That is, I gave it the start of the output (“Subject:”) so it knew what I was expecting to come next. This gave it enough of a hint to get it right.
Subject: Hank
Height: eyes
From: front
Distance: 1.1
Finally, ChatGPT. It is interesting as for distance it said “closeup” rather than a distance in meters as instructed. In reality, this is a better approach as physical distance does not guarantee how much is in the shot as then lens also impacts what is in the shot.
Subject: Hank
Height: eyes
From: front
Distance: Closeup
“Left profile of Hank, mid shot”
Llama got the angle wrong. It said the shot was from the front instead of from the left side for a profile shot.
Subject: Hank
Height: Eyes
From: Front
Distance: 2 meters
Mistral decided to include more information about the subject, which is really framing information for the shot. It may be correct, but not good for a machine readable format.
Subject: Hank, left side, head height
Height: eyes
From: behind-left-shoulder
Distance: 2 meters
Gemma was not too bad, but it is not a side profile shot.
Subject: Hank
Height: eyes
From: behind-left-shoulder
Distance: 1.5
ChatGPT: Again, distance was a subjective description instead of a number, but it did correctly get that it was a side shot from the left. It did not pick a camera height, but knowing it is a mid-shot is enough to default an appropriate camera height.
Subject: Hank
Height: N/A
From: Left
Distance: Mid shot
Frontal mid shot of Hank and Sam
Next camera shot. Llama only identified Hank (not Sam) and talked about left shoulder instead of from the front. It also included output that was not expected.
Subject: Hank
Height: Eyes
From: Left shoulder, 0.5 meters
Distance: 2 meters
Mistral did a good job, getting all the relevant information correct.
Subject: Hank, Sam
Height: face
From: front
Distance: 2 meters
Gemma also did a good job. It specified eyes instead face compared to Mistral, but both results are acceptable.
Subject: Hank, Sam
Height: eyes
From: front
Distance: 1.1
ChatGPT did a reasonable job, but dropped that it was a frontal shot. Since I would probably default to front, this is not a serious problem.
Subject: Hank, Sam
Height: N/A
From: N/A
Distance: Mid shot
The above is a simple test for a basic prompt. Many issues would be improved by tightening up the prompt. But all of the models got creative at times. The above were a few examples, but are illustrative of the errors that snuck in with all of the models. In my longer list of test cases, all of the approaches fell short of desired accuracy, even after tweaking the prompt for some time.
So what can be done to improve the results?
Fine Tuning
When you have samples you can provide, you can include them in the prompt. This can greatly improve the quality of the results. The only challenges is the more examples you give, the longer the prompt becomes. This is where “fine tuning” can be helpful.
With fine tuning, you can teach the model “a bit more” knowledge, while retaining existing knowledge. No need to teach a new model English sentence structure or basic cinematography concepts. Just give it more knowledge about the wanted output for different shot descriptions.
So how easy is it to fine tune the different models?
- Llama and Mistral: TensorRT can help with fine tuning, but it requires 40G to 100G of GPU memory, beyond what my desktop has. I may come back one day and try training on a cloud server with a bigger GPU. (One of the claims to fame of TensorRT is it makes it easier to move models between hardware.)
- Gemma: I did not explore due to Gemma being a last minute addition to my tests. From my reading it would also need a fair bit of GPU memory to fine tune.
- ChatGPT: With ChatGPT you can upload training data. I created 20 example inputs and outputs and fine tuning took around 5 minutes to complete. I show a few results below.
What was interesting to me was a common claim is “with fine tuning you can reduce costs by shortening your prompts”. My initial thought is this meant I could fine tune a model then provide very short prompts. However digging deeper into the instructions, the recommendation appears to be to include a detailed prompt in addition to fine tuning. And the instructions (the prompt) should be included in training data samples as well.
So you still need to develop a prompt. Fine tuning is not really about shortening the prompt. Fine tuning is more about improving the response accuracy. You can provide 50+ examples for the model to learn from, and these examples won’t fit in the base prompt.
So how well does fine tuning work? It is not perfect, and I have been changing the representation of the output instructions (I am still experimenting). But the accuracy has been better, and more sophisticated.
The request “Mid shot, panning from Hank’s face to Sam’s” now outputs:
Keyframe:
Subject: Hank
Height: face
From: front
Shot: mid shot

Transition:
Easing: ease-in-out
Duration: 2 seconds

Keyframe:
Subject: Sam
Height: face
From: front
Shot: mid shot
I have not tested fine tuning with the other models yet, but I expect similar results.
Conclusions
Large Language Models (LLM) can be a useful technique to convert English descriptions into a structured form easier for computers to parse. JSON or YAML may be a better output format, but personally I have had better experience with lines of the form “name: value”. A minor JSON syntax error results in the whole response being discarded, where it is easier to recover from problems with “name: value” lines.
Prompt engineering is useful to help with text to structured representations of instructions. For well-known fields of knowledge I have had good success with only using prompts. For less common domains, fine tuning may be necessary to improve the quality of results. This means of course you have to build up a set of sample data. But if you create the prompt first, you can feed in a set of simple text, generate a set of results, then manually correct the output data. This can make it more efficient to build up a set of test data.
Oh, and am I actually going to use this? I am not sure. Another approach is when creating a set to place a set of cameras into the scene for common shots. Got a sofa? Point a few cameras at it! That may result in better quality than using the above. But it can cope with camera transitions. I may explore adding cameras to scenes with descriptions, then using AI to pick the best camera to use along with transitions between them. We shall see!
