I have previously shared two videos on YouTube on some ideas for syncing animation with a music track in Adobe Character Animator. But there as a recent post in the forums where @SharonfromMD had completed her first music video and was asking for feedback on project organization before starting her next video. @mre8 shared how he approached his videos and I think had some really interesting ideas in terms of making life a bit easier. In this blog I explore adopting his approach to a music video. If you find this blog useful, feel free to give him a “like” and “helpful” in the forums!
Step 1: Record and lock down audio
Changing the audio later can cause all sorts of ripples later, so just get the right audio file before proceeding.
Step 2: Import into Premier Pro
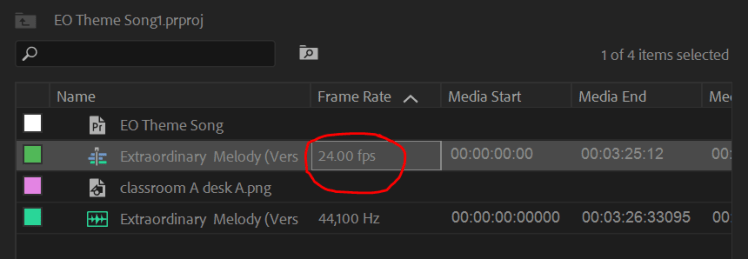
Create a project in Premier Pro, import the audio file, and create a new sequence with the correct frame rate / frames per second (fps). Character Animator now defaults to 24 fps, so I would recommend using that.
You can check the frame rate in the “project” panel.
Step 3: Go through and mark scene change points in Premier Pro
In my video I am thinking of showing the lyrics on the screen with the music, so I am going to use each line of lyrics as a potential anchor point.
You can do the lyrics display in Character Animator, but its frankly a bit of a pain. You have to create a new piece of artwork per line, then import them all as individual puppets. So instead here I am going to use the “Essential Graphics” panel in Premier Pro.

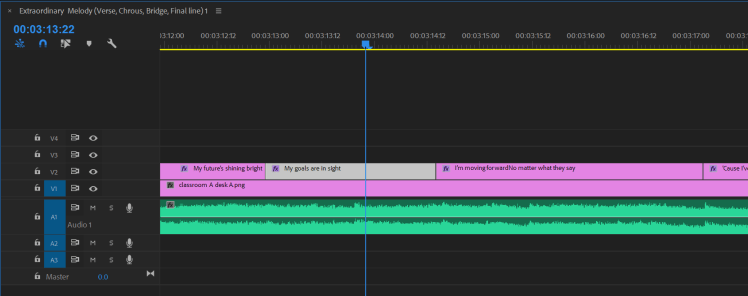
Using this, you can just use the mouse to place and move the text around the screen. I put it in the middle of the screen below, but I will probably move it to the bottom of the page in the real video.

Since I have not done the animation yet, I threw a static image onto the screen so its not just black. I fiddled with the text options to put it with a drop shadow to help make the text more readable. The resultant timeline is below. You can see the imported music audio track on the bottom (A1), the static PNG file as the base video (V1), and a series of titles above that (V2). That will make the lyrics appear in front of the image. Later I will add additional video tracks and so move the lyrics higher.
At this stage I go through the whole music track and carefully line the lyric start/ends with the audio. You can trim adjust the length of the lyrics just by dragging the end of the title clips.
Check and double check you are happy with the timings. You can change it later, but it’s easier if you don’t need to.
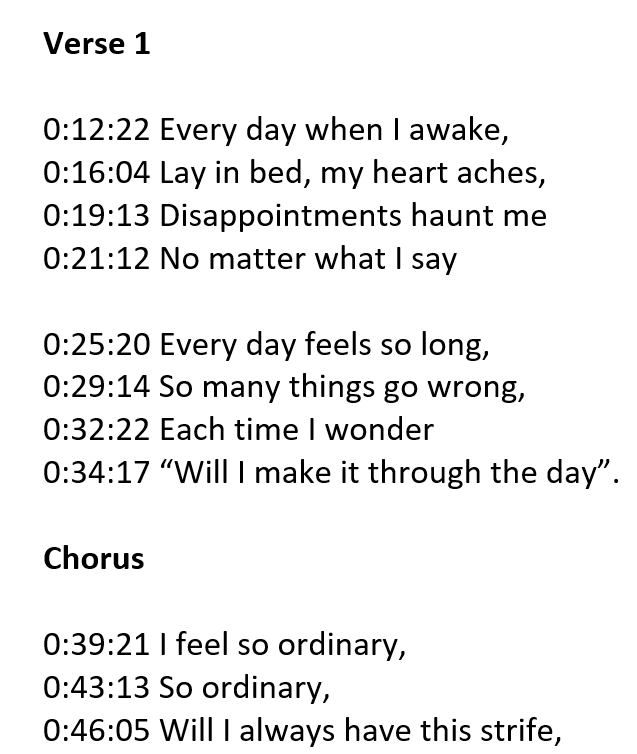
Once this is done, I took a document with the lyrics in it and added timepoints in front of each line. The timepoints are <min>:<sec>:<frame>. The frame number is 0 to 23 if using 24 fps. (You may be able to display frame numbers instead, but I could not see that option.)
To work out the time points, you can move the timeline marker (the blue line) to the appropriate points (below where the next lyric starts), using the forward/back frame buttons (marked) plus the zoom/slider control (bottom of screenshot).

We will use these same numbers over in Character Animator to get everything to line up. Modifying the length of lyrics afterwards can be a pain, so try to get everything locked down first as much as you are able.
Note: @mre8 suggested using the frame numbers rather than time points. That is, take the number of seconds (multiple the number of minutes by 60), multiply by 24, and add the frame number. This gives you the frame number.
Step 4: Create scenes in Character Animator
At this stage I know how many time marker points there are. You don’t have to create a new scene for every lyric. In Sharon’s case she had characters walking around a room for multiple lyrics, so she might go with say 5 long-ish scenes for her videos. I personally tend to have shorter scenes. This is just a question of style, not right and wrong. I plan to take the written down lyrics and time points and think about what scenes I can have to reinforce the lyrics. I may have scenes span several lines of lyrics – not sure yet. But I intend to plan it out before creating all of the scenes.
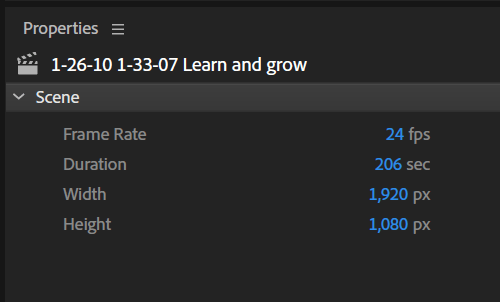
Create the first scene in a new project in Character Animator. Make sure the scene fps is set to 24. Note that Character Animator does not like colons in the scene names, so it turned them into hyphens below. This scene is going to be frames 1:26:10 through 1:33:07 (I included part of the lyric as a reminder in the scene name as well). I set the duration to the length of the full audio track. It was 3:25:12 which is 3 x 60 + 25 = 205 seconds + 12 frames (0.5 seconds). Character Animator does not show the fractions (so 206 seconds is shown below).
Step 5: Import the same audio file as in Premier Pro
Import the audio clip and drag it into the scene. (Line it up with the start of the scene.) That is, the scene has the FULL audio, not just the part wanted. Note if you zoom in, Character Animator will show the frame numbers from the start of the video.

Select the scene and use “Edit” / “Duplicate” to make copies with the audio track and length set up.
You can also add time markers (via the menu, select “Timeline” / “Add Marker”) to note where the scene starts. For 1:26:10 I scrolled to 1:26 (frame 2064) then moved forward 10 frames (to frame 2074). Repeat for the end of the scene (using “Timeline” / “Add End Marker”).
Step 6: Animate between the markers
All animation and recording should be done between the two markers. This will line up exactly with the audio in Premier Pro later. The rest of the scene should be blank (nothing present) so that will be transparent.
Note: This includes trimming the start and end time of background images and puppets so they don’t exist outside the time span.
I am planning to break @mre8’s rule here and permit myself to animate a few seconds before the scene starts. This is because some puppets have hair or hand movements that take a few frames to settle down. But everything in the scene must end precisely at the end marker. Note that I actually go over a bit in the screenshot below, but the puppet itself is trimmed correctly so it does not matter.

Step 7: Export each complete sequence
Rather than just exporting the few seconds of the scene where the animation is, export the whole scene. (You can hide/mute the audio track if you like.) Make sure you select an output format with transparency support – either “PNG Sequence” (a PNG file per frame) or my preference is to use the media encoder “QuickTime / GoPro CineForm RGB-16 with Alpha” in Adobe Media Encoder. This encoder supports transparency information in the video file. This is important.
The blank parts of the video encode pretty quickly and I suspect compress well, so its not as wasteful as it sounds.
Step 8: Import sequences into Premier Pro
Import the generated sequences into Premier Pro. Arrange them all in the timeline window with the lyrics at the top of the screen and the video files from earlier in the scene at the top. (This will hide the beginning of the next scene if any overlap.) To move the lyrics upwards to a higher track without slipping sideways, hold down the shift key while dragging.
Remove the audio tracks from the imported media (or mute the audio track before kicking off the rendering job). The end result is you will just have the original audio and movie clips per scene all exactly the same length.


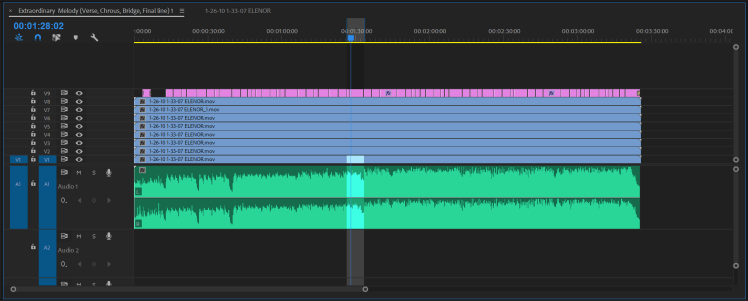
The end result is lots of layers in a Premier Pro project where you keep the original audio track, then you delete everything else. The following screen shot gives a bit of a feel of the final result (but I cheated and loaded up the same video file multiple times because I have not created the others yet!). Right clicking in the panel allows you to add extra video tracks. You can use the zoom control on the right side to adjust the zoom amount to shrink down the videos and enlarge the audio if you like.
Note: I have over 60 lines of lyrics in my video. I may end up trimming say the first half so I only need more like 30 lyrics (which if my scenes typically span two lyrics would mean 15 video files – which feels manageable).
Wrapping Up
The thing I like about the above approach is its pretty simple. Lining everything up is automatic – you just load the videos and have them all align at the start. This will automatically line up the contents. I have not tried it yet for a complete video, but it seems less error prone and fiddly. Everything should just line up.
And I can always fall back to trimming the videos in Premier Pro if it does not work out for some reason.
I have only just started animating the video, but here is the scene I used above using blends on head drags as per the previous videos. Note the swaying of the head is in time with the beat of the music.
