Anime style animation (and cartoons in general) normally use cel shading – 3D computer animation shading, but made to look more flat. So before you start on your own animation project, what shader should you use?
Historical background
In 2D animation originally cartoons were hand painted on sheets of cellophane. Each frame was hand drawn and had to use the same color as the previous frame. Gradients you could imagine were hard to achieve reliably across frames, and you need to do a lot of them! So instead, you reduce the number of colors and just change the color at a shadow line. (See How to Shade an Anime Face in Different Lighting at animeoutline.com.)
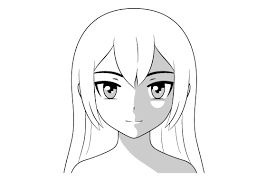
Here is an example using the RealToon shader. There are lots of adjustments, such as the threshold of the edge on the face between the light (upper right) and dark (lower left) regions.
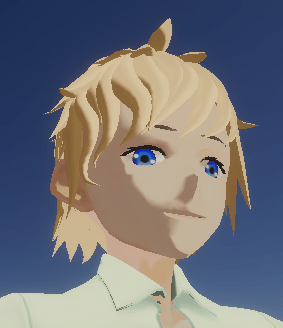
For comparison, here is the default HDRP Lit shader (lit shaders understand light; unlit shaders don’t respond to light sources). You can see smoother gradients on the face.
With the cel shader I find that I either have to reduce the impact of shadows (so the dark areas are not too much darker), or fiddle with lighting so the shadows don’t look too strange. There is skill to it.
Cel versus Lighting Effects
There is also a challenge with Cel shading and lighting effects. With Cel, it’s more like there are levels of light – if you are below the threshold its one color, above and it’s a different color. But that means you have less opportunities for special lighting effects (or at least its more complicated). For example, consider the following clip that has a point light moving between the two characters.
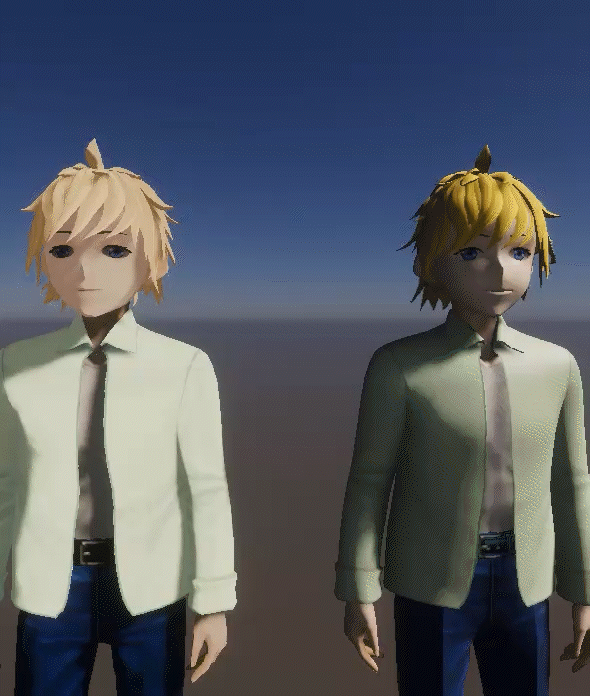
The cel shader version does not have much impact, whereas the default Unity Lit shader shows a lot more impact. (There are knobs you can adjust in RealToon to adjust the level of impact, but the whole idea of a cel shader is to eliminate gradients.) A practical effect of this is if you have a location and character where you want to brighten the character, you can be in trouble. You cannot just drop in a new light source to adjust the lighting focus, or you have to make the light so intense it starts affecting the background as well.
You can adjust materials and settings, but I share characters across scenes – so that means making duplicate copies of characters just to adjust the material shader settings (they are stored on disk and shared between all instances). This can get painful to manage.
Cel versus Backgrounds
Another overall challenge is what shaders are you going to use for your backgrounds? Different shaders often respond different to different levels of lighting in different ways. You can get your characters looking the same as background locations (I use Unity Asset Store assets for buildings, trees, etc) for one lighting level, only to discover that when you reduce the lights, the relative strength is now different.
For example, here is a classroom scene. On the left directional sun is full strength, middle its reduced (see the ceiling and backs of chairs are darker), then on the right its reduced a tiny bit more – suddenly the characters (which use a different shader) are all much darker. Some threshold was crossed. This lack of predictability is painful as I don’t want to adjust character settings per scene.

If you are smarter than I, then maybe there is a good solution. But ultimately it seems like it is best to use the same shader everywhere for consistency – or control your lighting better so it does not change as much.
Combining Shaders
Another consideration is how to combine shaders. Normally you cannot, but HDRP has a LayeredLit shader which allows you to combine Lit-based materials. For me this is interesting as I am considering having a “crying” shader that I want to apply to faces – tears trickle down the face. Using layered shaders offers the opportunity of reusing them. The same could also be true for blush shaders where you have a transparent cheek blush that you want to fade in and out over the top of normal skin.
Unfortunately, when I tried using LayeredLit with the RealToon shader it did not work (although it could be my user error). All of the new Shader Graph system seems based on Lit shaders as well.
Shader Graph interests me for two reasons – consistency (Lit appears to be the new default), and it feels like I can create my own shaders with built in settings for characters. Each character I want to adjust the textures to use, but really I want all other settings the same. By creating a Shader Graph and hard coding settings into the Shader Graph, I can use that shader for all characters. I decide to adjust settings I can do it in one place, in the shader graph. Currently I go through 10+ materials for 20 different characters one by one to make changes – ugg.
Conclusion
So which style of shader should you choose? If you want a more traditional comic look and feel, Cel shaders are the norm. There are a few different cel shaders around to choose from. Movies like from Pixar on the other hand use shaders more like the Lit shader. They are not trying to look like the old style.
For myself, I am still debating. I quite like the cel style, but I also like the extra depth in scenes you can get by controlling lighting more carefully. The more I try to adjust lighting, the more I am getting bitten by strange problems (like the students in the classroom above). I moved to HDRP to get the more advanced lighting effects (like shafts of sunlight through trees) for cinematic shots, but it has been hard to get everything consistent and reliable, although I am still early on the HDRP learning curve.

PBR 3D Anime is getting rarer and rarer but it can look extremely good and offers many advantages and goes with the flow of 3D software while toon shading goes against it.
PBR requires less tricks and knowledge to get it looking good so you can focus on other areas instead of dealing with issues and incompatibilities that cel shaders usually bring.
LikeLike