From the NVIDIA website, “NVIDIA Omniverse™ is a computing platform that enables individuals and teams to develop Universal Scene Description-based 3D workflows and applications.” It is based on USD, the file format originally developed by Pixar for their animation projects. For my purposes, it is similar to Unreal Engine and Unity for rendering 3D scenes and animation. While Unity and Unreal Engine were designed for games but can be used for animation rendering, NVIDIA Omniverse I believe is focused on standardization of models and materials so they can be interchanged between tools with consistent presentation. They are not focussed on a social applications (like Meta’s metaverse), but rather getting the building blocks standardized.
In this blog I give the NVIDIA Omniverse connector for Unity a quick run, exporting a Unity scene as a USD file, then comparing the rendering quality of the exported scene to the original.
USD Claim to Fame
Why does NVIDIA Omniverse use USD? (See my previous blog on USD for more details) Because many tools in the 3D space are converging on it as a standard format.
For large projects, USD supports concepts such as layering of USD files, allowing different teams to own different files in a layer stack. For example, in the case of Pixar, one team may be responsible for meshes of 3D models, another materials and textures, another for general rigging, and yet another for facial emotions. By layering separate files to create the final result, teams can edit their own file without reduced risk of colliding with the work from other teams.
If you are familiar with Unity, this is similar to creating prefabs (and prefab variants) with a base prefab/FBX file. Other prefabs can override parts of the original prefab. So the layering concept is not unique to USD, but using separate files with well defined semantics does make it easy to understand.
Omniverse Unity Connector
Omniverse has a relatively new Unity connector that can export 3D models from Unity to a USD file that Omniverse can then load. It supports a live sync mode where changes made in the Unity scene are immediately shared by the Omniverse Create tool (the equivalent to the Unity Editor). The Unreal Engine connector is older, and supports bidirectional syncing – changes in Omniverse Create can be immediately picked up by Unreal Engine.
I wanted to give the connector a go, so I loaded up school building asset from the Unity Asset store to see how the connector would fare. I was particularly interested to look at the hierarchy structure it created. For example, would it turn prefabs into reusable models with overrides. Note that these tests involved zero tuning – it is just a quick “load it and see what happens” project.
School Building
I created a default Unity 2021 LTS project, loaded the school asset, then followed the instructions and installed the connector. I changed the export setting to include the scene lights and exported the default scene for the school to USD. Very easy. It exported the current scene as a single USD file, with separate files for the textures for materials. I loaded the USD file in Creator… and it worked! Well, mainly worked. Read on for details.
I had also upgraded the school from the default Unity “built in” render pipeline to the latest HDRP pipeline (with ray tracing off), fiddling with a few settings, but frankly just struggling to get it to work again as all the shaders are different. So the following is not a review of HDRP render quality, but rather a comparison (based on one example) of exporting a scene to HDRP and to Omniverse. The challenge with upgrading to HDRP is the shaders are different and the provided upgrade tool frequently failed. This meant I had to try and repair the shaders by hand (as a non-expert).
So let’s look at some screenshots to compare the results.
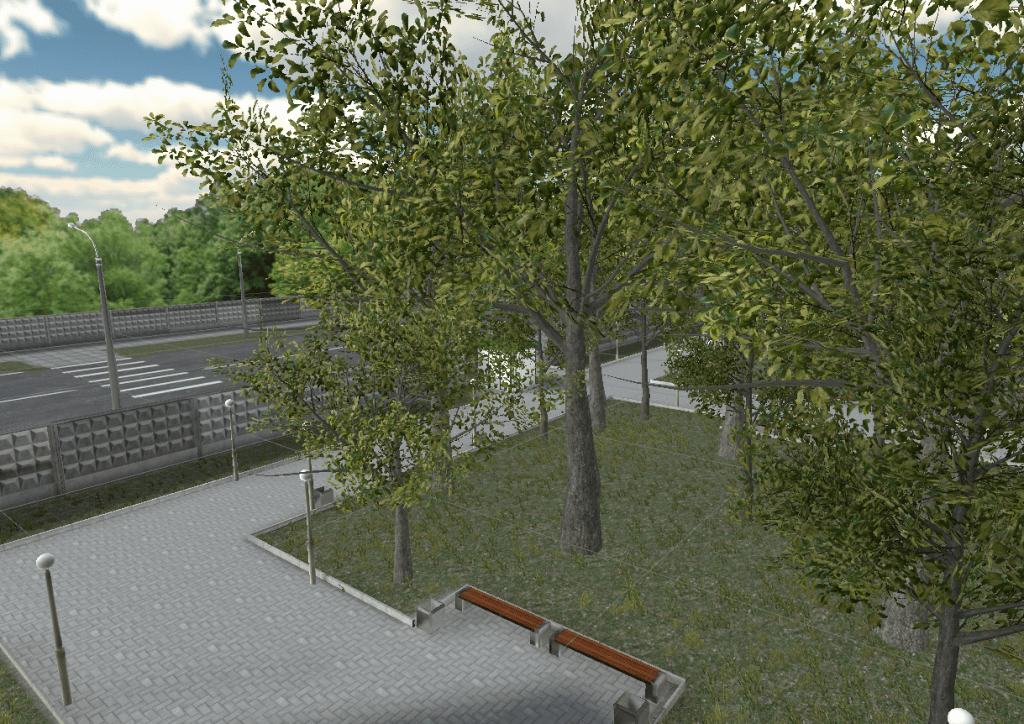
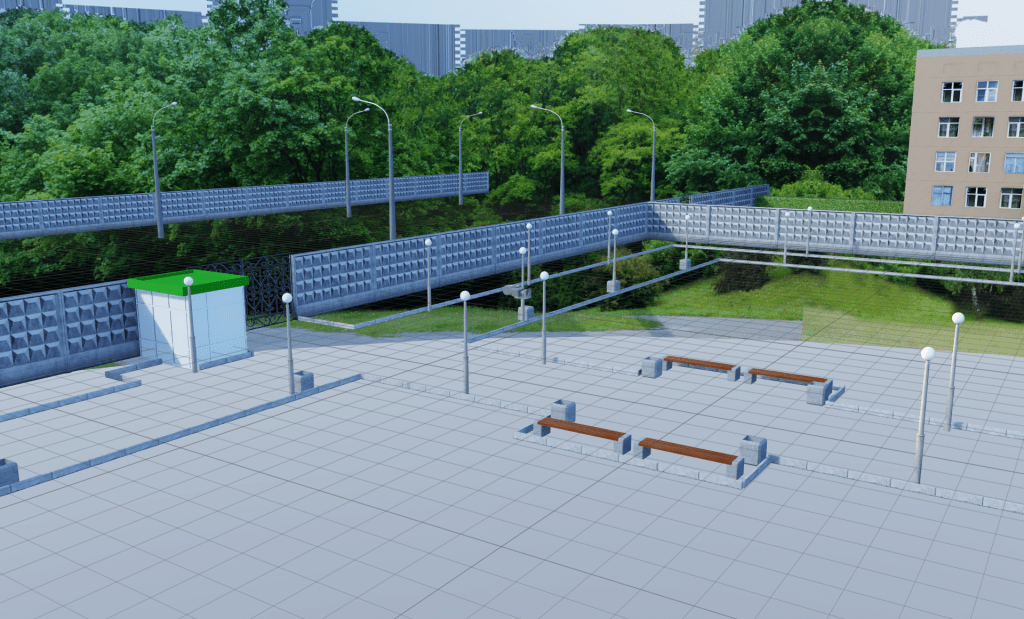
School Yard
First, a shot using the built in render pipeline of some of the front yard of the school from the school roof. Trees in the foreground, a road out in the street, etc.
Here is an equivalent HDRP shot. This shot uses volumetric clouds for a storm. (I also changed the landscape across the street and removed the 360 background image.)
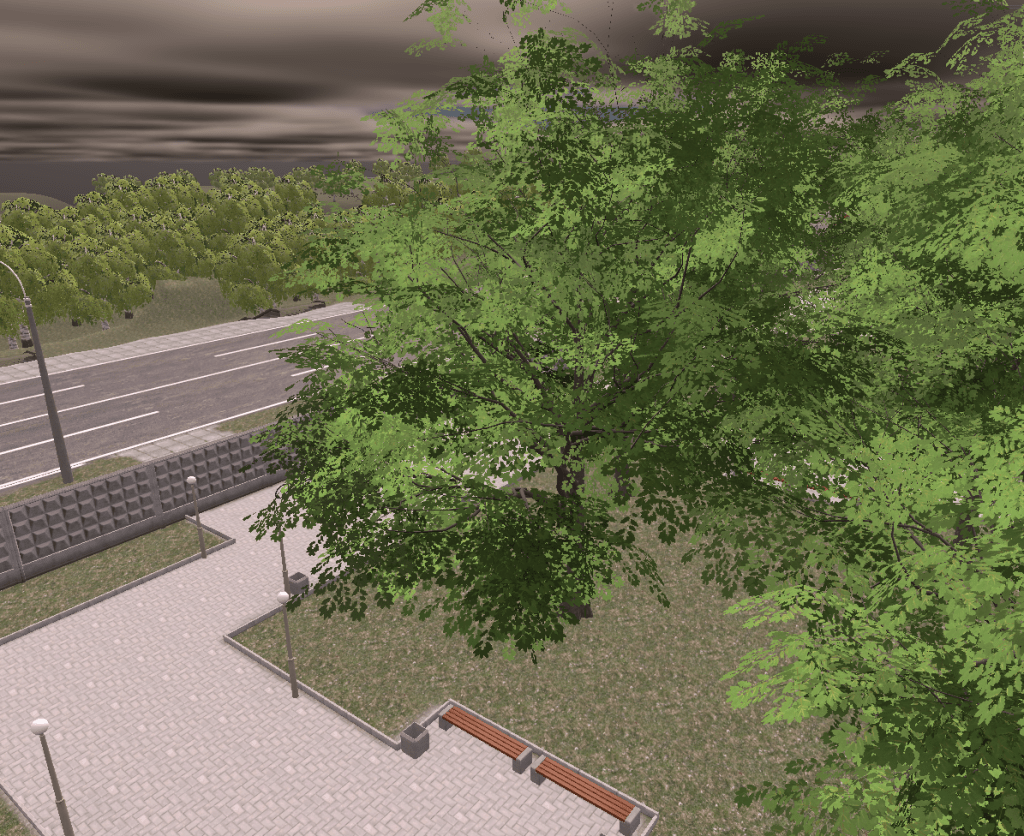
Note: the trees are animated to sway in the wind.
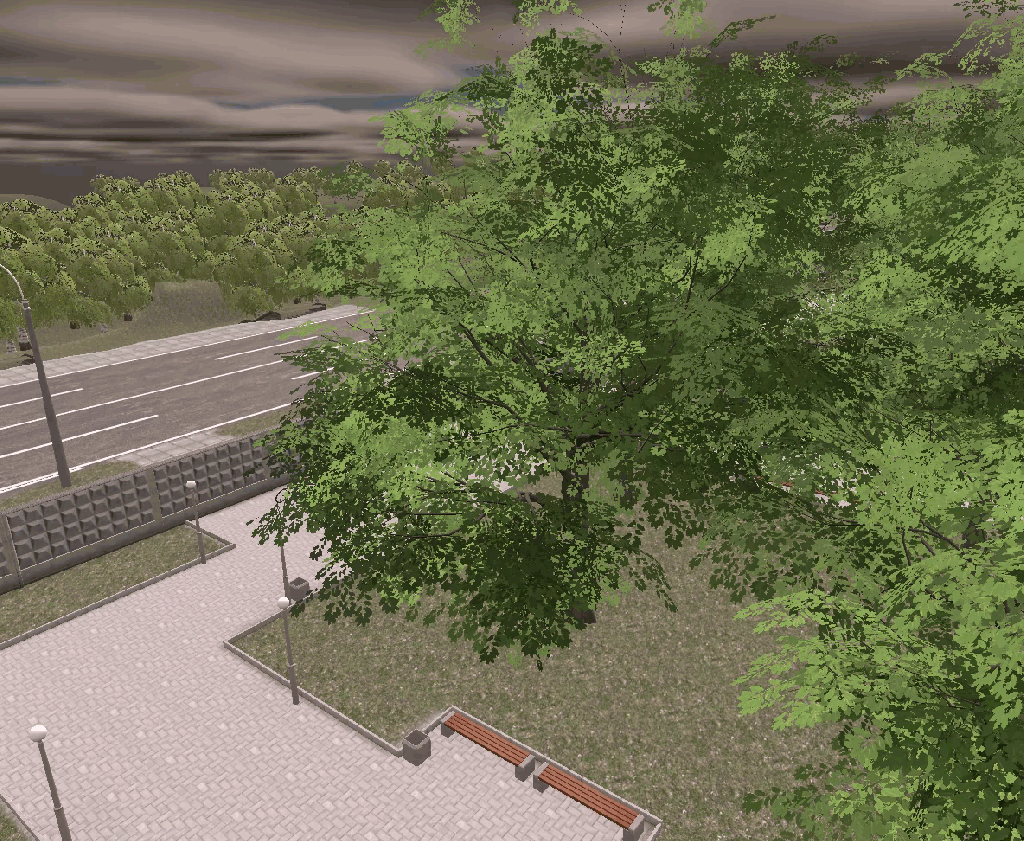
One problem I often hit with HDRP is there are so many settings and various limits to the number of lights etc, problems frequently occur. This is an early morning shot (hence the yellow tint), but see the circular edge to the shadow on the ground? Also the background shadows are flickering in the project. These sorts of inconsistent results due to overflowing buffers are unfortunately still common for me.
So how does the Omniverse connector go? Well, the first limitation I hit is it does not support Unity terrains. So the grass and trees in the yard are not brought across (as well as the road outside the fence). So I would need to redo all the terrains to move across.
Note that Omniverse Creator also supports a “paint” mode for trees, but it places actual trees in a scene allowing you to easily move them individually.
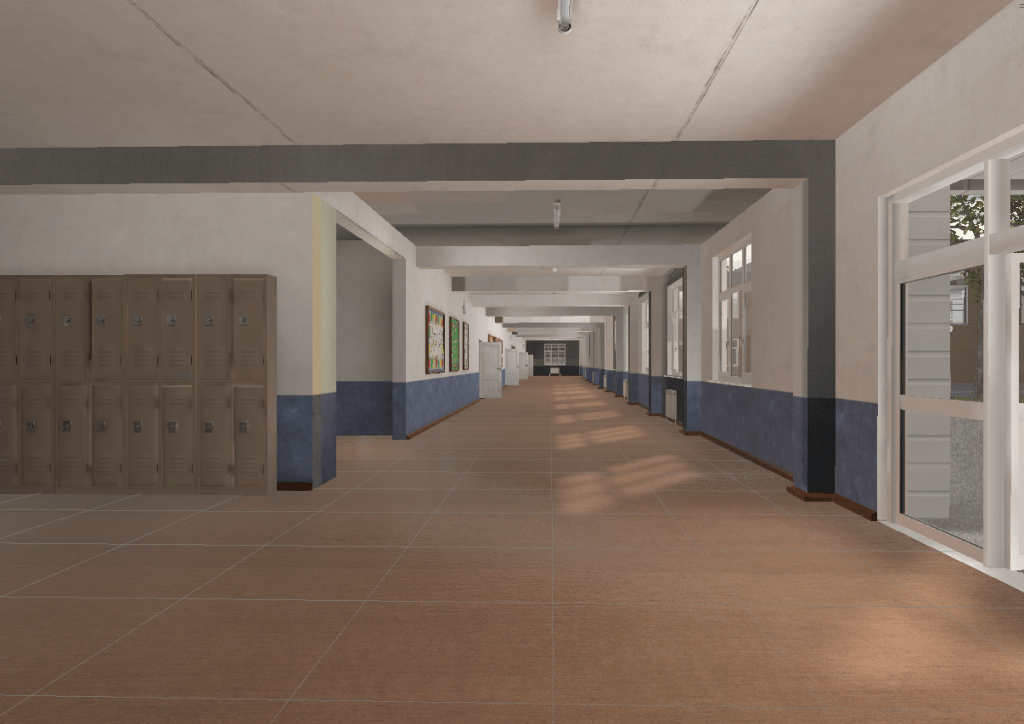
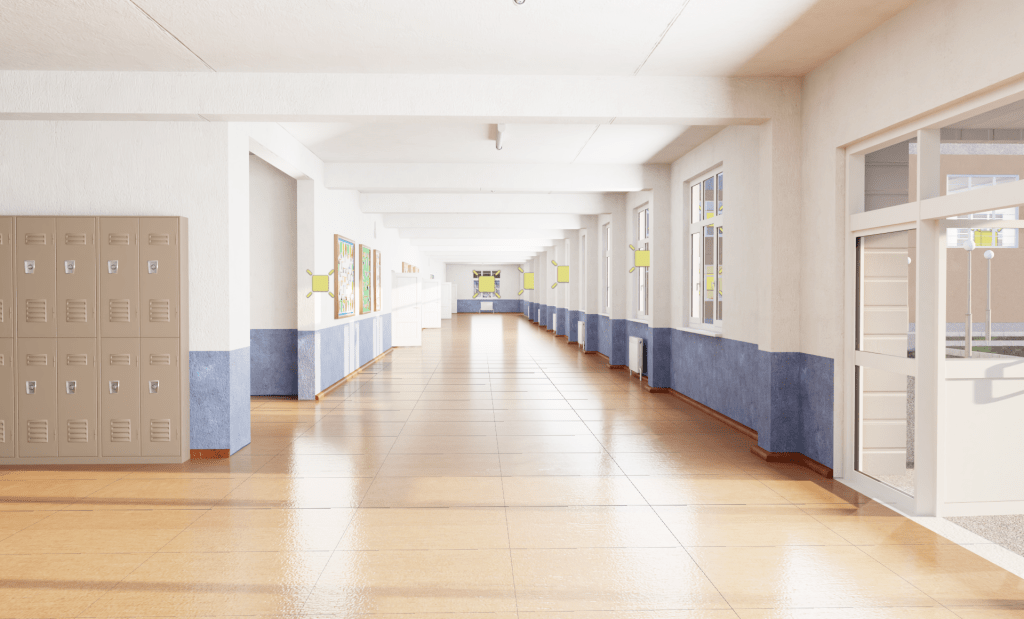
School Corridor
Next, a shot inside the school. First the default built in pipeline.
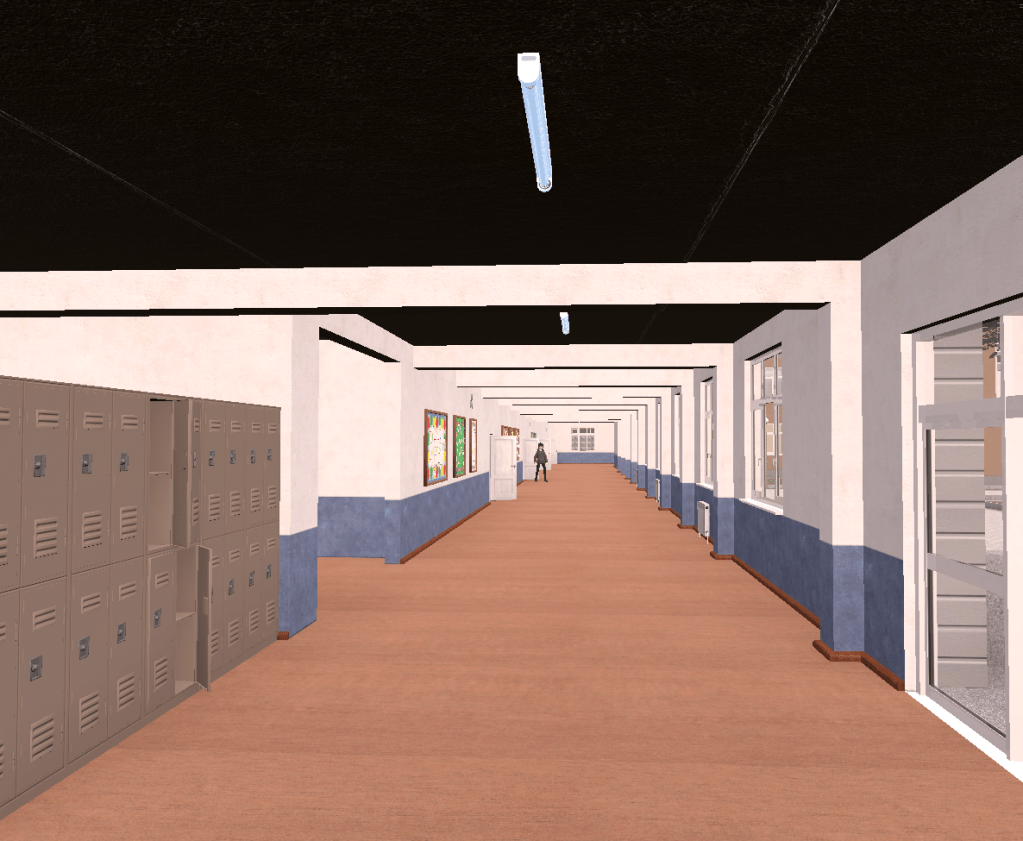
Next the same shot after upgrading to HDRP with inexpert repair of the textures. Frankly, it does not look as good. This highlightings the importance of getting materials right. I do not believe the HDRP rendering pipeline is the problem, it’s just the materials lost quality during the upgrade. See the lack of depth, and the ceiling darkness? The HDRP render pipeline has a lot of settings, and they have not been tuned in the shot below.
Now, the following shows the same shot loaded exported as a USD file then imported into Omniverse using the RTX real-time renderer. This is the default renderer when in Omniverse Creator as it renders in real time. It works pretty well, but you can see the shadows along the wall on the right. There is not enough light bouncing around the scene.
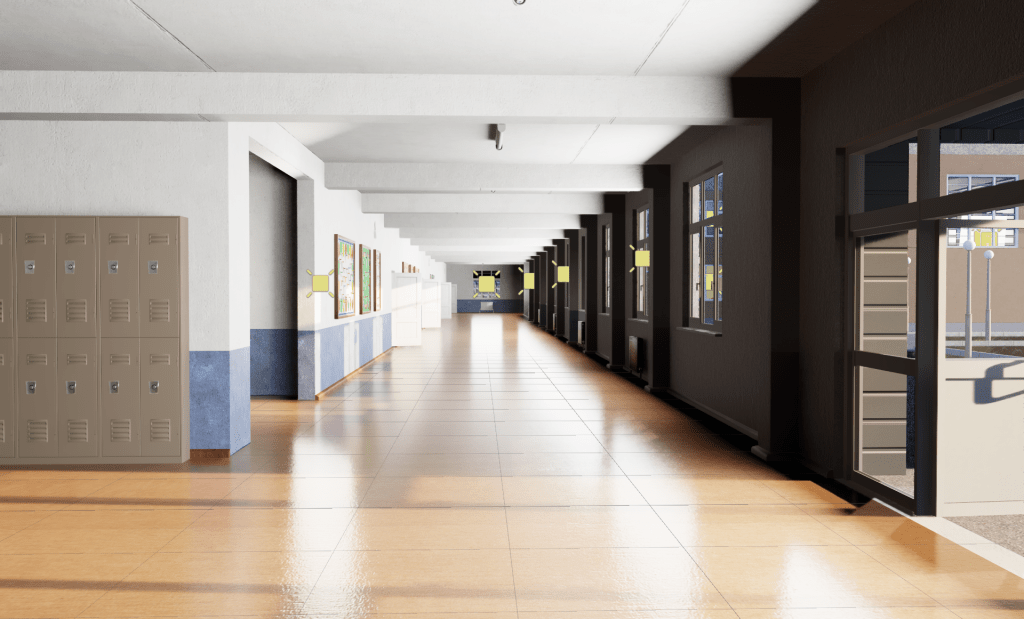
I also took a screenshot using the Omniverse RTX path renderer with default settings. This took a few minutes to finish one frame, so it’s much slower. The overall shot is brighter and the wall on the right is better lit as the light has bounced around the scene better.
One problem with the shot is there are some fake lights inserted in the scene. The more accurate reflections on the floor are reflecting those invisible light panels, so some tuning of lights is probably needed. (Look at the yellow icon dear the entrance to the stairs on the left of the image, then down at the floor immediately underneath it. There is a white patch on the floor corresponding to the light indicated by the yellow icon)
I also tried the advanced Iray render pipeline, but Creator crashed on my desktop. My guess is it ran out of GPU memory.
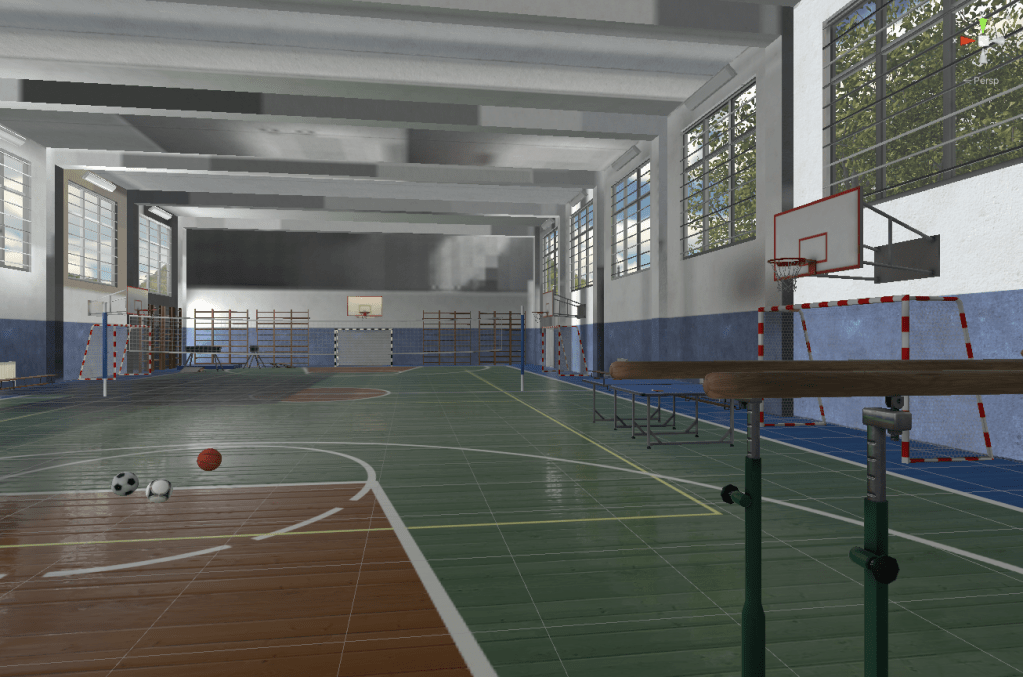
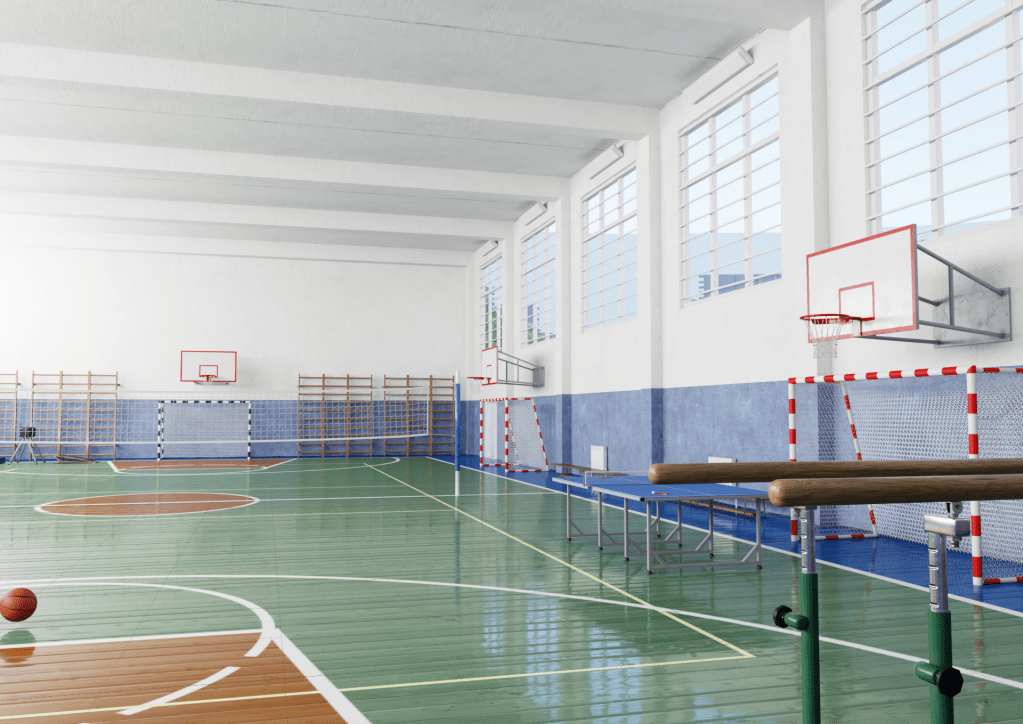
Gym
Next, a shot in the Gym with shiny floors. Again first, the Unity built in render pipeline. Note the shadows on the ceiling are not ideal.
The HDRP upgraded version. The floor kept some of the shiny surface better, but the ceiling has problems.
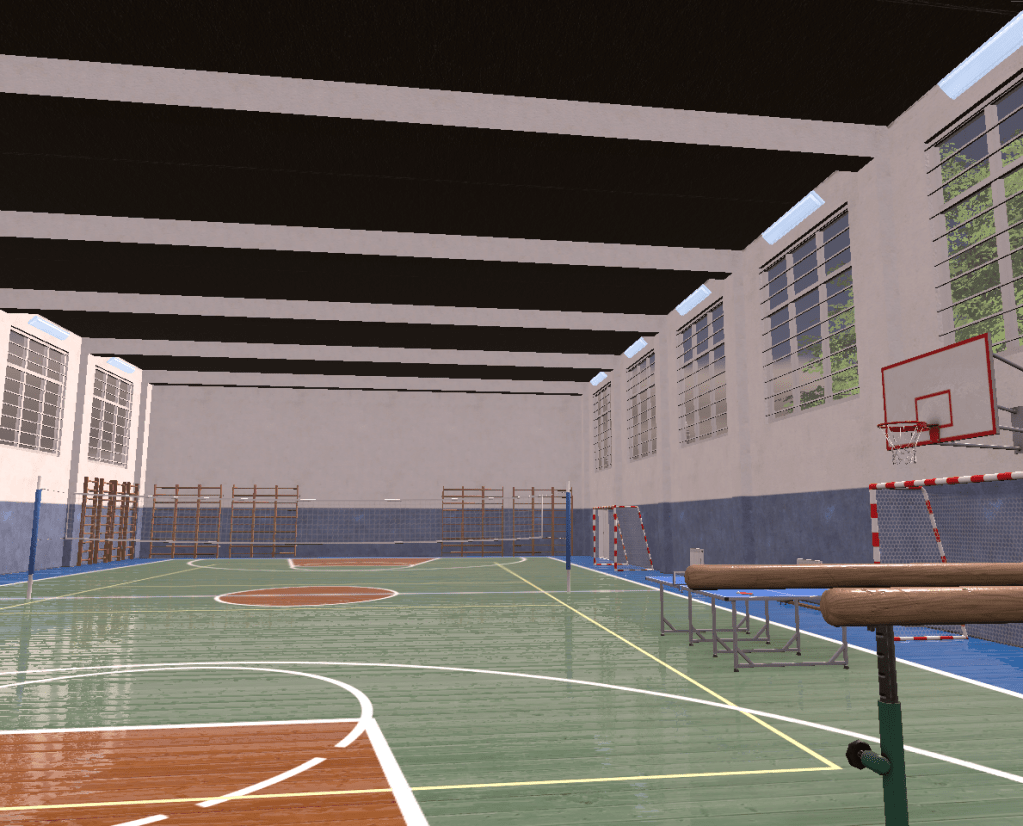
Omniverse Create did a pretty good job with the RTX real-time renderer.
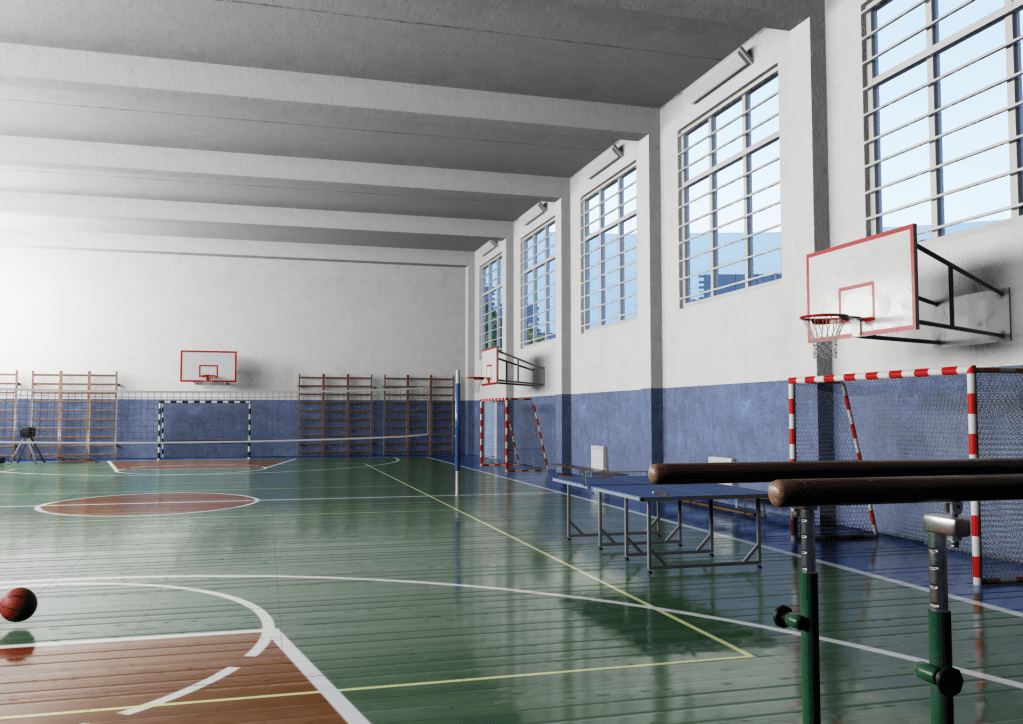
And again, the path tracing renderer came out best and brightest. For example, you can see the blue sky coming through the windows clearly reflected on the floor.
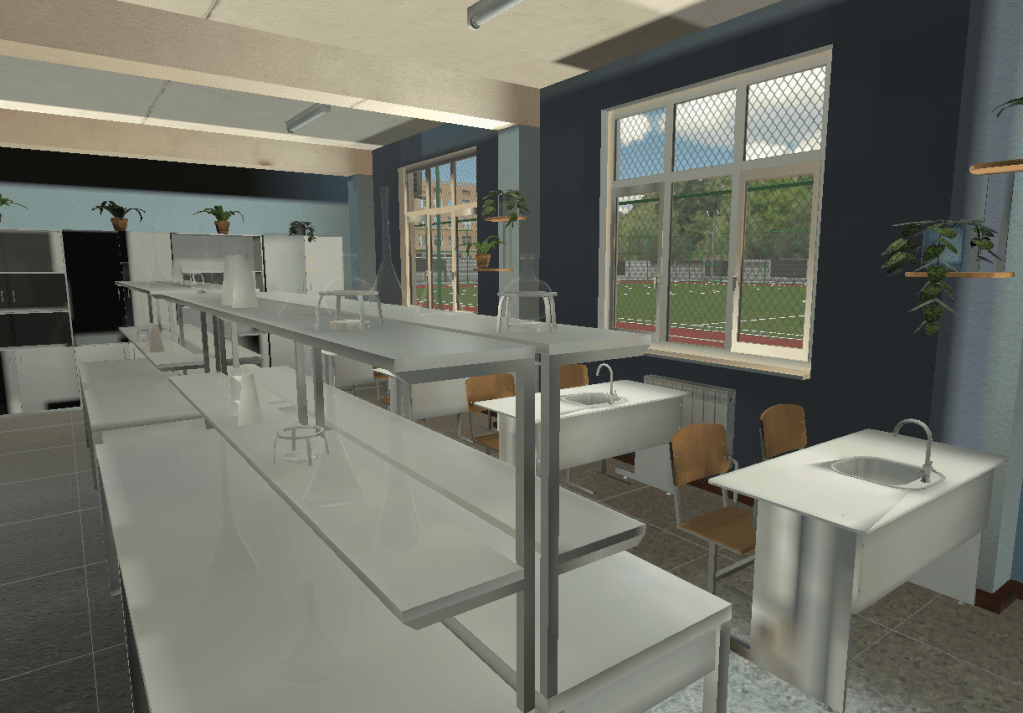
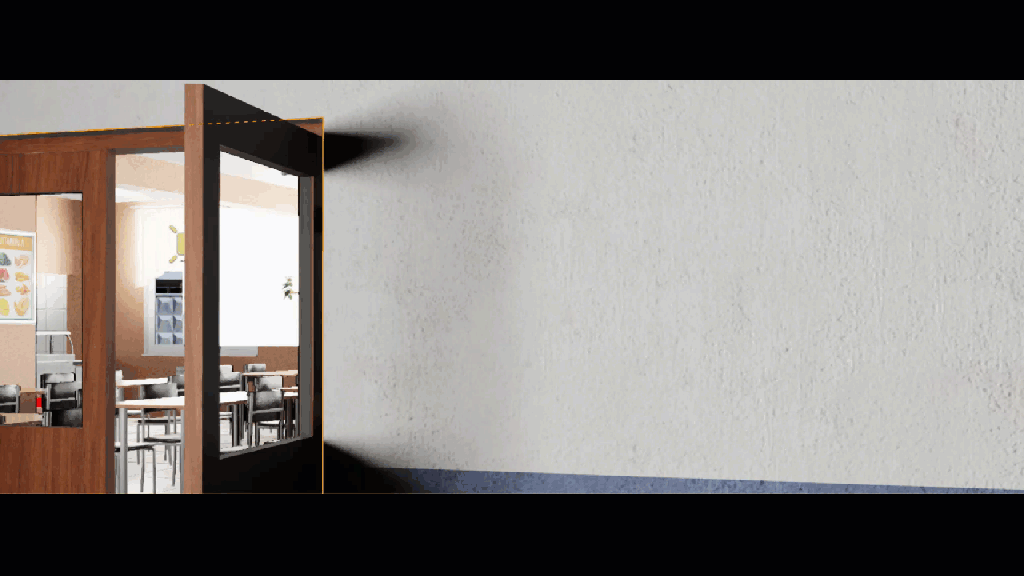
Science Classroom
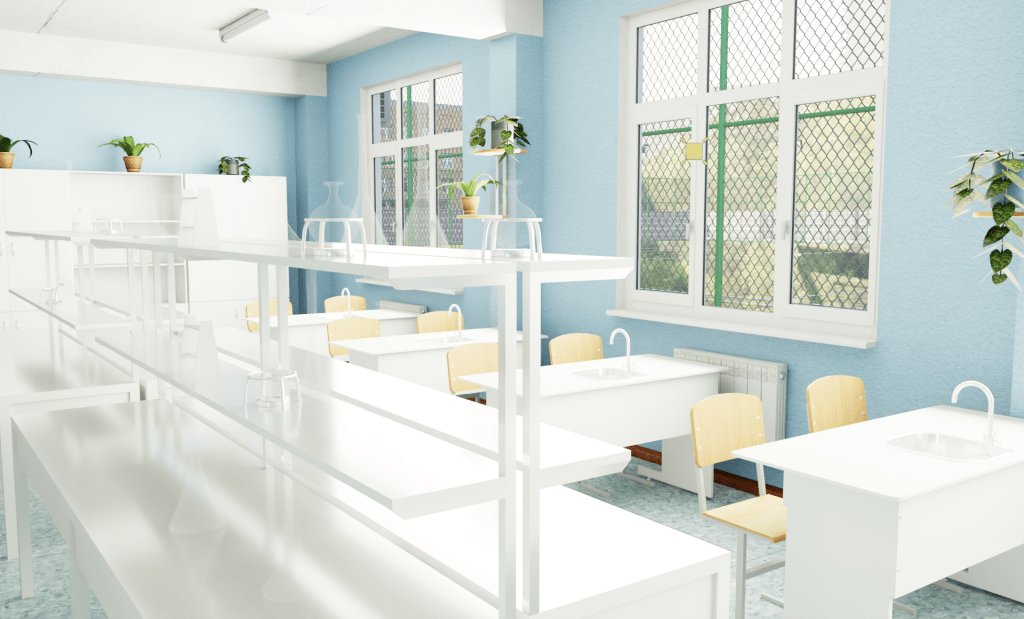
For final shot I used the science classroom as it had glass beakers and I was curious to see how they would come out. First, the default starting point. If you look carefully, you can see several glass containers on the bench top in the middle. Also note the strange shadows on the side of the front desk on the right.
The HDRP render is similar, but loses depth on the middle bench surface.
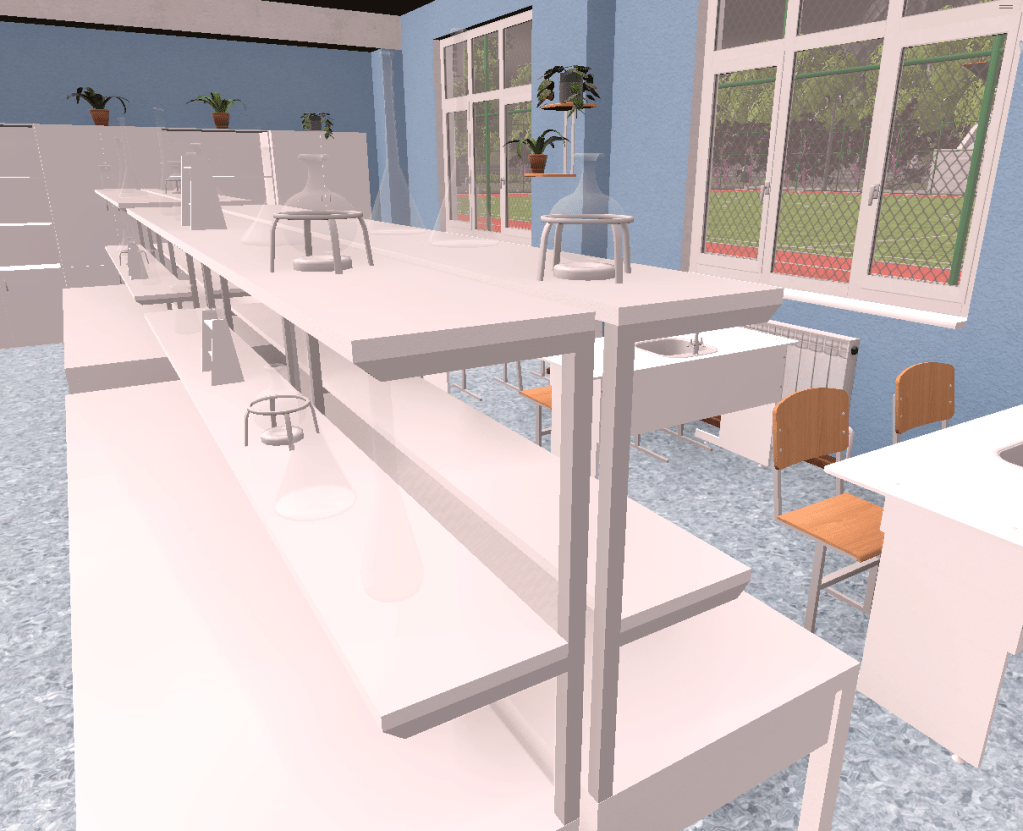
Omniverse Create RTX real-time raytracing is next.
The above screenshot has a number of problems.
- The wall on the right is dark in shadow.
- The glass containers on the bench top shelf are white instead of transparent.
- Glass containers on the middle shelf are not visible, but their shadows are.
- The bottom shelf has a dark round circle for the base of a container (which is just visible).
So basically, glass containers have not worked that well.
Trying the real-time renderer looking through a glass panel on a doorway to light sources behind, this might be the reason for the white containers. When you look directly at some light panels, they are not visible. But when you look at them through glass, they appear white. There are some light panels near the windows in this shot for example. When you look through the open door you cannot see them, through the glass panel in the closed door and you can see the light panel. Fun!
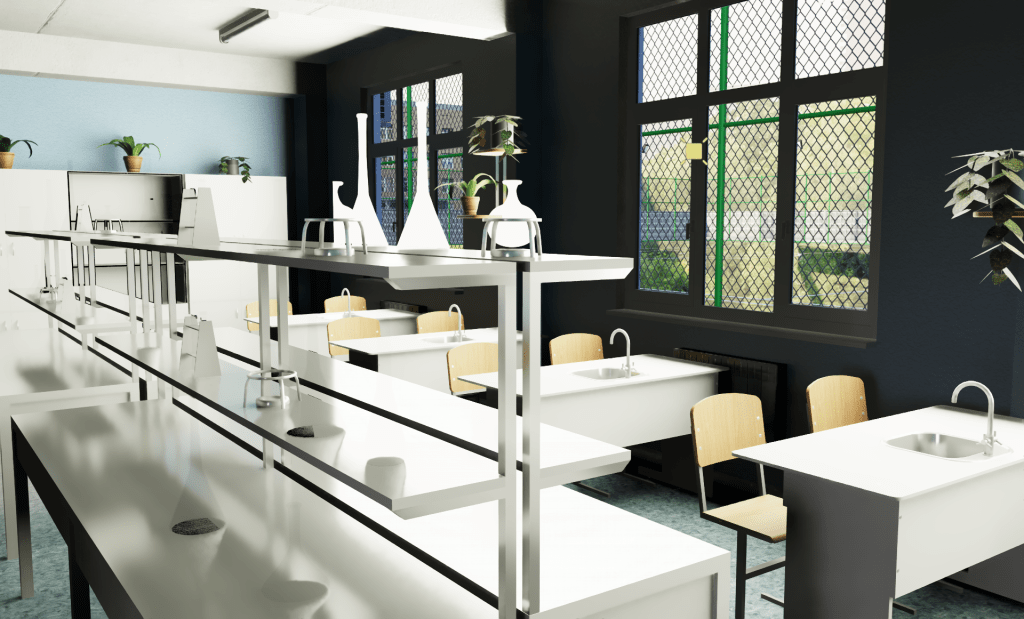
So let’s try again using path tracing.
The shadows on the right wall are fixed. The glass containers on top are transparent again. The middle shelf containers are not visible (no container or shadow). The bench surface containers look good.
Observations
This was not an exhaustive test, but a few observations from this quick first test.
USD export did a good job of maintaining the overall scene, but it lost all the prefabs. For example, each chair in the classrooms were an instance of the same prefab. When exported to USD, this relationship was lost. It did not bring the prefabs across as reusable models – it replicated them all. That is a pity. I want to explore more. For example, if the FBX files are brought across first, will it reference them instead of recreating them?
I brought up HDRP in this post not as a review of HDRP – you can generate very high quality renders with it. I included it to highlight that moving shaders and materials between render pipelines can be problematic, even within the one technology stack. This is a thumbs up for the Omniverse Unity connector (for this test project). It did a better job of maintaining the material quality than upgrading inside Unity to HDRP!
Terrain is not supported in USD. This is both for tree painting and rolling hills in the background. Darn.
All of the render pipelines struggled at times – none was perfect.
The NVIDIA RTX real-time pipeline was fast, but had more problems with shadows than path tracing. Unity’s HDRP also causes me lots of troubles with shadows. The coloring is also different for the different pipelines, meaning color grading in the platform is harder – you cannot color grade the RTX real-time pipeline and use that for the path tracing pipeline as the same scene renders quite differently.
My desktop with 12 cores, 32GB ram, RTX 3080, frequently reported running out of RTX 3080 memory and crashed at times.
Not all of the Unity features are available in Omniverse Create yet (as far as I can tell). Things like volumetric cloud, visual effects I am sure will be different, I have not tried the Omniverse wind support yet, etc. But it is an open platform where you can develop your own extensions (like Unity), so these are probably solvable problems. I also currently have Unity shaders for effects like raindrops in puddles and raindrops running down glass window panes that I need to explore in Omniverse. So getting my project Omniverse compatible is not going to be a small effort.
Conclusion
Wrapping up, this post was not meant to provide a recommendation of one platform over another. It was just capture first experiences with the Omniverse Unity connector. All up, it looks promising, but losing the prefab hierarchy is annoying. The render quality is pretty good without touching any settings, although shadows can be problematic for the RTX real-time renderer.
For my own projects, I think I would also like to be able to plug in my own converters so my custom Unity connectors can be converted to Omniverse scripts appropriately.
So all up, it’s a pretty impressive start, but all of the render pipelines have problems. There is no silver bullet.
