In this post I summarize the Unity terminology related to Cinemachine timelines and cameras. Cinemachine is a package for Unity design to create cutscenes or create short movies with. This blog summarizes terminology related to Cinemachine timelines and cameras. Later blogs will describe how to use these tools to achieve various objectives. (See also https://learn.unity.com/tutorial/timeline.)
Timeline window: The timeline window is used in Unity to create cut-scenes, cinematics, game-play sequences by visually arranging tracks and clips linked to GameObjects in your Scene. When producing a movie, this is how you move characters around in a scene.
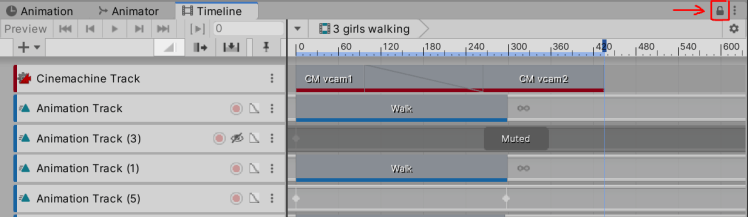
I found that the timeline window kept disappearing as I selected other objects. To stop that, there is a little lock icon at the top right corner that stops the flipping to other windows away from the timeline window.
Timeline Asset: A timeline asset stores tracks, clips, and recorded animations without links to specific GameObjects being animated. Timeline Assets are saved to the Project. If you record key animations when dealing in the Timeline windows, the recorded clips are saved as children of the Timeline Asset. One naming convention I have seen is to append a “TL” suffix to timeline asset name. An example of a Timeline asset might be a victory dance which can be used by multiple characters. Timelines can also be placed into other timelines (similar to animation clips), allowing more complex timelines to be built up from simpler ones. For example, a full episode can be created from a series of shorter timelines. In this case the “master” timeline should have the “Play On Awake” property checked, all other timelines in the scene should have this property unchecked so only the main timeline plays when the game is started.
Note that a timeline asset lives outside a scene, so cannot directly reference GameObjects in a scene. This is in part why you need “bindings” to bind tracks to GameObjects in a scene. Think of them like different roles in a play where you have not decided which actor will play the role yet) . In this timeline window you can see the animation track on the left shows “DollyCart1” as the GameObject bound to this track.

Timeline instance: A timeline instance GameObject in a scene stores links to the specific GameObjects being animated (typically a character) or affected by the timeline asset. These linkages are referred to as bindings. A timeline instance associates a Timeline Asset with the GameObject in the Scene, through a Playable Director component. Selecting a GameObject with a Playable Director component, will show the Timeline instance in the Timeline window. The bindings appear in the Timeline window and in the Playable Director component (in the inspector window).
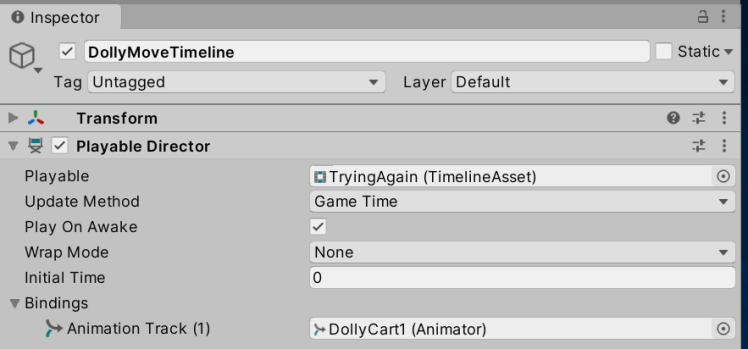
Typically you create a new empty GameObject in a scene, then while it is selected bring up the Timeline window. It will offer to add the necessary components to the object so it can be used as a timeline. It will also ask for the timeline asset file (or create a new one for you) with a “.playable” extension.
Tracks: A timeline can have multiple tracks, for controlling multiple things in a timeline together. This might be multiple characters, lighting, position of cameras, etc.
Track Groups: You can group tracks together to help organize them. For example, you might create a “Characters” group under which all tracks for characters go.
Master Timeline: A common pattern is to have a series of short timelines in separate timeline objects, then combine them using a master timeline panel. Alternatively you could export each short timeline one by one and join them together with a tool like Adobe Premier Pro. However having a master timeline makes it easier to preview the overall flow without leaving Unity.
There are different types of tracks, capable of capturing different timeline data.
Animation [Animation Sequence] Track: You can add properties and then use keyframing to adjust those values at different time points in the timeline. The “Animation” editor can be brought up by double clicking in the track area of an animation sequence track. If you drag an object from the scene hierarchy into a timeline (below the existing tracks), it will automatically make that object available for animation sequence keyframing. You can also expand say the “Face” of your VRoid character and drill into the “Face / Skinned Mesh Renderer” blendshapes to adjust the settings for each blend.
To start recording property changes on the object, click the “Record” button for the track so it starts blinking. You can then go to the inspector for the GameObject and adjust the parameters. The property fields will turn red in the inspector and a keyframe diamond will appear in the animation track. Drag the play head to the next time point in the animation clip and adjust the property again. The new value will be recorded and a blend between the two property values will occur over that time frame.
(Note, you can even animate the texture/material used by a GameObject by replacing it, such as to add a blushing version of the face material, but this does not allow the blush to fade in. I will describe other approaches in a later blog post.)
Animation tracks are the most common track type I have used so far.
Activation Track: Can add activation clips to an activation track to control when the GameObject is active in the track (when not active, it is not visible/present).
Animator Track: Can override the current animation clip of the GameObject (as would normally be played from it’s state machine) using an animator track.
Audio Track: A music file or speech etc.
Control Track: Something to do with giving control of “time-related elements”. (I don’t really understand this one yet!)
Signal Track: Used to trigger events. You can actually put signals on other tracks as well, but a Signal Track indicates the track exists *only* to contain signals (signals are events to publish). Putting signals on a timeline can be used to trigger code in objects to be triggered at a particular point in a timeline. Another strategy is to create components on objects and give them a property that the animator can animate.
Playable Track: You can drop animation clips into a playable track.
Cinemachine Track: Used to control virtual cameras, e.g. when using a camera dolly.
Track Recorder: To capture a timeline as a movie file, add an additional track to the project, a “Recorder Track”. Then add an Recorder Clip and adjust control how much of the animation is captured to a recording. A Recorder Clip can output a movie, image sequence, GIF animation (or Animation Clips). I found the MP4 files were very poor quality (unusable), although I found a mention of a bug in the forums. Maybe it has been fixed since. Instead I exported a sequence of PNG files which I merged using Adobe Premier Pro. I had to start from image file number 1 (instead of 0), but I could import as a sequence automatically then render it to a MP4 file that way with good video quality.
To trigger a recording, I had a timeline with “Play on awake” enabled. When you hit the Play button in Unity, it started up and played this timeline. The recorder kicked it for the parts it was enabled and wrote out the image files for those sections. If you use a “Master Timeline” which you add all the shorter timelines too, then only the master would have the “Play on awake” enabled (the others are turned off) so the master sequence plays. Adding the Track Recorder to the master timeline therefore will capture all of the shorter timelines in one hit.
Transform Tween Track: From the “Default Playables” package. Simplifies smooth tweening between values without creating an animator component.
So if you have a character you want to animate in a scene, first create a timeline then drag the character into the timeline window below existing tracks. It will offer to create a new track – select “Add Animation Track” and this will create all the necessary bindings between the game object and the track ready for you to start recording property animations.
Cameras
When using Cinemachine in Unity, a scene generally has a single camera which captures what the final video will include. This camera is moved around as required using “virtual cameras” that you drop into a scene as required. Virtual cameras have a fixed position or can be told to follow and look at characters. Some quite sophisticated approaches can be set up if desired, such as focusing on a nearby character with camera blur on a distant character, then changing focus to the other character with focus blur now on the first character.
Camera / Main Camera: A real camera that captures what the final video will contain.
Virtual Camera: If you need different camera positions in a scene (which is common), use virtual cameras to define those positions and direction of view. You can use instructions like “look at this character”, and the virtual camera will track that character even if they move. The Body properties of a VC control its position; the Aim properties change the direction it is pointing (Look At). You can also change the camera lens and field of view. This is done by updating the main camera. That is, the virtual camera is just a convenient way to control the real main camera. Blending between virtual cameras does a smooth transition.

You can create a virtual camera to look directly at a character’s face, adjusting the field of view to control the zoom in level. One way to do this is to open up the bones hierarchy of the character (click on the character in the scene, then open Root, J_Bip_Hips, J_Bip_Spine, until you drill into J_Bip_Head. If you target the head unfortunately the camera focuses on the chin. So while J_Bip_Head is selected, create a new child GameObject. Rename it to something like CenterOfFaceTarget. Then when you create a virtual camera, use that as the LookAt target.

Adjust the “Y” position of the CenterOfFace game object so the camera is correctly centered on the face. A value of 0.06 seemed to work well on one character I had, but it depends on the position of the eyes in the head (adjustable in VRoid). To get the value correct I set up a virtual camera to “look at” the CenterOfFaceTarget, then I adjusted the Y value until it was suitably centered on the screen.

Target Group: You can create new GameObjects (such as AdamFollow and AdamLookAt) and add a CinemachineTargetGroup component to the object. Then in the Follow/LookAt GameObjects, add a new binding. Expand the character to find the desired bone and drag that in as the target. The pelvis bone is often good for following, but the head is generally better as a look-at target. By using a GameObject in this way, if you decide to follow or look at a different bone, you can update it one is the Follow/LookAt object and all other references will update as well.
That is, instead of adding a GameObject into the character for the center of the face, you can create a separate GameObject and add the CinemachineTargetGroup to that object. This object (outside the character) can then be set up to reference a bone in the character.
Volume: Refers to effects that can be applied to a camera shot. Volume can be global, or per GameObject. Examples of “volume” HD Shadow Settings, Procedural Sky, Visual Environment, Volumertric Lighting Controller, and Volumetric Fog.
Post processing (PostVolume): Post processing effects include motion blur, distance focus blur (e.g. focus on close item or distant item), and lens flare.
Cinemachine Brain component: You can think of this component like a cameraman. He does his best to carry out the director’s instructions (you!). You can have a default blend type, but can also specifying the type of blend to use from one camera to another (cut, ease in out, ease in, hard in, linear, Custom (curve)). This component is added to the main camera to control it based on decisions from virtual cameras.
Constraints links: a GameObject to another GameObject using constraint components (Aim, Look At, Parent, Position Rotation, Scale).
Manager Camera: A manager camera uses the results of virtual cameras (Free Look Camera, Mixing camera, blend list, Clear Shot Camera, State Driven Camera, Volume Settings extension, Post Processing extension, Follow Zoom extension, …).
Virtual Camera Extension: A special type of component you can add to a virtual camera. For example, a Storyboard Extension displays a static image instead of looking at the camera, so you can draw something by hand as a placeholder in a scene then replace it later. You can also add camera blur to an extension
Dolly Camera GameObject: Creates a dolly track in the hierarchy. Camera will move along the path defined for the dolly.
A Path is a GameObject. Add a CinemachinePath or CinemachineSmoothPath component and waypoints along the path to control the structure of the path.
Cinemachine Dolly Cart component: Constrains the transform of its GameObject to a Path/Smooth Path. It can move a GameObject long a path. This could be a Follow target for a virtual camera, so the camera moves along the path.
Lighting: There are various forms of lighting including spot lights, ambient lighting, directional lighting, and more. You cannot always see the light source, but you can see the effect of the light. E.g. you can have a spotlight on something, causing that object to be more visible, but you will not see a physical source of the light.
To wrap up on cameras, in a timeline add a Cinemachine track to the timeline and bind the main camera to the track. This track will now control the main camera. Next, add a Cinemachine Shot Clip to the timeline Cineamachine track. (Right click in empty track area and select “Add Cinemachine shot”.) Click on the clip to select it. In the Inspector window there is a “Virtual Camera” property – drag a virtual camera into the property so the camera will be moved to that virtual camera position. If the two clips are dragged to overlap each other then the main camera will blend from position of the first virtual camera to the second. (You can control how the blend occurs by selecting the second clip and adjusting the “Blend Curves In” property.
