If you have watched Suvidriel’s YouTube channel you will know you can have multiple textures for your VRoid character face, clothes, etc using tiling. This allows you to add a blush to the cheeks, tears around the eyes, etc. This blog describes some quick tips for doing this more efficiently in Adobe Photoshop.
Here is an example result (I am still experimenting).

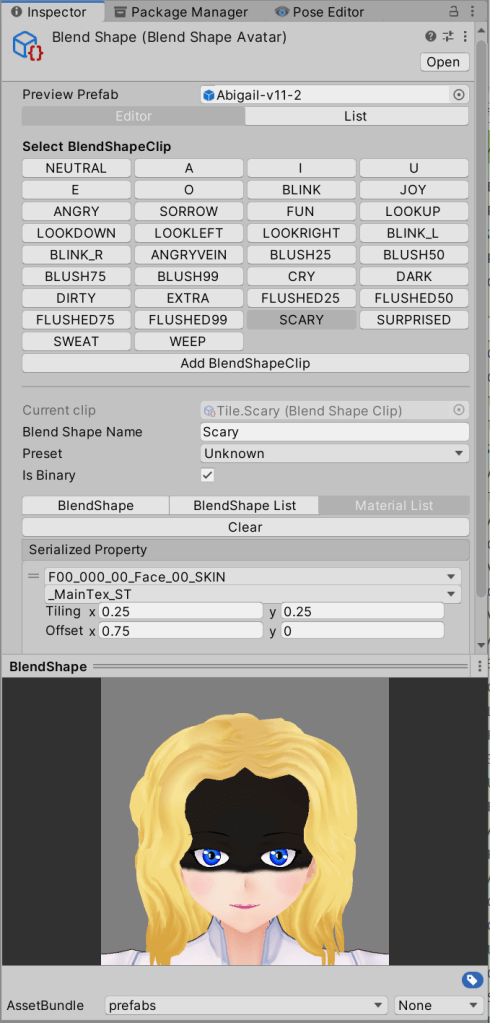
Inside Unity, you can use fractional offsets (0, 1/4, 1/2, 3/4) with a tile size of 1/4 to then pick which image to display. This can be done in the material list of a BlendShapeClip.
The bottom left corner (offset 0,0 in Unity) is the default neutral expression. To the right is (0.25,0) angry, (0.5,0) dark, and (0.75,0) scary. Dark you can still see the eyes. Scary I used in combination with tiling on other materials for the eyes to get yellow glowing points instead of the normal eyes (using the “Extra” blendshapes supplied by VRoid).
The row above is has (0.25,0) sweat on the cheek (might need to draw it bigger), (0.25.0.25) crying, (0.25,0.5) humorous weeping, and (0.75,0.5) an unused slot (I am thinking it use it for face with dirt on it).
The row above that is use to crudely animate flush rising up the face. The top row I have a series of different strength blushes, again so I can crudely animate it fading in. I am not sure this is a good idea or not yet. (Note: I am trying to use trackers like VSeeFace or Luppet — I am trying to do animation inside Unity, but wanted to make the characters so they could be used with standard packages as well in case useful later.)
So how to create this in Photoshop? The following is what I am doing.
- Export the PNG file from VRoid Studio and open in Photoshop. It will be 1024×1024 pixels.
- In “Edit / Preferences / Units & Rulers…” set the Rule unit to Pixels (not inches etc).
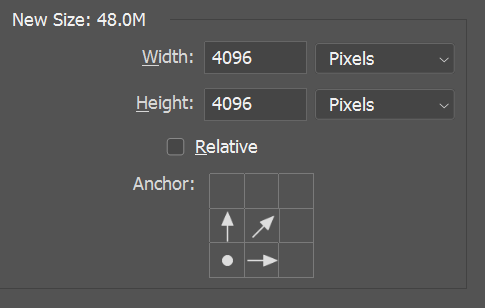
- Enlarge the canvas using “Image / Enlarge Canvas…” to 4096×4096 (it needs to be powers of 2 to keep Unity happy apparently. Click the bottom left corner so the face stays in the bottom left corner.
- Rename the existing artwork layer to something like “Original Artwork”. Put the lock symbol on it to protect it.
- Select rectangular selection tool and set the “style” to “Fixed Size” and enter 1024 x 1024 as selection size.

- Use the selection tool to select the original artwork. Since it is “fixed” you only have to position the selection area over the image, and it will hopefully snap to the bottom corner nicely for you. (You can just drag out a selection rectangle to exactly the right size, but I found it painful – if off by one pixel, it messes everything up.)
- Use “Edit / Define Pattern” to capture the rectangle. Give it a name such as “<Character> Original Face”. (Note: I delete the pattern later so it does not really matter.)
- Hide the original artwork layer. I keep it around just in case.
- Create a new empty layer in Photoshop (click the “+” button in the layers panel – I named mine to “16 faces”), select all (control-A), then use “Edit / Fill” to fill the layer. In the fill dialog select “Pattern” and the face pattern you just captured, then deselect (control-D). If it is exactly 1024×1024 you should end up with a perfectly filled 4096×4096 region. I put the lock on this layer too.
- Once done, I then open “Window / Patterns” (the patterns panel), click on the pattern I created, then click the delete (trashcan) button. I ended up with too many similar patterns otherwise.
- I then create new layers on top and draw all the extra artwork. Using a separate layer (or layers) for adjustments allows me to update the “16 faces” layer later without losing my additions. (I am also doing multiple characters, so I can copy the same effects into multiple files to save effort.)
- I had a series of separate PSD files with additional layers for tears etc. I merged these all into the big tiled file. I found “Free Transform” (control-T) allows entering the precise numbers for offsets.

I also defined a pattern for the guide and repeated it over the 16 copies using a pattern as well. I also added another layer with coordinates and the purpose of each cell as a reminder for myself. It was useful as a reference as I am going to use the same offsets for a series of different characters so I can use the same animation clips for all the characters.

To export a PNG file to load up into Unity to replace the default image, I then used “File / Export / Quick Export as PNG”. Just remember to hide the guide layers first!!
Some notes:
- I am using the red cross anime icon (bulging veins) for anger on the face skin, but may instead use a separate quad (or a VRoid Studio hair texture) so this can float in front of the hair. The same is true for the sweat.
- I am currently not planning to do this for crying as the artwork has to line up precisely with the eyes, even as the face morphs with different eye expressions.
Oh, and as a final tip, I am using the same BlendShape clip definitions across characters. UniVRM however if you click the “+” on the “List” panel will create a new file each time. The only way I could find to copy blend shape clip files was to use the “Restore” menu item. It loads all the clips from the character’s blendshape directory.

However the default order is weird. If you want the ordering nicer, make the following code change in Unity (inside the UniVRM package to be precise). Find the “BlendShapeAvatar.cs” C# script and edit in a text editor. (You can search in the asset search box to find it.)

Go to around line 60 and replace
Clips = Clips.OrderBy(x => BlendShapeKey.CreateFrom(x)).ToList();
with
Clips = Clips.OrderBy(x => {
  var key = BlendShapeKey.CreateFrom(x);
  return (key.Preset != BlendShapePreset.Unknown)
    ? ((int)key.Preset).ToString("00")
    : key.Name;
  }).ToList();
This orders the built-in presets first (using the preset number) followed by additional blend shape clips in alphabetical order.
Here is a final example blend shape clip in Unity with the settings in the material list with all the tiling offsets.
I should point out that the above blend shape clips may not be what you want. For example, the flushed expression you may want to mix in “surprised” or similar embarrassed expression as well. This is because most trackers only play one clip at a time. Internally inside Unity there is no such restriction however, so for my personal animation purposes I can use two blend shape clips together if desired.
Another way to do flushed is to adjust the “_color” of the layer in the material list (no need for tiling then). Tiling images as it gives more precise control over the end result, but the color blend shape clip can use a weight to adjust the strength of the flush so you can fade it in smoothly.

ADDENDUM: Suvidriel pointed out two additional notes:
- The outline and normal map files also need to be tiled along with the face. The good news here is appear to be shared between all male avatars and all female avatars, so the outline and normal tiled maps can be shared if you are creating multiple male or female characters. I turned F00_000_00_Face_00_nml into F00_000_00_Face_00_nml_4x4 and F00_000_00_Face_00_out into F00_000_00_Face_00_out_4x4 (repeated also for the M00_ for male texture files as well).
- Texture (bitmap) files have properties, such as the maximum resolution. This for my version of Unity was 2048×2048, which is less than the actual 4096 resolution I was using. To change, click on the texture and then in the inspector panel update “Max size” near the bottom from 2048 to 4096 and click the “Apply” button.

