(UPDATED Jun 28, 2021 to reflect my greater understanding.)
Just a quick blog of my initial experiences and understanding of the new sequences support. I signed up for the open beta and downloaded the “Cinematic Studio Sample” from the asset store. I just read the 2021.2 beta blog and it looks like it is being included with that release as well.
You can of course read the documentation, and I am sure it will improve over time, but it took me a moment to understand how the different parts fit together. If you stumble across this blog, hopefully it will help you pick up the concepts a bit quicker.
Be aware however that this is based on a beta of the package. The documentation contains warnings that the package may change in non-backwards compatible ways before official release and support.
Master Sequences, Sequences, and Sub-Sequences
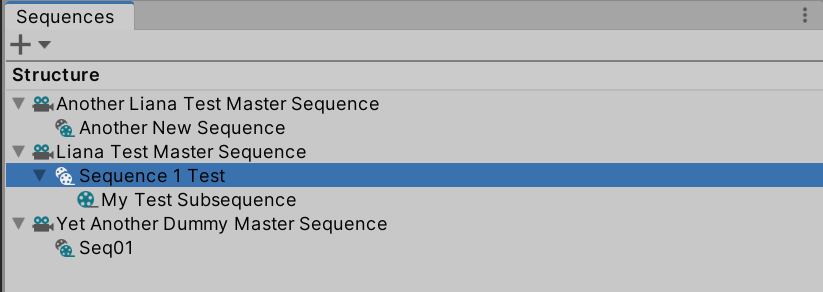
There is a new sequences window that you can use to create and keep track of sequences. Creating a new “master” (top level) sequence automatically creates a timeline asset for you (under Assets/Sequences) and adds it to the current scene. This saves a bit of time hooking it all together. Creating a nested sequence in this view also adds the sequence to the parent timeline, the idea being the parent sequence can be used “sequence” a list of child sequences.
As a bonus, when you select a sequence from the list the Timeline window is updated to the timeline for the sequence. This is nicer than having to use the lock icon in the top right corner of the timeline window.
Three levels of nesting appear to be supported (with different icons for the three layers), but they are all timelines. The Structure panel of the Sequences window is global. You need to have the scene open for the master sequence when adding sub-sequences, or else the scene won’t be updated with the additional game objects correctly.
Asset Collections

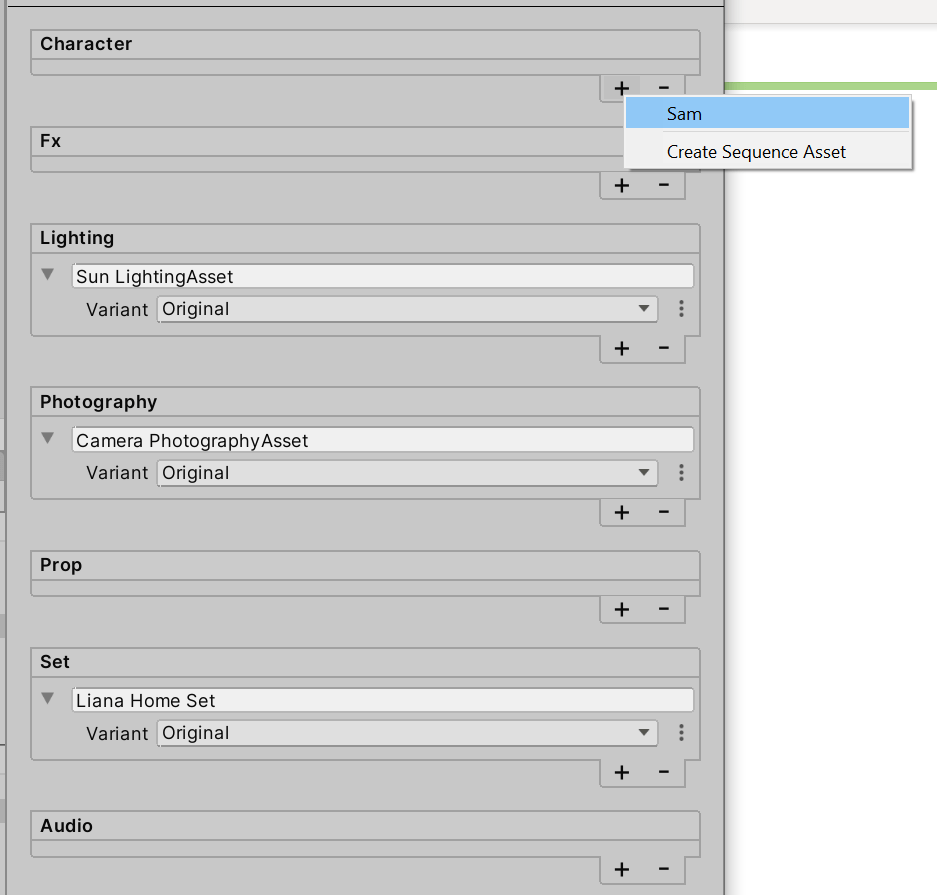
In the same Sequence window, under the Structure panel is a second panel called “Asset Collections”. (Personally, I am not sure why this is in the same window.) There are different types of assets supported:
- Characters – I am going to add Prefabs for all the characters in the series into here, with variants for different sets of clothes for the same character. The documentation example uses variants for different animated sequences.
- Fx – for special effects (I assume).
- Lighting – I plan to add typical lighting scenarios, such as bright morning sun from an angle with bloom effects, mid-day sun pointing down, and so forth. Note that you still have the Lighting window to control Scene lighting settings.
- Photography – suitable for camera objects (typically one per scene). You can add a master camera and Cinemachine virtual cameras (which I assume can control the master camera). I need to explore a bit more here.
- Prop – for props that you want to add to sets. For example, one of my characters has an electric scooter. This will be used across sets.
- Set – a set or location that the action will take place in. I use assets from the Unity store, with adjustments, so will load each up into this area. It can still contain lighting objects (e.g. if a fire is burning in a room), but things that need to change between episodes are removed. (I will explain later, but I am not going to use Sets in my project.)
- Audio – yeah, audio stuff, but I am doing more like lightly animated comics, without sound, so I am not planning to use this.
The above Sequence Assets can also all have variants defined. Each sequence asset has the “original” prefab, but you can also create “Prefab Variants” if you need to override values of a character. For example, I have a school backpack object added to many of the characters. I may therefore create a variant of “Sam” above called “Sam with Backpack” which shows the backpack (which I hide by default). In the example above, I created a prefab for when there are more clouds in the sky.
However, each Sequence Asset also has a timeline. This is shared between each sequence where the asset (e.g. character) is included. This can be used, for example, to create a variant per animation sequence. For example “Sam Walking” or “Sam Jogging”. (The demo project uses a variant per recorded sequence, effectively “Sam in episode 1, scene 2”.) You create a variant for each sequence to record the animation clip in.
In my case, I expect most sequences to be animated differently, and I plan to use multiple override tracks when animating characters. I also need to line things up across characters, cameras, etc. As a result, I am not planning in my project to create variants for each animated sequence for each object. I am also worried that the number of variants will get too long for me to manage as I am hoping to do a long running series – I am worried the list will get too long to be useful. I want recordings to be nested inside the sequence hierarchy, not nested under the globally shared characters.
Sequence Assembly
Finally, once you have selected a sequence you are working on in the Sequences window, you have added all the sequence assets to the Asset Collections, then you can go to the Sequence Assembly window and add characters, lights, sets, props, and so on to a sequence. This creates new game objects in the current Scene, again saving a bit of time wiring all the different objects together. This makes it pretty quick to assemble a sequence, which is actually quite nice.
Scene Activation
Scene activation I am planning to use so I can have a scene per set (with lighting data baked in if needed) which is selected using a Scene Activation Track. Due to having complex scenes, this seems more practical than using multiple Set prefabs in the one scene. (My understanding is if you use the Sequences package set prefabs, which makes them appear and disappear based on the playhead in the one Unity scene, you cannot used baked lighting. A Unity scene can only hold the baking data of one set – it cannot cope with the set changing as it would have to rebake the scene every time you moved the playhead to a different set.)
To create a new scene for a set, a sequence in the Structure panel can be right-clicked to bring up an option to “Create Scene”. You are then asked where to create a new scene (on disk), adds the scene to the current hierarchy, and adds a “Scene Activation Track” to the current sequence.

More commonly if you have an existing set scene you want to reuse, go to the timeline window and add a “Scene activation track”.

Select the new track and look in the Inspector panel. Select the scene to load. (There might be a better way to do this, as it is not as smooth as other parts of the tools.)

Right click on the episode in the Structure panel and select “Load scenes”.

This will automatically load the set scene in the hierarchy panel below the episode scene.

This will cause the scene activation track warning icon (shown earlier) to disappear. The set scene will be visible (activated) whenever the play-head is over the “Active” clip.

To summarize, I plan to have an episode scene per episode that holds the sequence hierarchy for that episode, virtual cameras, characters, etc. I will also have a set scene per location and use Scene Activation tracks to enable the correct set scene at the right time. So I expect to have multiple set scenes appearing below a single episode scene in the hierarchy panel. Set scenes will have baked lighting data, as appropriate. (Warning: I have not tried this on a “real” project yet. I am trying to avoid baked lighting to make editing faster, but am still using separate set scenes just in case I need baked lighting in some cases. The Skybox however is also in the scene lighting window, stored per scene, so I wanted separate scenes so I can include the skybox in the set definition.)
Recording
In addition to creating scenes, you may have noticed that right clicking on a sequence offers to record the sequence. When selected, the following panel comes up. You will need to add a recorder using the “+ Add Recorder” button. (I added the “Movie” recorder which creates a MP4 file.) You can adjust the output directory and file name before recording if you wish.
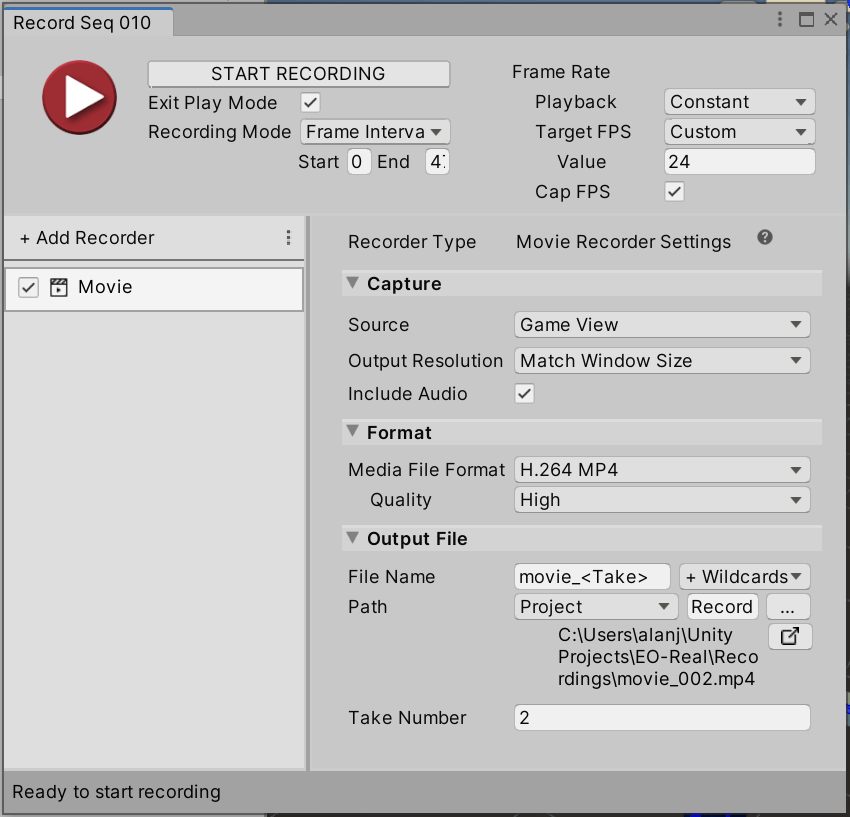
Note that you can also add a “Recorder Track” to the timeline and then add “Recorder Clips” to the track. Each such clip can be used to specify the range of the sequence to record and the filename to record it to. I plan to use this as I will be creating many short clips and I don’t want to have to re-enter the filename each time.
What are my plans?
The folks from Unity have been very helpful in explaining how the new features worked. One point they made is they are not trying to be prescriptive of how to use the new functionality. So the following explains what I am planning to do.
- I am going to create a new scene per episode and create a “master sequence” for that episode in that scene.
- I am not going to use “Sets” (prefabs) for locations. Instead, I am going to create a scene per location and use “Scene Activation” in sequences. The location scene will not contain any characters, cameras, or similar. They will be in the episode scene. I believe this is important if your set scenes use baked lighting. (Feel free to leave a comment if you know better!!)
- For characters, I may use variants for different clothes, but not for animations per sequence.
- When I add a character to a sequence, the package adds a sequence asset track that references the sequence of the character. I am going to delete this track and then add a animation track and animate the character using the that track (plus override tracks with avatar masks and multiple layers of animation clips). The sequences package has no direct support for animation clips or avatar masks, so I will do this by hand.
Conclusions
Initially I had a number of reservations in the new support. I am more positive now that the pieces are falling into place in my mind. There are different ways to use the supplied tools. For example, I am not going to follow the examples of creating character prefab variants per animation recording. I am going to use more standard animation clips with avatar masks and track overrides.
My most important belief is if you need baked lighting, you need to use Scene Activation rather than Set prefabs.
Another insight is the tools are set up to work best with recording animation clips in character variants. I am not sure I like this approach. I may end up using the package to create sequences and timelines, then just doing the rest myself (not using the Sequence Assets panel to add things to my scenes).
So my next goal is to restructure my project a bit around the above, standardizing naming for scenes, locations etc. Then it is time to start animating and try and get an episode published! (Just give me another year or two…)
