I am using Unity with VRoid Studio characters to create a series of cartoon episodes. Unity supports “real time” and “baked” lighting. So which to use when creating animated videos?
- Baked lighting is where you tell Unity “the sun is not going to move, so you can pre-compute the sun and shadows on objects that don’t move to save CPU when playing the game.”
- Real time lighting is where all lighting and shadows are computed on the fly.
Baked lighting is particularly useful for games to be played on a mobile device with limited power. So it is good to use on unmoving objects like buildings and similar, but characters walking around the scene (or props that need to move) cannot use it.
Lighting is attached to a scene. So you can used baked lighting with the same location by creating a prefab of the location, then adding that prefab to multiple scenes with different lighting conditions.
For myself, I have gone with the path of never using baked lighting. (I might change my mind one day!! There is a mixed mode to combine them both.) I am just using the default render pipeline (nothing special), and I am recording videos not playing games live, so I don’t need to worry about saving CPU when rendering. I was having issues keeping lighting consistent for characters and props across scenes (I use the same prefab across multiple scenes and lighting affects the renderers of skin and clothes etc. and sometimes I want a very dark room). So I went with the approach of consistency across all scenes, and an approach that will always work.
Scene Lighting Settings
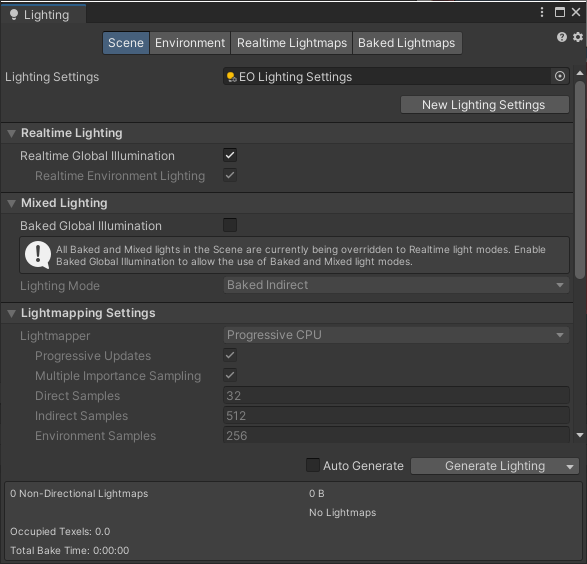
To change the lighting mode for a scene, bring up the Windows / Rendering / Lighting window. I created a “Lighting Settings” for my projects that all scenes share, to ensure consistency. The values it uses are:
On the “Scene” tab,
- Enable “Realtime Global Illumination”
- Disable “Baked Global Illumination”
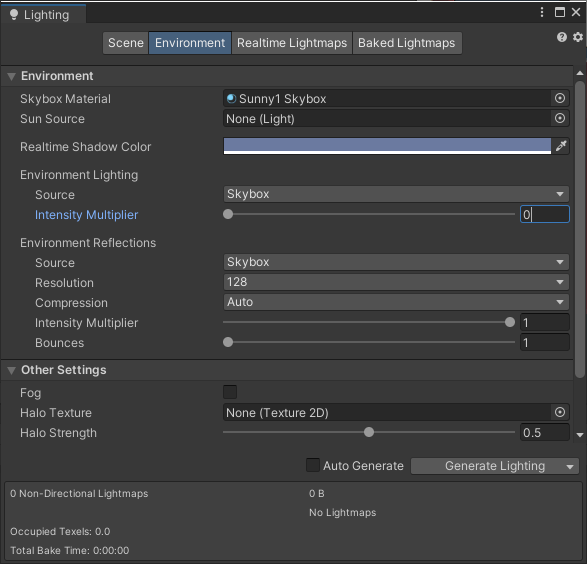
On the “Environment” tab,
- Set the “Intensity Multiplier” to 0 for “Environmental Lighting”.
That is my starting point for all scenes. Problem solved, right?
Sigh. Life is never that simple.
Area Lighting
In a scene you have multiple forms of light objects you can add.
- Directional Light – a major source of light heading in one direction, like from the sun
- Point Light – a light globe radiating light out in all directions
- Spotlight – a directional cone of light, light in a battery powered torch shining forwards
- Area Light – lights up everything in an area, if the other lighting is too dark.
The problem? Area lights only work in baked lighting mode – they are not available when only using real-time lighting.
With lighting, there are settings like number of bounces so a light source can indirectly light up areas, but I have not had a lot of luck with them getting the lighting I want.
The solution? I set a location up as above, I add what additional lights as appropriate, then I fall back to the “Environmental Lighting” setting for the scene and crank it back up (say to 0.5). That does the same thing as an area light, but for the whole scene. This seems to be working okay so far because I create new scenes per episode and per location. If I do need different lighting in the one episode, I will just make two copies of the scene and change the setting.
Wrapping Up
My goal was to capture a simple approach for lighting, not explain it all in this episode. One of the better YouTube videos I found on lighting was
https://www.youtube.com/watch?v=okYhs6kQ0xw&t=2s
My goal however is to find simple paths through all the available options, then repeat them consistently. Using real-time lighting alone might not give the best results, but I am trying to have a cartoon-ish sort of look, so perfection in rendering is not what I need.
