Added Aug 20, 2022: Please note: This post can still be interesting, but if you want my final answer, check out this newer post.
One of the unexpected areas of change when upgrading my Unity project from the built in render pipeline to HDRP was that Wind support is now different. My existing trees with wind support stopped moving when I upgraded! This post is my current understanding of where things have headed. Questions and wisdom from others welcome in the comments!
With the old pipeline, my experience with wind was I got some assets from the Unity Asset Store and trees moved in the wind. Set up a wind zone and done! That was great! I did not know how it worked, but I did not need to. So part of my journey was trying to understand how Unity makes trees move in the wind, then how to apply that in HDRP.
Looking around I found a Unity demo project (FontainbleauDemo) that had wind support built in. Unfortunately, it seems to be for a 2019 version and I am on 2022.1. It did not work out of the box for me, so I kept looking. (More on this later!)
Shader Graphs for animating trees
I came across this video Simulating Wind in URP (Shader Graph Tutorial).
So shader graphs seem to be a very useful for movements. A part of my move from built in render pipeline to HDRP has been to moving to shader graphs for all shaders I am using. I like consistency. A very real problem with the built in render pipeline I was having was getting different objects to react to light in the same way, a function I believe of people using custom shaders. I would lower the light, and things would not dim to the same level. It was one of the reasons I decided to take the plunge with HDRP. I wanted a more consistent lighting model by moving everything to the same shaders (as much as possible). (I am not sure this is actually reality by the way! But I can hope!)
After some more browsing, I ended up using the shader graph this video: Vegetations Wind In Unity HDRP. It took a while to get it all entered, but so far it has been working well for me. I am not saying it is better, I just gave it a go and like it so far.
But a part of the journey was understanding that shaders can do more than change how a texture looks. They can move the vertexes of the object! In particular, if you open a shader graph, look for “Vertex” / “Position” and all the graph that feeds into it. If I understand correctly, this is using maths to change the position of all the vertexes of the mesh that textures are mapped onto. Basically you want the vertexes near the bottom of the tree to not move much, then the vertexes up higher to move more, swaying with the wind. (This is a different way to make things move than bones and blendshapes in models, which I am more used to.)
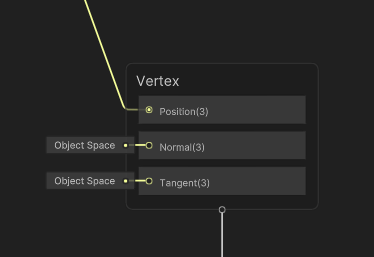
So in the above video, how much fed into changing the vertex positions?
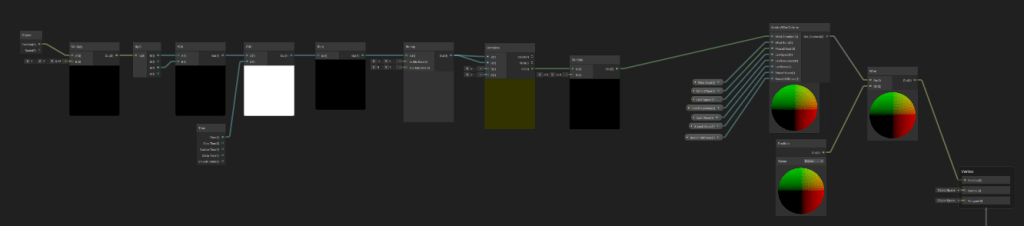
Not too bad, right? Well, except one of those nodes was a subgraph. So add the following
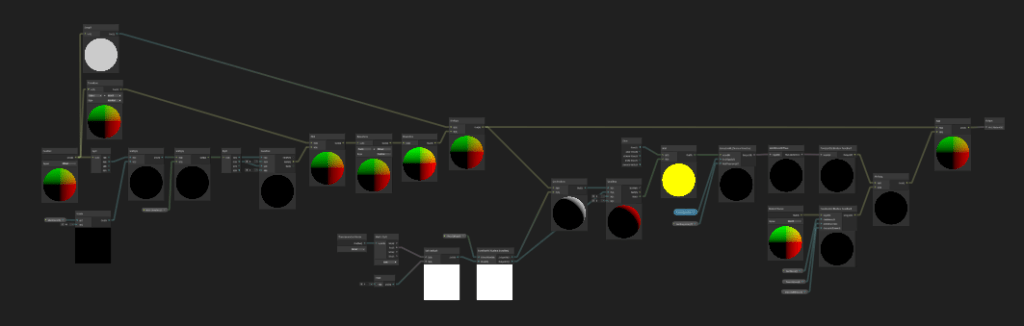
Scary! Bottom line, I am not planning to create my own wind shaders from scratch any time soon! I am quite happy using ones provided by other people!
Animating Wind Strength
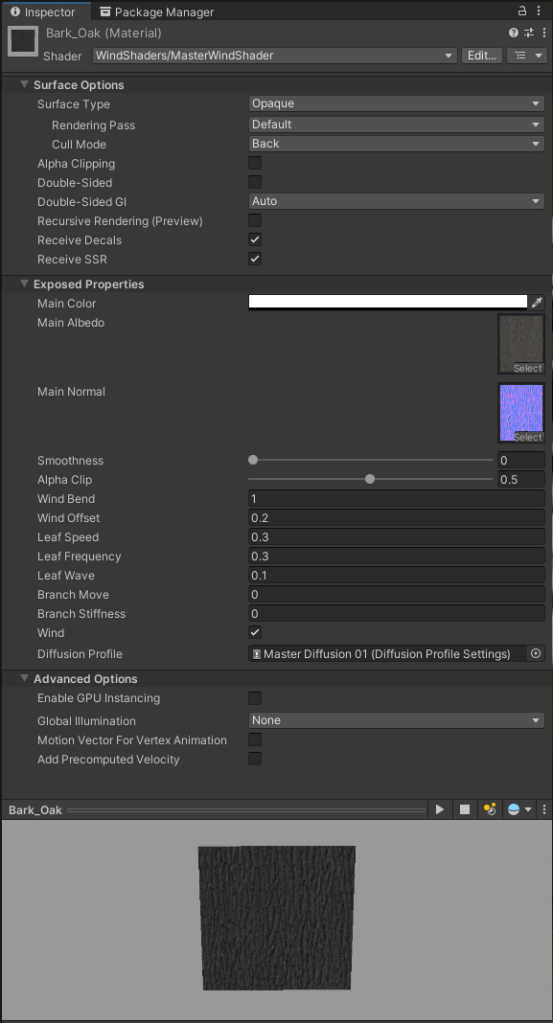
But how to adjust the wind strength? Shader graphs are materials, assets on disk shared by all objects that use them. I want to be able to change the strength of the wind for different shots using the Sequences package in Unity. (I am creating a little animated cartoon series.) Here are the material properties.
One solution I found is there is a custom materials animation track for Timeline that someone implemented. I could use this to animate the material properties – making sure everything is set back to the default at the end. I don’t like this approach much however. I have found when you animate properties of assets, when you are scrubbing around the timeline and then jump to a different shot, the properties will be left at the value you ended up on based on the playhead position. Then you have to go back and try and get everything to reset nicely. (Either that, or you have to animate every asset property in every shot – ugg!) I am not sure if a feature or a bug, but it is what it is.
So what I want is an approach where I do not have to animate the properties of assets (in my case, materials). But what is the “recommended” way now in HDRP?
HDRP Volumes
This is where HDRP volumes come in. You can create volumes (which are assets, shared files on disk), start with a base default, then add additional volume profiles and blend the strengths of profiles using a weight. For example, I can have a “blue sky” profile for HDRP clouds, plus a “slightly cloudy” and “dark overcast” etc profile, then use weights to get different cloud strengths between the extremes. The weight is a property of the Volume component in the scene hierarchy that references the volume profile assets, so that is easy to animate without touching the shared asset.
And this appears to be the best way to use profiles. Set up a standard set of volume profiles that you reuse by adjusting weights. It works with Clouds in HDRP because the volume system supports blending with clouds (now). It also works with camera exposures, allowing me to create a few profiles then again adjust the weight between them.
So how to do the same thing with wind? How to get the settings for wind strength etc into the volume system with blending support, set up some extreme volumes (not windy, very windy) and blend between them using weights?
FontainebleauDemo
Yep! You guessed it. That first demo I came across does just this! Inside the Assets/Scripts/BasicWind directory there are a series of shader graphs plus some C# code that
- Defines a new volume extension, for wind settings
- Looks at the current camera volume stack at run time to work out the current settings
- Uses Shader.SetGlobalTexture/Float/Vector() etc to set default values for shader properties (these are shared across multiple shaders)
- Defines shaders that will use the defaults to make the leaves etc move
For example, a set of standard shader property names are used in the shader in the project with “BASIC WIND” as a prefix.
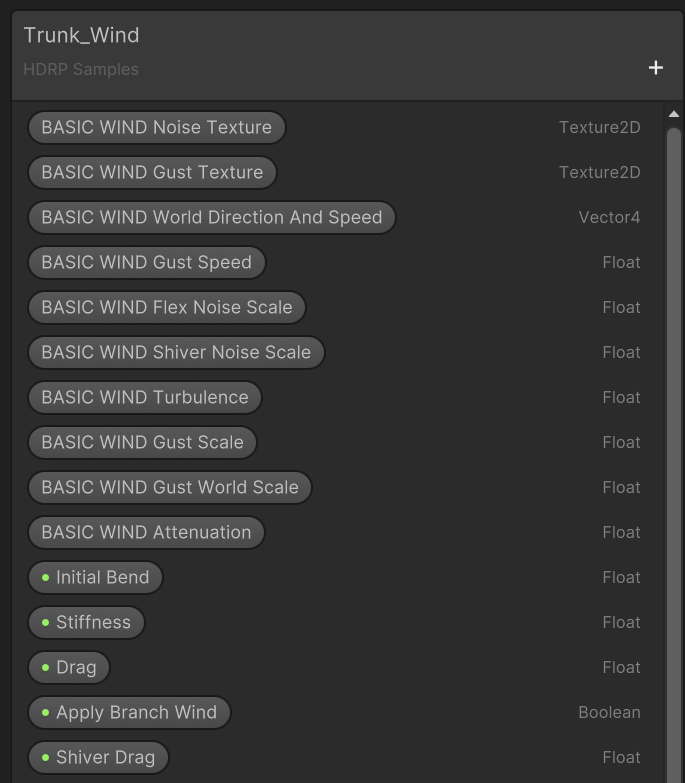
These properties do NOT have the “Exposed” property set (see the little green dot is missing).
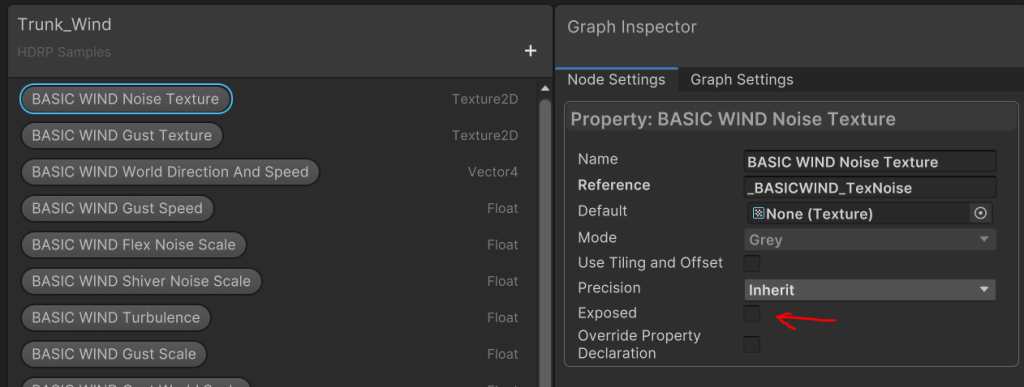
Any shader can use these property names and they will pick up the shader global defaults, set by the Shader.SetGlobalXXX() functions.
Wind zones kick in because of the code in the basic wind volume implementation. It looks for a wind zone object, and if present, sets the wind direction and strength properties based on those settings. So the wind zone data gets passed into the shader via its properties.
Conclusions
I am still experimenting with wind before deciding on my final approach for my project. I like to use a new feature on a few episodes to make sure it supports a range of circumstances before locking it in. But the approach of using HDRP volumes makes sense to me. Using global shader defaults seems a way to get values into shaders, and wind as a global setting makes sense.
If I stick with the wind shader I am using, I will probably take the BasicWind sample code and adjust it for my own shaders – the wind properties are different for the shader I am using.
Got a better solution for wind in HDRP? I would *love* to hear about it. I am just writing down my discoveries in case they save others a bit of time walking down the same path of discovery.
