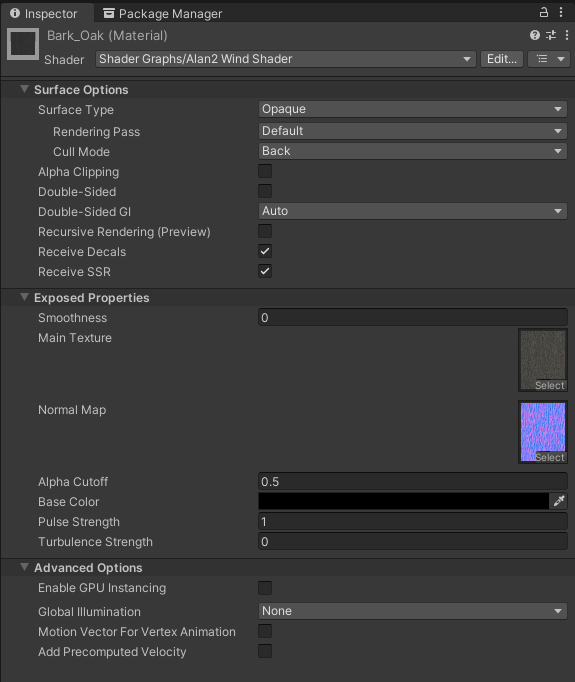
I am (slowly!) working on creating an animated cartoon series using Unity 3D to animate the characters. I am upgrading the project from the older Unity built-in render pipeline to the latest High Definition Render Pipeline (HDRP), which is forcing me to re-learn how to achieve various effects. I wrote up a recent blog mentioning the Unity demo project (FontainbleauDemo) that includes a Wind example based on HDRP volumes. Go back and read it if you like, but it made me reflect upon whether I really need HDRP volumes just for trees swaying in the wind. So here is my new favorite solution – a HDRP Shader Graph that gets its input from Wind Zones without HDRP volumes. We shall see how long before I change my mind again! 😉
Note: I step through the shader graph structure in some detail, so this post may interest you as a shader graph example even if you don’t care about wind.
Update: Jump to the end if you want better tree shaders that cope with wind.
Some Concepts
Before we dive into the details, some terminology to set the stage.
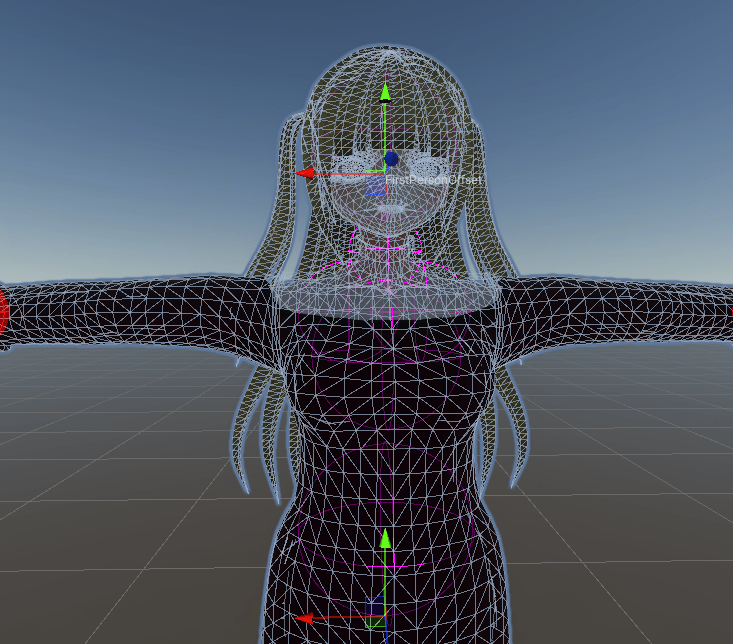
Models (I am going to use a tree in particular) have one or more meshes (of triangles). Here is a model of a character as its a bit easier to see the triangles than on the tree I am using. Each point the triangles meet at the corner is a vertex. The nice thing about triangles is they are always flat, not matter where you move one of the tree vertexes.
To make the mesh look good, you apply a material to the mesh. Materials include textures (PNG or similar) as well as properties such as how light reflects off the material. Materials also reference a shader that is the code that worries about how to render triangles of the texture on the screen.
To help reduce the number of triangles needed for a model (and hence improve performance), there are clever tricks. Where a texture defines the artwork for a material, a normal map defines how light bounces off it. This allows you to create the illusion of shadows on a surface, even if it’s actually perfectly flat. Here is the neck region of the above character. You can just make out the U shape at the top which corresponds to under the chin. Then the vertical lines under neath, and the horizontal lines at the base of the neck for the collar bones.

The end result is the neck has better looking shading, beyond what the mesh alone would look like. The collar bones are highlighted a bit more, you get a bit more texture where the throat is. But the mesh is just an approximate cylinder for the neck.
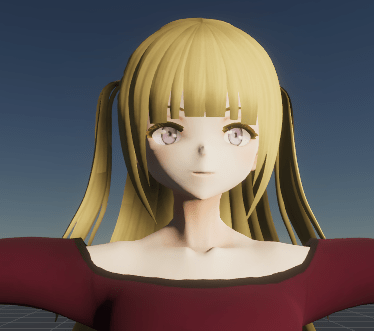
Another trick is to use transparency in textures. The character above uses transparency for the open section of the clothes, revealing the skin beneath.
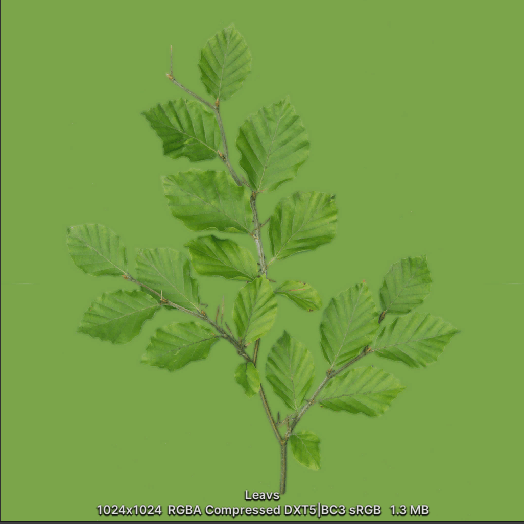
This is also useful when draw tree leaves. You just erase the texture to make gaps between the leaves. This means you can have a few triangles contain tens (or even hundreds) of leaves. Using “alpha cutoff”, Unity can may alpha channel data on to what is visible and what is not visible (transparent).
Here is an example texture before applying alpha cut off.
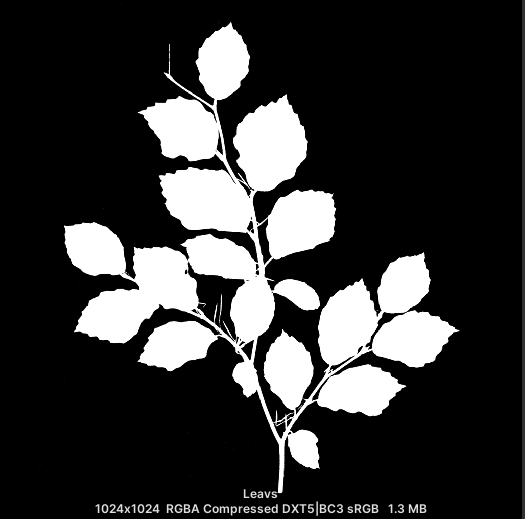
Here is an example alpha layer that can be used to make everything transparent except where the leaves are.
The end result is nice looking leaves on a tree.
Without the alpha transparency cutoff in use by the shader, you get this sort of effect. See how there are relatively big flat sections where you could see multiple leaves before?
Finally, Shader Graph allows you to create shaders for materials using a drag and drop visual editor. The idea is you don’t have to learn programming (well, not as much anyway). It also includes ability to preview your results as you go. Using shader graph you can do clever things with textures for rendering a material.
But there is one more useful capability, especially for wind effects. Shaders can move the vertices of a mesh (the points at the corners of triangles). That is what we are going to use here to achieve a wind effect. We are going to use a material that makes vertices move around based on the wind.
Unity Wind Zones
Unity has the concept of wind zones that existed before HDRP. The idea is you can put an object with a wind zone component in a scene and set the direction, strength, gustiness, and turbulence of the wind. All the trees in your scene can then use the wind zone, allowing you to change the direction or strength of the wind on one component and all the trees adjust.

HDRP appears to have changed how wind works, putting more emphasis on the creator of trees regarding how they should react to wind. The following is one solution to this problem. I like the simplicity of a wind zone, so I added my own new component you may see above – “Alan Wind Zone to Shader”. Here is the complete code for this component:
using UnityEngine;
using UnityEngine.Rendering;
using UnityEngine.Rendering.HighDefinition;

[ExecuteAlways]
public class AlanWindZoneToShader : MonoBehaviour
{
    private WindZone windZone;

    void Update()
    {
        ApplySettings();
    }

    void OnValidate()
    {
        ApplySettings();
    }

    void ApplySettings()
    {
        if (windZone == null)
        {
            windZone = gameObject.GetComponent<WindZone>();
        }
        if (windZone != null)
        {
            Shader.SetGlobalVector("_WINDZONE_Direction",
                                   windZone.transform.forward);

            // wind speed/strength (e.g. 1)
            Shader.SetGlobalFloat("_WINDZONE_Main",
                                  windZone.windMain);

            // How many pulses of wind per second
            Shader.SetGlobalFloat("_WINDZONE_Pulse_Frequency",
                                  windZone.windPulseFrequency);

            // Pulse strength, e.g. 0.5
            Shader.SetGlobalFloat("_WINDZONE_Pulse_Magnitude",
                                  windZone.windPulseMagnitude);

            // Degree of variation (e.g. 1 is lots of variation)
            Shader.SetGlobalFloat("_WINDZONE_Turbulence",
                                  windZone.windTurbulence);
        }
    }
}
Some key points of particular note for people new to writing C# scripts in Unity.
- The “[ExecuteAlways]” directive tells Unity that this component should be used in both Editor mode and Play mode, which makes previewing results easier. (This does not always happen for me – I think it might give up if the CPU load is too high.)
- My script assumes it is added to the same game object as the Wind Zone component (so it can find it easily using GetComponent<WindZone>()).
- Update() (called in Play mode) and OnValidate() (called in Edit mode) both call the ApplySettings() function.
- The ApplySettings() function copies the wind zone settings into Shader global default values using Shader.SetGlobalVector() and Shader.SetGlobalFloat(). The shader graph is going to use these values next.
As you can see, the above code is pretty simple.
Shader Graph Input Parameters
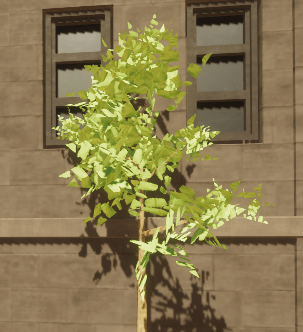
Next, the tree I am using has separate meshes for the main trunk and branches (with leaves). What we want to do is make the vertices of the trunk sway from left to right (zero movement at the base of the tree where it connects with the ground, more sideways (X and Z, not Y) movement higher up). For the leaves, we want to add some turbulence so it looks like the leaves are fluttering in the wind, but not on the tree trunk.
My solution is the shader graph picks up default shader global default values, but materials referencing the shade can add their own weights into the mix. E.g. there is a turbulence weight. If set to zero on a material, there is no turbulence. I will use turbulence zero for the trunk of the tree, with a turbulence of 1 for the leaves so they “flutter” in the wind.
Here is the full list of input parameters
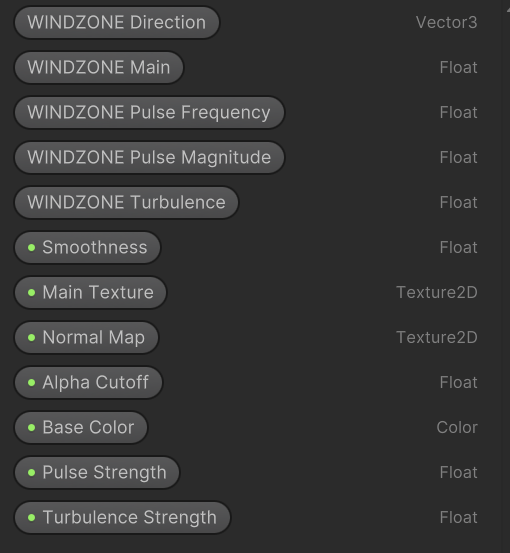
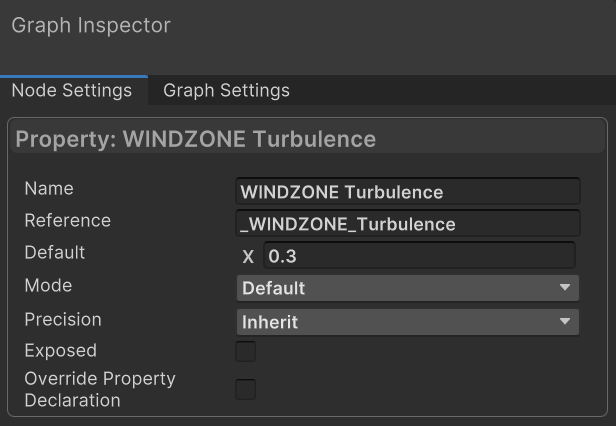
The input parameters starting with “WINDZONE” have the “Exposed” property set to false, so they will always pick up the default shader global values. Note the “Reference” name matches the C# code above.
The other values are used per material. There is the main (albedo) texture and normal map, smoothness, etc. There are also “Turbulence Strength” and “Pulse Strength” settings (typically values in the range of 0 to 1) which are multiplied with the wind zone settings so a material can decide how much weight these effects have. For example, the tree trunk material I set the turbulence to 0 (so no turbulence gets added to the trunk) and the leaves I set to 1 (turbulence makes the leaves shader flutter the leaves more).
Now we know the inputs, let’s go through the sections of the shader graph in detail.
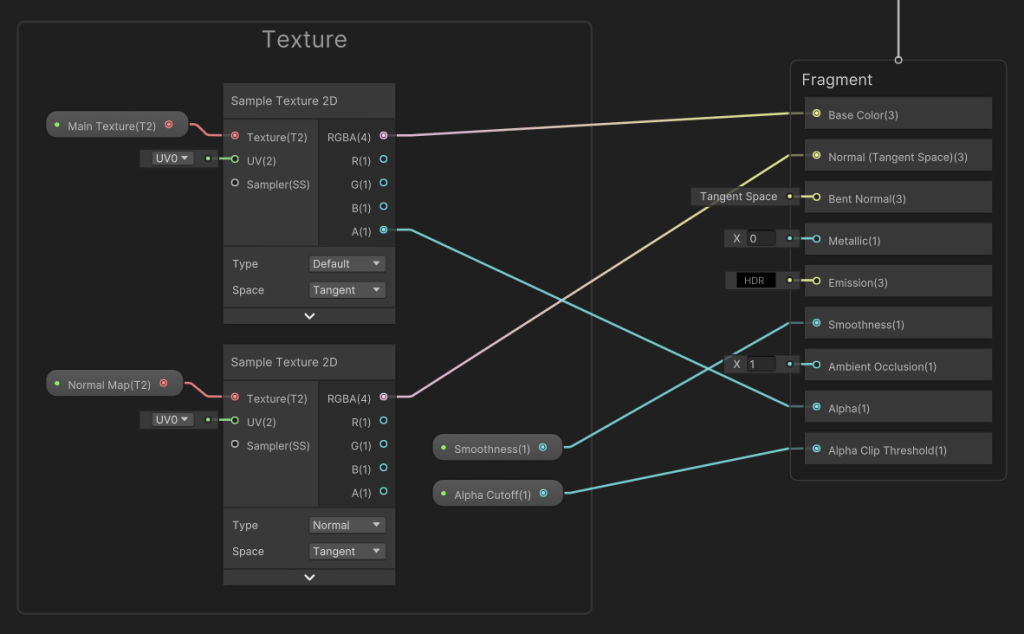
Textures
First, we need to load a texture (a 2D image file, like a PNG) and normal map (also a PNG file) using the Sample Texture 2D node type, and plug them into the rendering part of the graph. Fairly simple and traditional stuff. Nothing from the wind zone component is used here. Note that the main texture RGBA output has the alpha channel in it, but the fragment wants it provided as a separate input, hence the A output is supplied separately.
Some shaders do clever things with the alpha channel of the normal map for feeding into smoothness or emission, but that requires a carefully designed PNG file.
The rest of the shader graph is more interesting. I should note I took a lot from the shader graph presented by Unity in Simulating Wind in URP (Shader Graph Tutorial)
It turned out this shader had closer effects to what I wanted for less effort related to swaying trees and turbulence.
Sway by Height
There are three things I use to contribute to how much a vertex should sway. The height of the vertex (the top of the tree moves more than the bottom), the time, and some settings to control the strength of the sway. These are all eventually multiplied together for the final strength. Let’s start with height.
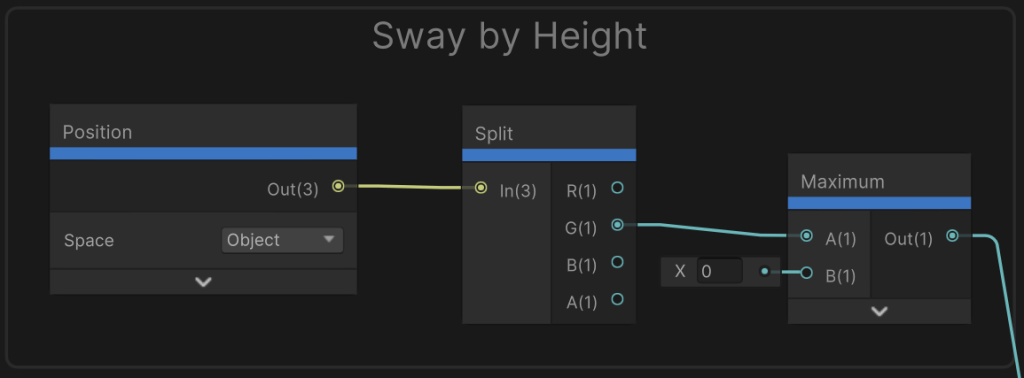
The Position node works out the position of the vertex. Because I specified “Object” space, it is relative to the base of the object (meaning if a tree is on a hill or in a valley it does not matter – the world space is not important). The Split node can be used to pull out the second value in the vector (shown as the Green channel, but in our case the second value in the vector is the Y coordinate of the vertex X,Y,Z). The base is assumed to be at height 0, but just to be safe we add a Maximum node so values less than zero return 0 (we never get a negative number).
The end result is the root of the tree will output a zero (no movement), then the higher up the tree you go, the more movement there will be (as Y is getting bigger). The maximum value returned is the height of the tree.
Sway by Time
Next, the shader graph uses a cosine function to sway backwards and forwards with a graceful swinging motion as a function of time. That is, as time progresses, the value will smoothly swing from -1 to +1 and back again.
See the following graph to illustrate. Time is used as the angle to the cosine function, the x-axis on the graph. It keeps getting bigger and bigger, but cosine will always output a value between -1 and +1. (Sine could have been used as well – makes no difference in this case. We just want a smooth swaying motion.)

Here is the shader graph
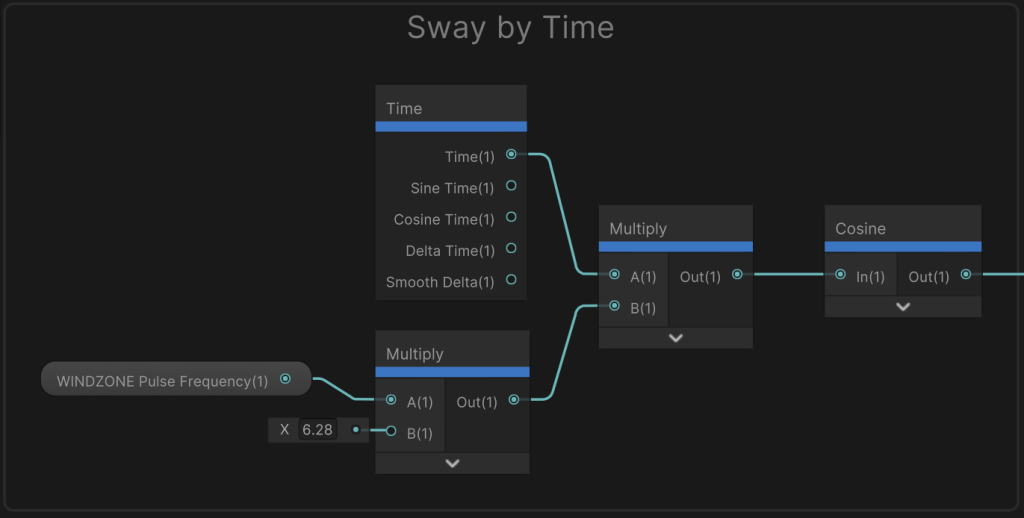
I decided that a pulse frequency of 1 should cause the tree to swing backwards and forwards once per second. Since the cosine function takes radians as input, I multiple the pulse frequency by 6.28 to cause a sway and return each second when the pulse frequency setting is 1 (there are 2Pi, or 6.28, radians in a circle). A pulse frequency of 2 will make the angle go around the circle twice per second.
So the output is a number between -1 and +1, following the cosine wave shape at a speed based on the pulse frequency from the wind zone.
Sway Strength
We have a few different inputs that we want to use to control the sway strength. The pulse magnitude from the wind zone must contribute. But to give materials a bit of control, each material can also have a pulse strength they can contribute (e.g. so different trees in a scene can sway at different amounts). The overall strength of the wind should also contribute, so we just multiply all three together.
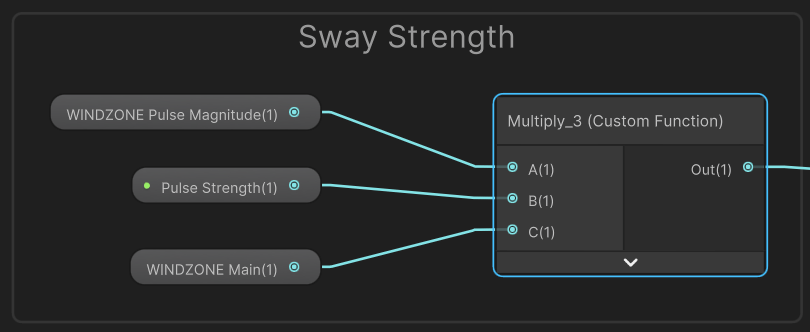
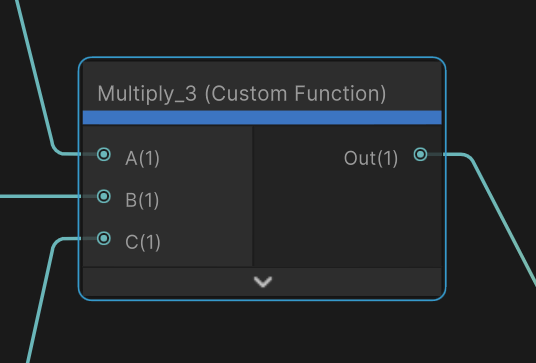
The shader graph multiply node can only take two inputs, so to multiply three values you normally have 2 multiply nodes. You multiply the first two values, then feed the result into another node that takes the result and multiplies the third value in – like ((A*B)*C).
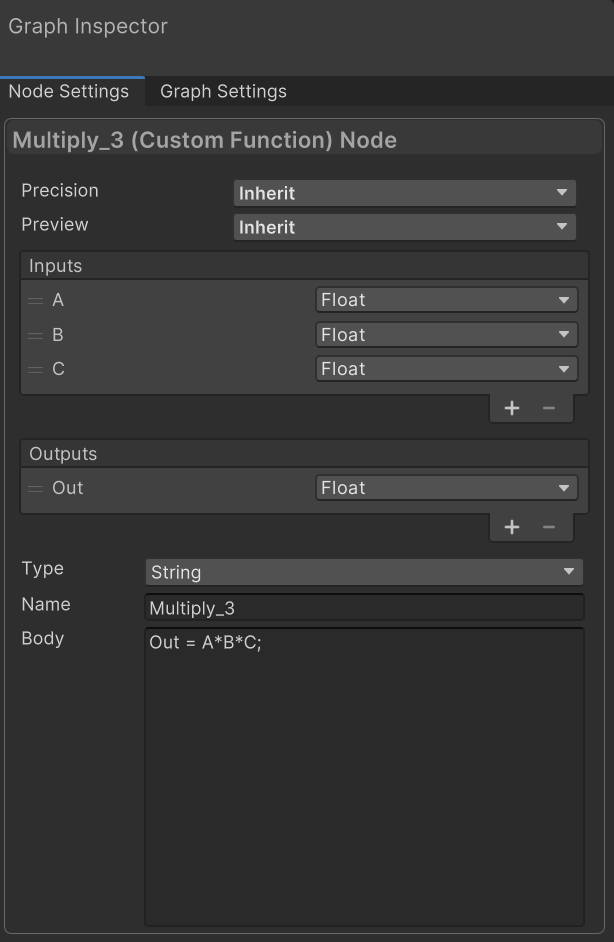
For fun, I created a custom function that multiplies 3 numbers rather than using 2 multiple nodes chained together. The definition of the custom function is as follows. It has 3 inputs I creatively called A, B, and C. The output is also a float. The script itself is just a multiply function “Out = A*B*C;”. This is probably overkill here, but just illustrating you can do more complicated formulas when needed.
Combining the Sways
The three sway values (sway by height, sway by time, and sway by strength) are then multiplied together to result in a single float value of how much a vertex should sway by. I use multiply and not add because if sway by height is zero, the result should be zero no matter what.
I use another copy of my multiple three numbers custom function.
Wind Direction
We know how far a vertex should move when swaying, but it should move in the direction of the wind. So we want the shader graph to take the direction of the wind (from the wind zone) and multiply it by the strength result from above.
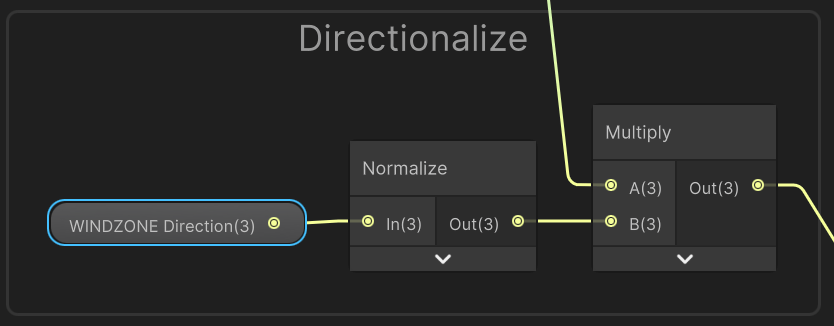
The normalize node is probably not needed, but it makes sure the direction vector is always of unit length 1. We don’t want its length to affect the amount of swaying, just its direction. Multiplying by our single strength number generates a vector that is how much we want a vertex to move by (a delta amount to add to its original position).
Turbulence
Next, let’s look at turbulence for making particularly the leaves of trees flutter in the wind.
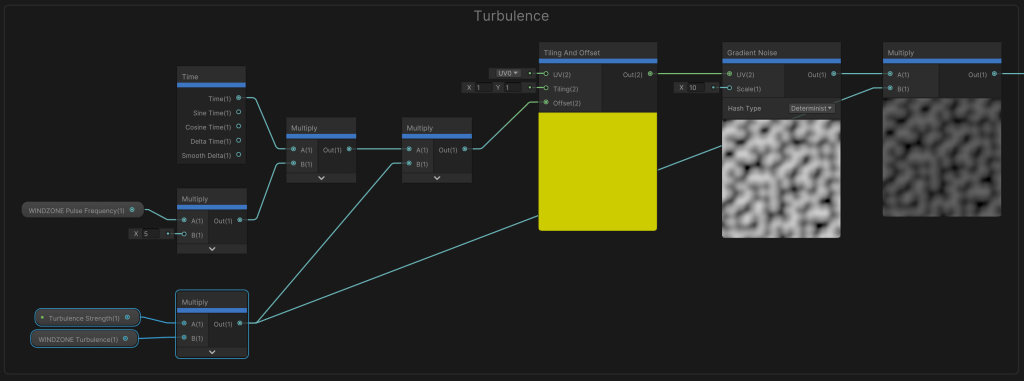
The bottom left corner starts by multiplying the wind zone turbulence and the material turbulence. I normally set a leaf material texture turbulence strength to 1 and the tree trunk turbulence to 0. I don’t want the trunk or branches fluttering in the wind, just the leaves. The final turbulence strength gets used in two places, as we will see later.
I want the fluttering to be a bit out of sync with the tree sway, so I take the pulse frequency and multiply it by 5 (feel free to try your own value!). This is multiplied with Time to change the speed of change. I also multiply the turbulence strength in for good measure (high turbulence increase the speed of fluttering).
This value is then fed into a Tiling And Offset node which feeds into the offset of a Gradient Noise node. (Since we feed a single float in but the offset wants a vector of 2 values, the the Shader Graph uses the single float for both values in the Vector2 – so the texture slides on a diagonal.) I set the gradient scale to 10 of the noise node so you can see the changes. Again, you can fiddle some of these numbers if you like – they will all impact the rate of turbulence. If you look inside shader graph, you will see the gradient texture slide diagonally over time across the view area. This contributes to the vertices moving over time (fluttering in the wind).
The reason for using the Gradient Noise node is so each vertex will have a different additional offset value, but with vertices next to each other having a smaller difference than ones far apart. So a leaf mesh gets distorted a bit, sort of like crunching up a sheet of paper a bit. Over time, they will all move around a bit. The gradient scale for example will change by how much values close to each other can change.
Finally, a multiply node uses the turbulence strength to also control the magnitude of how far vertices move due to the turbulence.
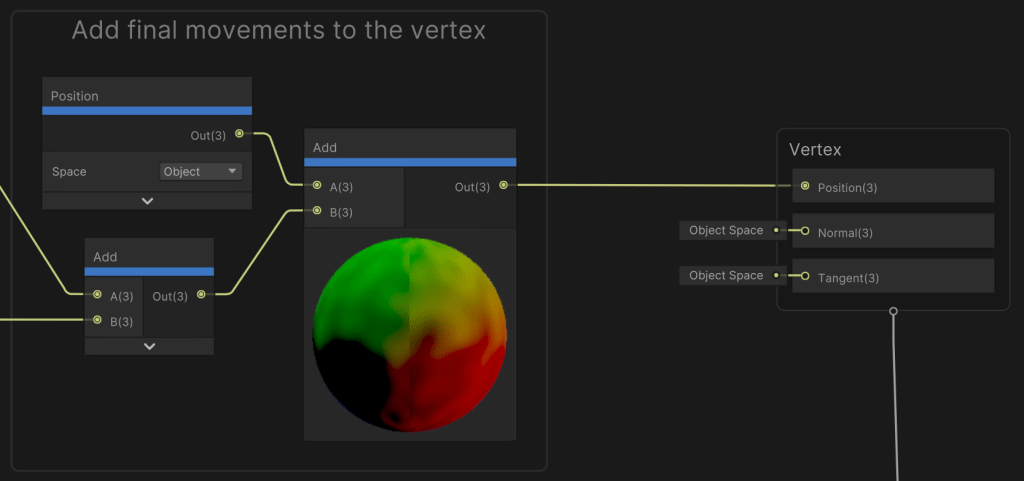
Add Final Movement to Vertex
Phew! We are into the home run! Last, we take the vector of how much to move the vertex due to swaying, add in the turbulence, then add the delta we computed to the vertex original position in object space. That then feeds into the vertex handle for vertices. Done!
Everything
Here is the final total graph. (Look at the above for readable explanations!)

As you can see, you can do pretty clever things with shader graphs. Obviously, the more complex the shader graph, the more CPU that is required. But it creates some pretty clever effects, such as wind in the trees.
Got a better solution? I would love to hear it! I am writing down things as I learn them in case it helps others on their journey. If there is a better way I would love to know!
Update: Feb 27, 2022: Tree editor and SpeedTree
If I understand correctly, Unity has a built in tree editor, but it is quasi deprecated. It used to be a separate package, but it has been merged into the core of Unity. The documentation refers to shaders and textures from “the package”, but I cannot find them when I search. Reading around the forums, this seems like a common problem. My guess is they merged a separate package into the core, dropped excess (example) files from the package, but did not update everywhere in the documentation.
Warning: I broke a few materials using the tree editor. It was making recommendations about the shader to use which broke the materials in my HDRP project. “Undo” to the rescue!
In the meantime, SpeedTree is a 3rd party service that got purchased by Unity (explaining why it’s mentioned on the Unity tree editor home page). SpeedTree is a paid service which allows you to create great looking trees in the cloud then download to your computer. You can try out the tree creation for free, but you have to pay a subscription if you want to download the trees for your project.
For me, it’s not worth the money, but if you download various demos from the Unity Asset Store, you may come across the SpeedTree shaders. As they specialize in trees, I am guessing they will do a better job than my first shader above (no! really!). For example, in Shader Graph they use a custom script that picks up wind zones automatically, so no need for my approach above of setting global shader parameters. Nice!
For example, I think Unity ships with the following shader for trees in general:
- HDRP/Nature/SpeedTree8
The HDRP Terrain Demo in the asset store includes trees using the shaders:
- HDRP/Nature/SpeedTree_Branch
- HDRP/Nature/SpeedTree_Bark
The shaders are part of the demo project. The Branch shader is for small then branches including the leaves. The Bark is for the main trunk.
Note that the SpeedTree shaders I do not believe are 100% compatible with the tree editor. The editor expects particular properties to be available on the shader, so you get errors in the console.
Furthermore, I am not sure if the SpeedTree shaders will work on non-SpeedTree meshes. Browsing around in the shader, it appears to use the “SpeedTree8Wind” shader sub-graph, which uses the “SpeedTree8Wind.hlsl” file, which appears to get wind information from _ST_WindVector and similar inputs. This forum post indicates they are generated by SpeedTree logic, where this post says there is a hidden “Tree” component on SpeedTrees that copies the wind zone values across. I am not sure yet if I can use them in my own projects. Also, looking inside the .hlsl file, it appears to use the uv3.w values to work out the vertex type (leaves? branch? etc). So it seems like you have to carefully craft the UV channel data for the shaders to work correctly. (Yikes!)

Thank you!
LikeLike