The Unity Sequences package support has a number of features to make it easier to create movies, game cutscenes, or in my case short animated video clips for including in my motion webcomic. When I first started using Sequences, I planned to use Scene Activation tracks, but over time I found a number of limitations with what I was trying to achieve and so now no longer use them. In this blog I describe some of their pros and cons to help you decide if they are useful or not for your project.
Terminology in this blog
There are conventions in filmmaking for terms:
- Set – “the scenery and props as arranged for shooting a film”
- Sequence – “a short piece of film or extract from a film, depicting a specific action or event”
- Scene – “a scene in a play, film, or book is part of it in which a series of events happen in the same place”
In this blog I use the word “location” interchangeably with “set” because “set” has other meanings in Unity (like setting a property), I use “sequence” to refer to a Unity Sequences package sequence (which is not restricted to a single place or location as in movie making), and I use “scene” to I refer to a Unity scene file (not a movie scene).
What is scene activation?
The Unity Sequences package adds a concept of Scene Activation (remember we are talking about Unity scenes, not movie scenes). What it allows you to do is have a “main” scene where you drop your characters into, create timelines in, etc. then have one or more additional “set scenes” which holds all the game objects for a location (buildings, roads, etc). You can have different set scenes used in different points in the sequence you are creating by having a “Scene Activation” track that tells Unity which set scene to activate when. You can think of it like changing what is in the background of the shot.

For example, I follow the convention of having a master sequence per episode in my series, a nested sequence for each location in the episode, and the second nested level for shots at that location. (Sequences in Unity supports at most three levels of nesting, which has been fine for my usage.)
I added scene activation tracks to the location sequence timelines.
- Episode Sequences (master sequence)
- Location sequences (1st level of nested sequence with a scene activation track)
- Shot sequences (2nd level of nested sequence)
- Location sequences (1st level of nested sequence with a scene activation track)
I added scene activation tracks to the location sequence timelines to avoid repeating the tracks per shot.
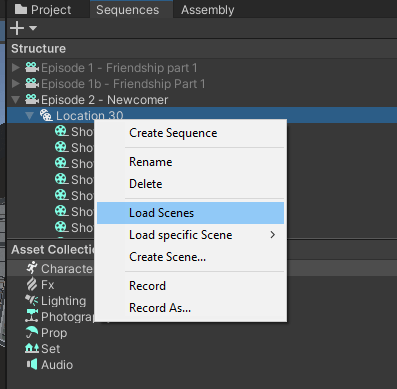
Scenes (other than the main scene) are not loaded by default, which can improve performance. To load the extra scenes, you can use the Sequences window. Normally I just loaded them all, but you can load specific ones individually to save resources while editing.
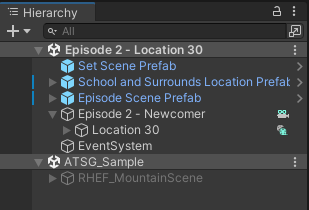
Loaded scenes appear in the hierarchy under the main scene. They are inactive until a Scene Activation track activates them based on the position of the playhead.
Benefits of scene activation
- One sequence can load and unload different scenes during the one sequence (e.g., I could have a master sequence for a full episode, then activate the different locations as needed)
- You can use baked lighting in activated scenes – if you need different lighting (e.g. different times of the day) you can create multiple Unity scenes loading the same buildings via prefabs, but with different lighting, then bake the lighting for each lighting variation
Why I no longer use them
- Over time I found Unity projects having all the files for all locations got sluggish – so I now create a new Unity project per location and just load the assets needed for that location into that project (I combine the video clips I create outside of Unity, so I can get away with this – not true for a cutscene in a game)
- I use a combination of assets from different sources with different shaders, and was having trouble using baked lighting to get the lighting consistent across all assets – so I now only use runtime lighting to simplify things
- I also found I frequently wanted to adjust lighting per shot, so again, baked lighting felt too restrictive at times (you can do it, but it was cumbersome)
- A key restriction of scene activation is your main scene with the timelines can only animate game objects in the main scene (not the secondary scenes) – so you cannot animate a swinging door or moving a chair in a set scene – I had to copy the door from the set scene into the main scene, hide it in the set scene, then animate it in the main scene
The last point was the deciding point for me. I started finding every episode that came along I wanted to animate another piece of furniture (e.g. change its position) during a shot. I had to remove that piece of furniture from the set scene and add it to a new prefab of “things I want to animate at this location” that was loaded into the main scene so I could animate it. It worked, but became annoying over time.
Conclusion
For my project I started using Scene Activation tracks and did not encounter any bugs. But the inability to animate objects in set scenes (like doors and chairs) became annoying. When combined with the restrictions of baked lighting being less flexible per shot, and with performance improvements of having separate Unity projects per location, it led me back to just using a prefab per location and putting it in the main scene. The end result is, for each location project, I have one scene per episode. Simple!
