I am in the process of upgrading my Unity project from the Built in Render Pipeline to the High Definition Render Pipeline (HDRP). HDRP does some effects differently, one of which is the Depth of Field effect which is useful for background (or foreground) blurring. (I have blogged on effects like this previously, for the built-in render pipeline, including examples of Anime using it.)
Why am I upgrading? Two reasons.
- First, I assume at some stage the built in render pipeline is going to go away at some stage. This might be a long way off still, but all new features and capabilities are moving to the new pipeline.
- Second (and more importantly) the results often do look better. This is not because the images are higher resolution, but rather the rendering technology is smarter and more able to mimic real world lighting.
Volumes
A part of HDRP is a move to a new “volumes” engine. You can have a default global volume, then apply overrides or additional effects to particular shots or locations. You can also attach volumes to Cinemachine virtual cameras. Most of the camera effects are now done via volumes.
One thing that I am still not sure if I like is volume profiles are stored in files on disk, which are referenced from game objects. This means if you clone the game objects in a shot, volume game object clones will (by default) reference the old profile. If you make a change to the profile settings, all cases where that profile is used will be affected. There are definitely times a global profile makes sense, but I have bitten myself a few times changing a profile only to realize I messed up another shot elsewhere by accident.
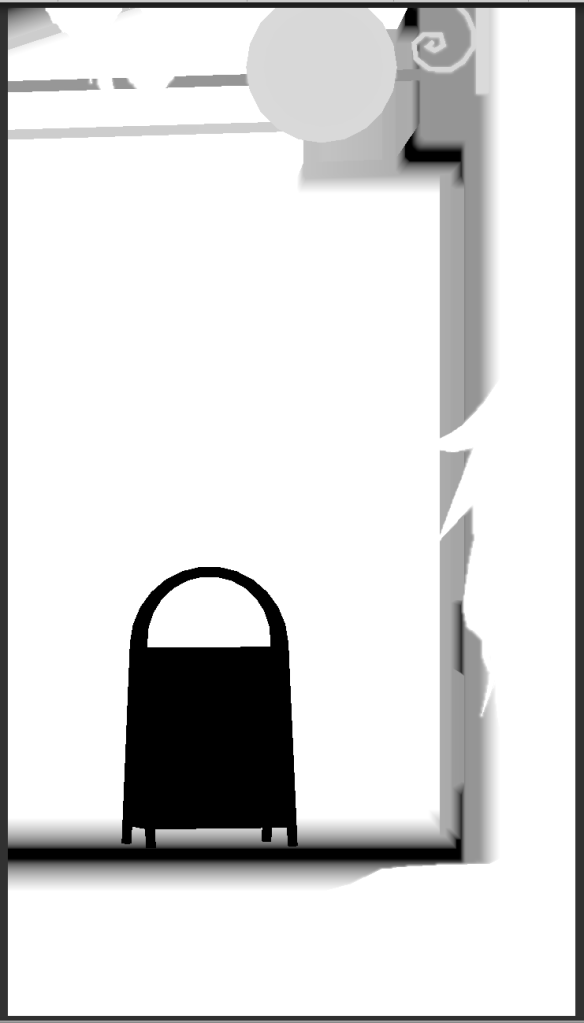
I can’t see no visualizer!
One of the things I have not worked out how to do yet is the old “visualizer” capability for depth of field. The visualizer would visually show what was in focus and what was not. This was really useful when manually adjusting how far away you want the point of focus, and how much of the scene will be in focus. In the following, the sign board in the distance was in focus and not much else.
Autofocus
Instead of setting the focal length by hand, Cinemachine Virtual Cameras have the ability to compute the settings focus on a specified object. This can be useful as Unity computes the right focal length, and will update it as the character or target object move.
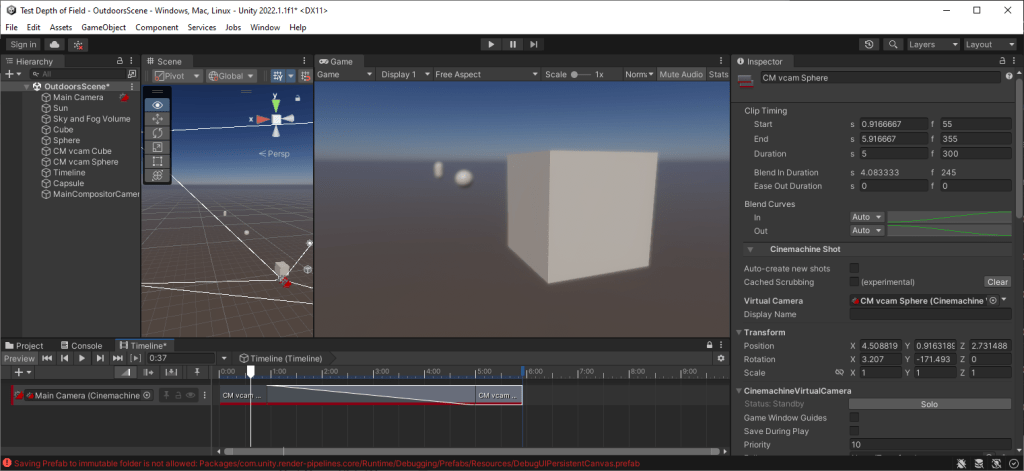
Further, you can blend between two Cinemachine virtual cameras and it will adjust the focal point from a foreground object to a remote one. Here is a simple sample project where focus changes from the foreground cube to the remote sphere. Note the timeline has a blend between two virtual cameras which have been set up with “Look At” target objects of the cube and the sphere.
First, the cube is in focus (the front face to be precise, more on that later).
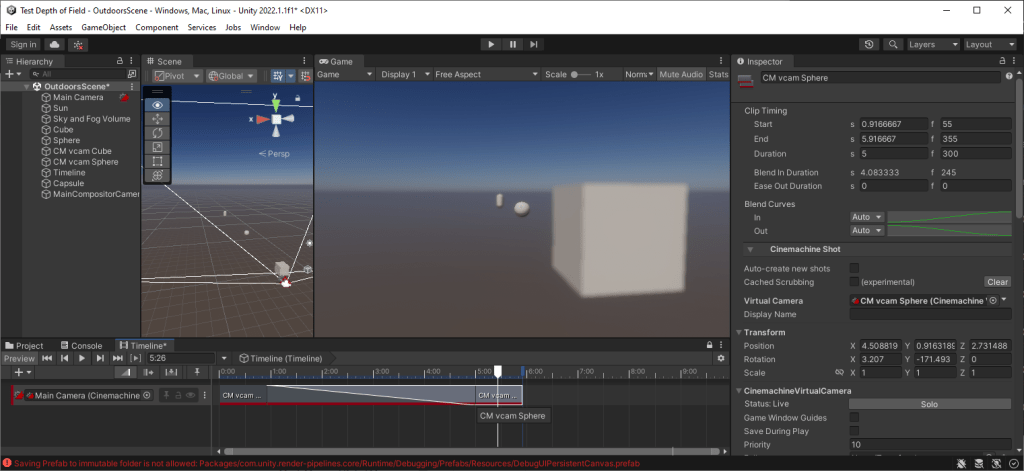
Then, moving to the other end of the blend, the sphere is in focus and the cube is blurred.
So how to achieve this in HDRP?
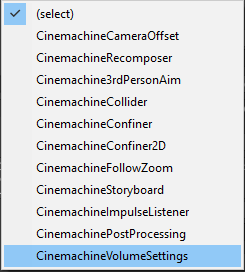
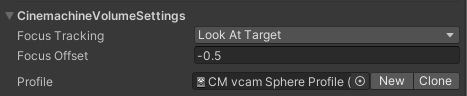
The answer is to use the “Add Extension” of the Cinemachine Virtual Camera and add a CinemachineVolumeSettings (not CinemachinePostProcessing). This will allow the camera to change volume settings (Depth of Field being one of them).
Then for autofocus to track a target object even if it moves, set the “Focus Tracking” the “Look At Target” mode (I have the virtual cameras set up to look at target objects of the sphere and cube respectively – you can pick one of the other focus tracking modes if you prefer). If you don’t use focus tracking, you can update the “Focus Distance” property by hand.
A problem can be the selected object can be out of focus if the target point is in the middle of the object (which is the middle of the sphere and cube in my example). The -0.5 for “Focus Offset” is needed so the front of the cube is in focus instead of the middle (it is a 1x1x1 cube, so -0.5 is half the depth of the cube).
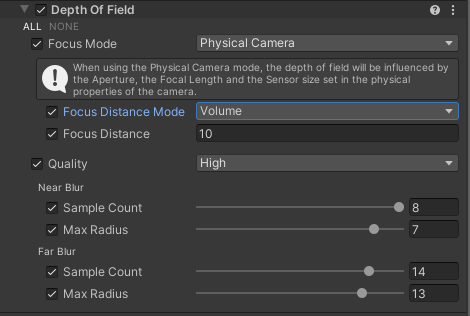
When you add the extension, the profile will initially be blank. Click “New” to create a new empty volume profile file. Then click “Add Override” on the profile and select “Post-Processing” / “Depth of Field”.
For the autofocus capability to work correctly, you need to set the “Focus Mode” to “Physical Camera” and “Focus Distance Mode” to “Volume”. It will then update the Focus Distance for you automatically (the value is not shown – it just happens behind the scenes).
So, as you can see, there are a few steps to the overall process.
Focal Depth
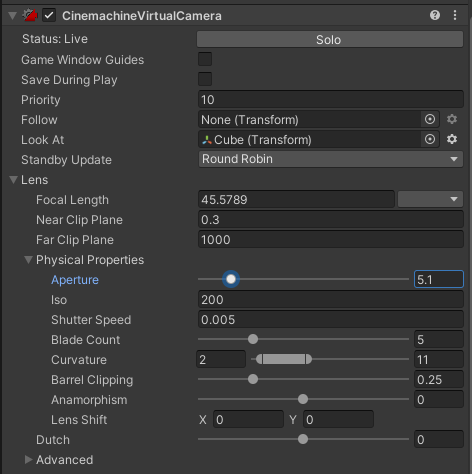
Think you can handle all the above! Great! Because we have not finished yet! How to change how much of the image will be in focus? This can be adjusted by setting the Cinemachine Virtual Camera “Lens” / “Physical Properties”/ “Aperture” property. Smaller values cause a more precise focus point, larger values will result in the whole scene being in focus. This was the width of the black area in the old visualizer. Now you have to work it out by looking at the screen.
Blur Strength
Are we there yet? Be patient! Just a little bit more. I was finding the degree of blur was not enough for my liking. Changing the Aperture property of the virtual camera was not giving me the blur strength I wanted. Have no fear! There is Yet Another Setting to turn on.
Go to the Main Camera (the one that the virtual cameras control) and click the “Physical Camera” checkbox to expand the section talking about the camera. As far as I can tell, the virtual cameras are going to turn on the Physical Camera checkbox behind the scenes even if you don’t check it. My advice, check it on and leave it there.

The easiest way to change the strength of the blur is to pick a different value from the “Sensor Type” dropdown. Smaller mm values (like 8mm) have less blur, larger mm values (like 70mm) have more blur. It adjusts the “Sensor Size” and “Focal Length” values. The “Aperture” value is controlled by the virtual cameras.
Conclusion
The visual result of the new volume system does look better to me. The lighting is more realistic, there are more effects like sun shafts through fog amongst the trees. Some of it looks really nice. But sometimes that comes at the price of complexity. I must admit to pulling my hair out trying to work out all of the above. I only got there due to help from the Unity forums.
But, in summary, you can do tracking shots with the focus blends with Cinemachine virtual camera blending. The trick is to:
- Turn on the physical camera property of the main camera and pick the right physical camera settings based on the strength of blur you want (I plan to set up a prefab for this)
- Add a volume profile extension to the virtual cameras
- Use the Focus Tracking feature to automatically compute Focal Distance for you, or set it up by hand
- Adjust the virtual camera Aperture to control how much depth you want around the focal point
