Depth of field is a Unity camera effect in allows you to blur the background and foreground, creating greater focus on your character.
I recently wrote an article about how to achieve depth of field in HDRP (which I am going to assume you have already read), but upgrading the opening shot of my series from the Unity built in pipeline to the new High Definition Render Pipeline (HDRP) raised a few more points when tracking a moving character.
What is the Shot?
Have a look at the following video clip (5 seconds).
I wanted the shot to start looking at the character’s feet from behind and work up to the face, in a slow reveal. First attempt I had two virtual cameras and blended directly between them. This resulted in the main camera moving in a straight line from behind my character, Sam, to in front, potentially going through the middle of the character (I started a bit off center – if I started directory behind the character, the camera would have gone through the middle of the body).
I wanted it to more orbit around the character, but I was not sure how to implement that at the time. (I later found CinemachineBodyOrbitalTransposer, but have not got around to trying it yet.)

So instead I inserted a third side shot virtual camera. Not as good as a nice curved orbit, but good enough to make sure the midpoint between the first and final position was not too close to the character.

For reference, here is the scene hierarchy for the above shot. I am using the Unity Sequences package to manage the timeline instances for me.

Enabling Depth of Field
To focus on an object (allowing the background to be blurry), There are two things you need to worry about:
- How far away is the target, to make sure you can focus on it
- How deep is the target, to make sure you can focus on all of it
For example, a head has depth. If you focus on the front of the head and don’t have much depth, the hair on the rear of the head may look blurry. So you want a bit of depth. 70mm gives a lot of blur, but I was finding it hard to get the depth right, so I am now trying out 65mm for good amounts of blur, with a little more depth of focus to play with. (I still miss the visualizer I described in my last blog, for checking focal distance and focal depth!)
Camera Distance
To get the focus right, how to work out the correct depth? (The distance from the camera to the focal point.) One approach is to make sure all three virtual cameras are about the same distance from the character and work out the focal distance based on that. I found this hard to do in practice. (Yes, yes, I know. I really should look into CinemachineBodyOrbitalTransposer!)

One approach to increase the depth of field is by using a 35mm or 16mm sensor type instead of 65mm and see if that covers the breadth of ranges needed, but it can result in less background blur.
Depth Tracking
So here is the set up I am using for this shot.
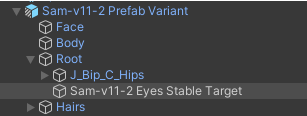
In every character I have two empty objects added solely for the purpose of using as targets for tracking.
The first I made a child of the character root, and move it directly up from the ground to eye level when the character is in a T-pose. If the character leans over or sits down, the object will not follow.

Note: I could just use the root of the character and use “Y-offset” values to move the camera to the correct height. It actually works pretty well because when framing a shot, you often fiddle with the offsets. I just liked having a target at eye level for each character as their height varies.
Second, I make another empty game object under “Head” and place it right between the eyes. If the character leans over, the target moves with the head.


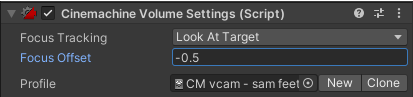
Then I set the Cinemachine virtual camera “Aim” to point at the first target object, and set the “Focus Tracking” mode of the “CinemachineVolumeSettings” virtual camera extension to “Custom Target” and point it at the second target object.
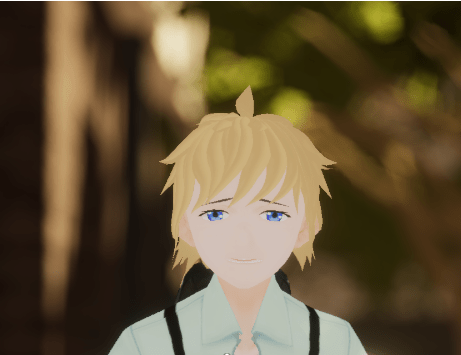
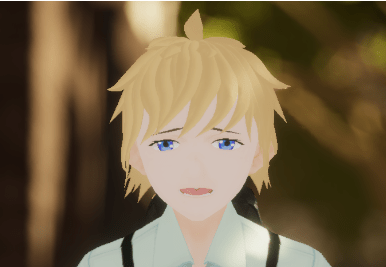
The result? Nice focus! Nice blur!
Why the two target objects?
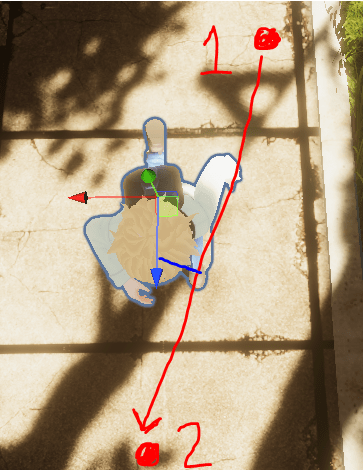
I use the second target object for focus because it tracks the real face. For example, when running in the shot, the animation clip has the character leaning forwards. Here is a top view. The face is quite a bit further forward from the character’s root position.
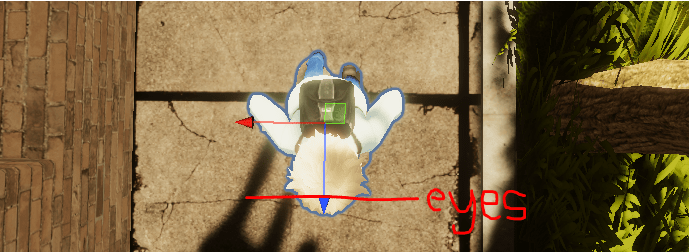
Side view:

You can use the “Look At” mode instead of “Custom Target”, but I found myself having to fiddle with the “Focus Offset” (set to -0.4) to get sharp focus on the face. Without the offset the eyes are a little blurry. (And yes, the bloom effect lowers the quality a bit too.)

With the offset, the eyes are sharper, but its just hard to get right.

So why not aim the Cinemachine virtual camera at the second target between the eyes? The problem is when the character walks or runs, the head bobs up and down. Then end result is the camera bounces around too (tracking movement of the head), which is not very pleasant to watch. Using a point relative to the root of the character (with X and Y aiming offsets as required) results in a much more stable shot, which is why I name that target “eyes stable target”.
Conclusions
The end result is automatically computed focal lengths with depth of field for background blur. Nice and sharp images for where it matters the most (the face).
